Help Centre
Global Info & Compliance
Cross-entity compliance operations – CDD inventories, workflows, scheduled tasks, FATCA/CRS tax reporting, screening, digital KYC, and regulatory submissions from a single unified dashboard.
Key points
- Global Info aggregates data across all entities you have permission to see
- Seven sub-tabs: Inventories, Workflows, Tasks, Tax Reporting, Screening, Digital KYC, JFSC Registry
- All filters persist per user and are restored automatically across sessions
- Workflow steps are locked while being processed – only one user at a time
- Bulk screening and KYC operations run as queued background tasks
- Tax reporting covers the full FATCA/CRS pipeline from obligations through to filed submissions
Overview
The Global Info area provides a centralised, cross-entity view of operational compliance, task management, and regulatory workflows. Unlike entity-specific tabs (which show data for one entity at a time), Global Info screens aggregate data across all entities the user has permission to see – making them ideal for compliance officers, administrators, and operations managers.
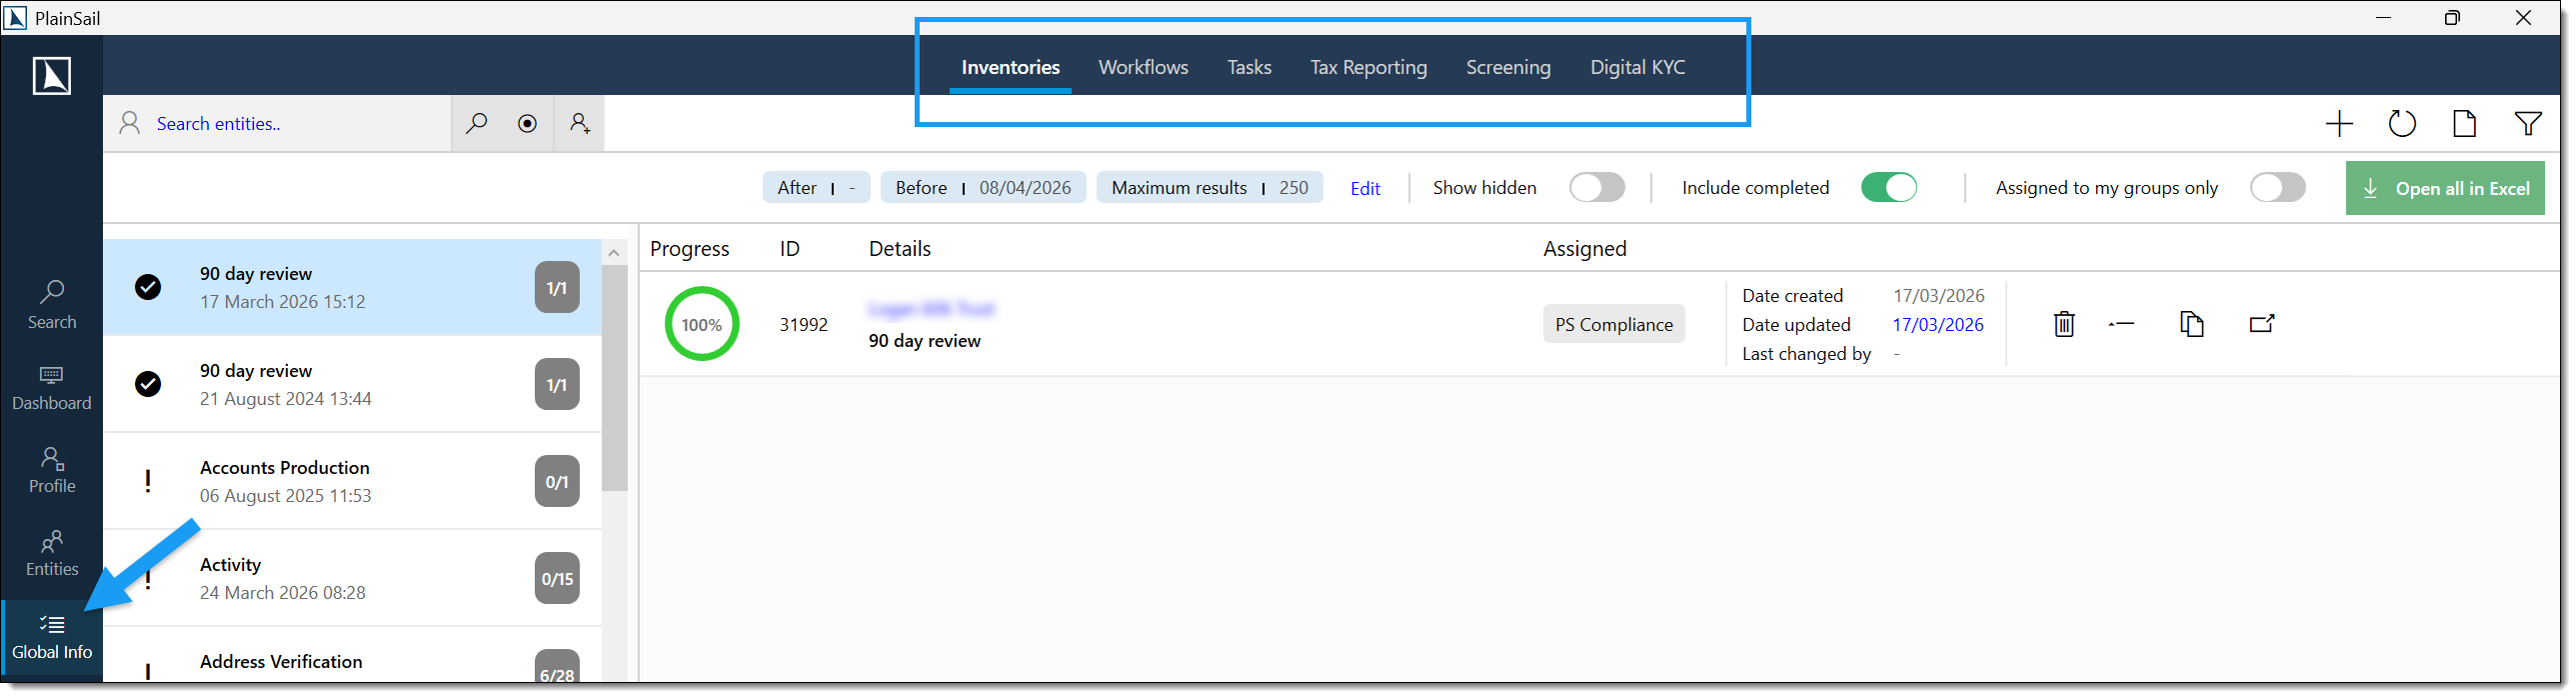
Accessing Global Info
Select the Global Info button (checkbox icon) from the main navigation ribbon at the top of the application. The area contains seven sub-tabs:
- Inventories – CDD / AML checklists across all entities: outstanding items, completed items, statistics.
- Workflows – multi-step approval and processing workflows: 4-eyes checks, configurable step sequences.
- Tasks – scheduled user tasks: to-dos, recurring items, reminders, exportable lists.
- Tax Reporting – FATCA / CRS reporting obligations: pending reports, approvals, submissions, filings.
- Screening – background checks via LSEG World-Check or RiskScreen: API and manual screening.
- Digital KYC – identity verification via Tiller or MeshID: document upload, liveness checks.
- JFSC Registry – Jersey-specific Annual Confirmation Statement submissions via the JFSC API.
CDD Inventories
Inventories (also called CDD or AML checklists) are structured data-collection forms that record compliance information for entities. Each entity can have multiple inventory instances, each based on a template defined by administrators. The Global Inventories tab provides the cross-entity view.
Navigate to Global Info > Inventories.
GlobalInventories_View to access the global inventories list.
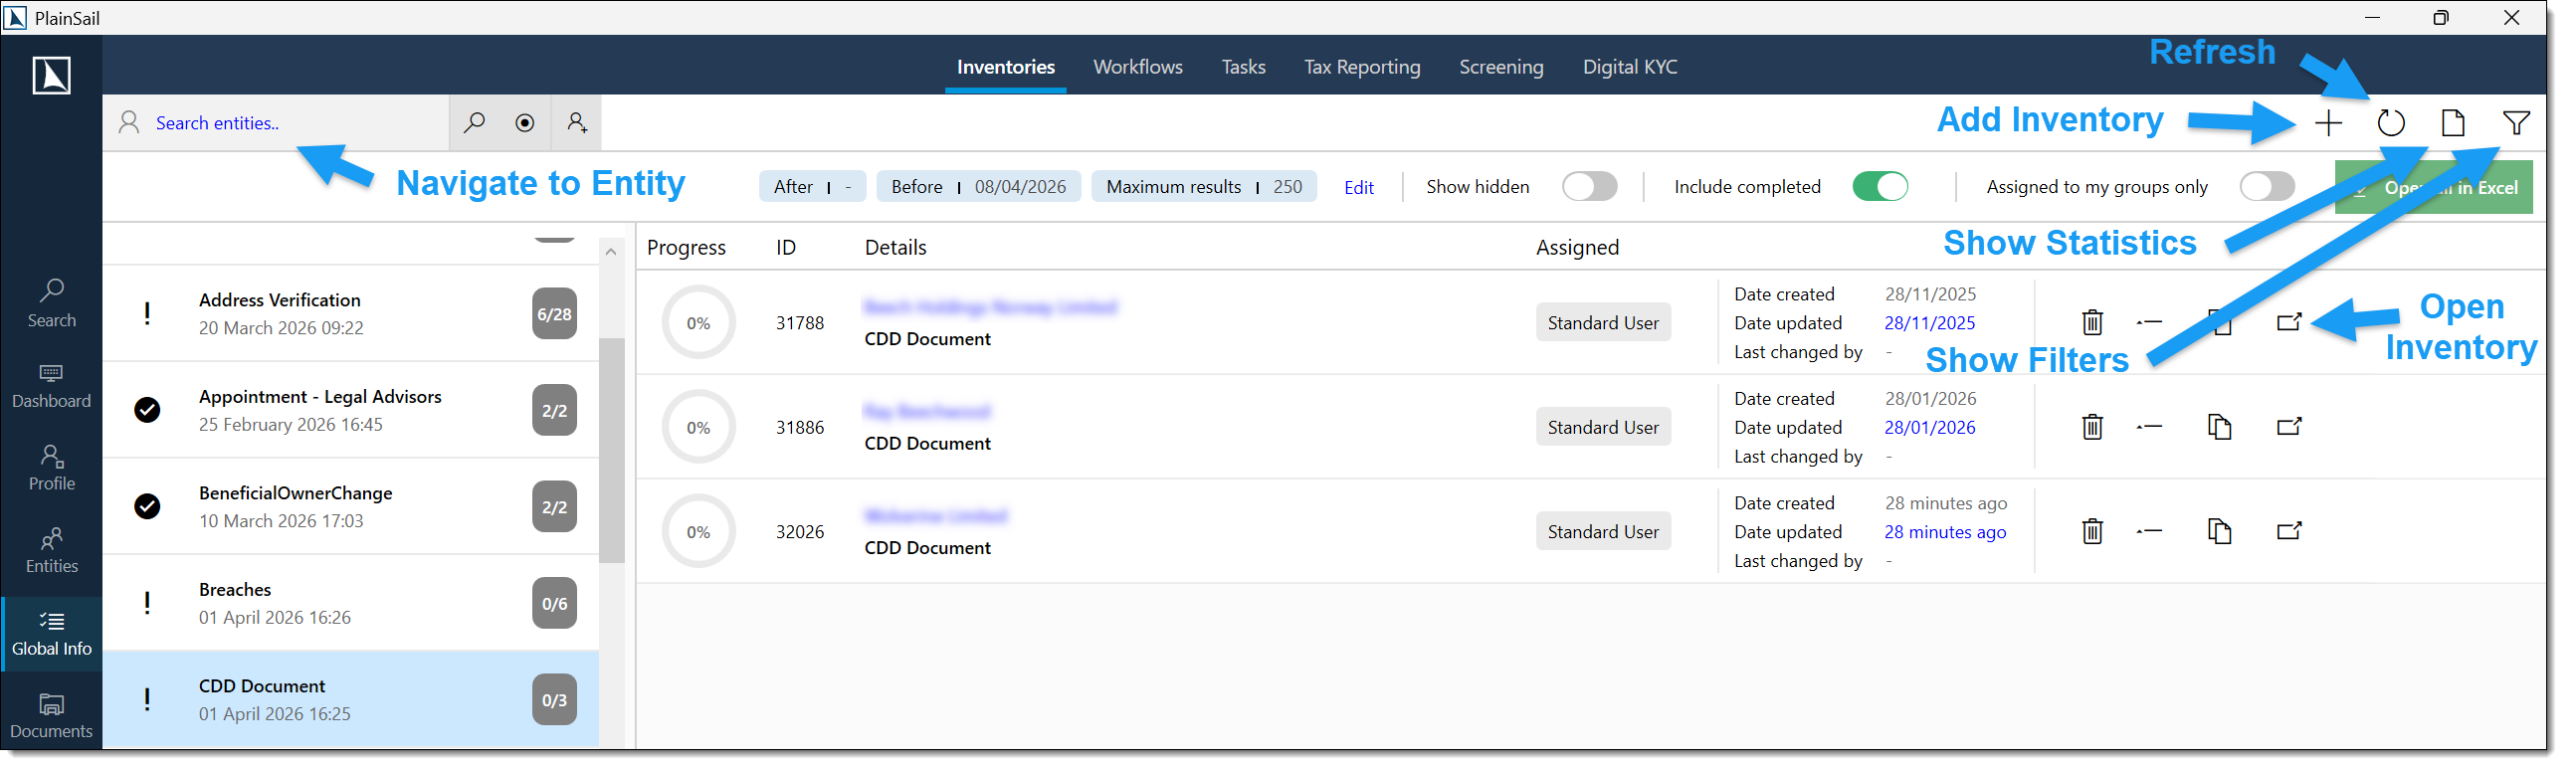
The inventories list
Displays all inventory instances across all entities. Each row shows the entity name and type, inventory template name, status (pending, in progress, completed), assigned user, due/completion date, and percentage completion.
Filtering
- Entity selector – select a specific entity to see only its inventories. Clear the selection for all entities.
- Show completed – include completed inventories (enabled by default).
- Show assigned to user – restrict to inventories assigned to the current user.
- Search – free-text search across inventory details.
Grouping
Inventories are grouped by template name. Click a group heading to expand or collapse that group. Click a different heading to switch groupings.
Actions
- Open inventory – click a row to open it for viewing or editing.
- Add Inventory – create a new inventory instance for an entity. Requires
Inventories_Create. - Show Statistics – opens a popout showing completion percentage breakdowns.
- Show Summary – opens a summary view across all entities.
- Show Filters – toggles the filter panel.
- Navigate to Entity – jump to the entity's inventory tab in the Client View.
- Refresh – reload from the database. Also triggered by changing the entity selector.
Inventory Details
When you open an inventory, you see the structured checklist of fields defined by the template. Fields can be text inputs, dates, dropdowns, checkboxes, file uploads, or links to other entities.
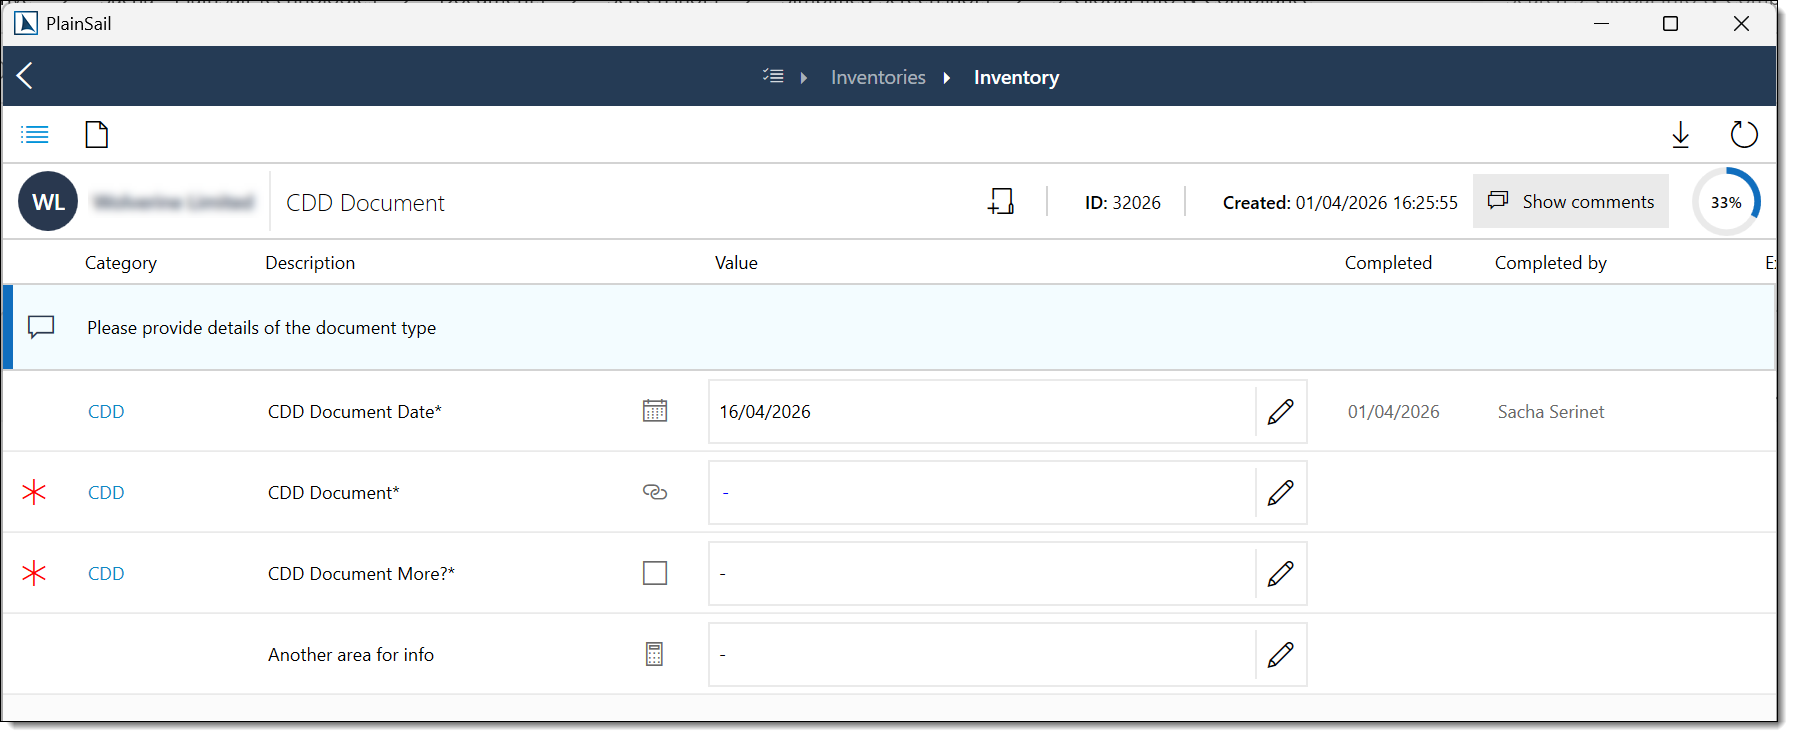
- Each field has a mandatory or optional indicator.
- Some fields trigger workflows when completed (as configured in the template).
- The overall completion percentage updates as you fill in fields.
- Changes are saved as you work – there is no separate "Save" button for individual fields.
Inventories_View to view. Inventories_Create to create. Inventories_Edit to edit. Inventories_Delete to delete.
Workflows
Workflows are configurable multi-step processes that guide users through structured tasks – approving a new bank account, completing a client review, processing a payment request. Each workflow follows a template defining steps, assignments, and required actions.
The Global Workflows tab shows all workflow steps across all entities available for the current user or their teams. Navigate to Global Info > Workflows.
Entities_View (inherited from the Global Info parent area).
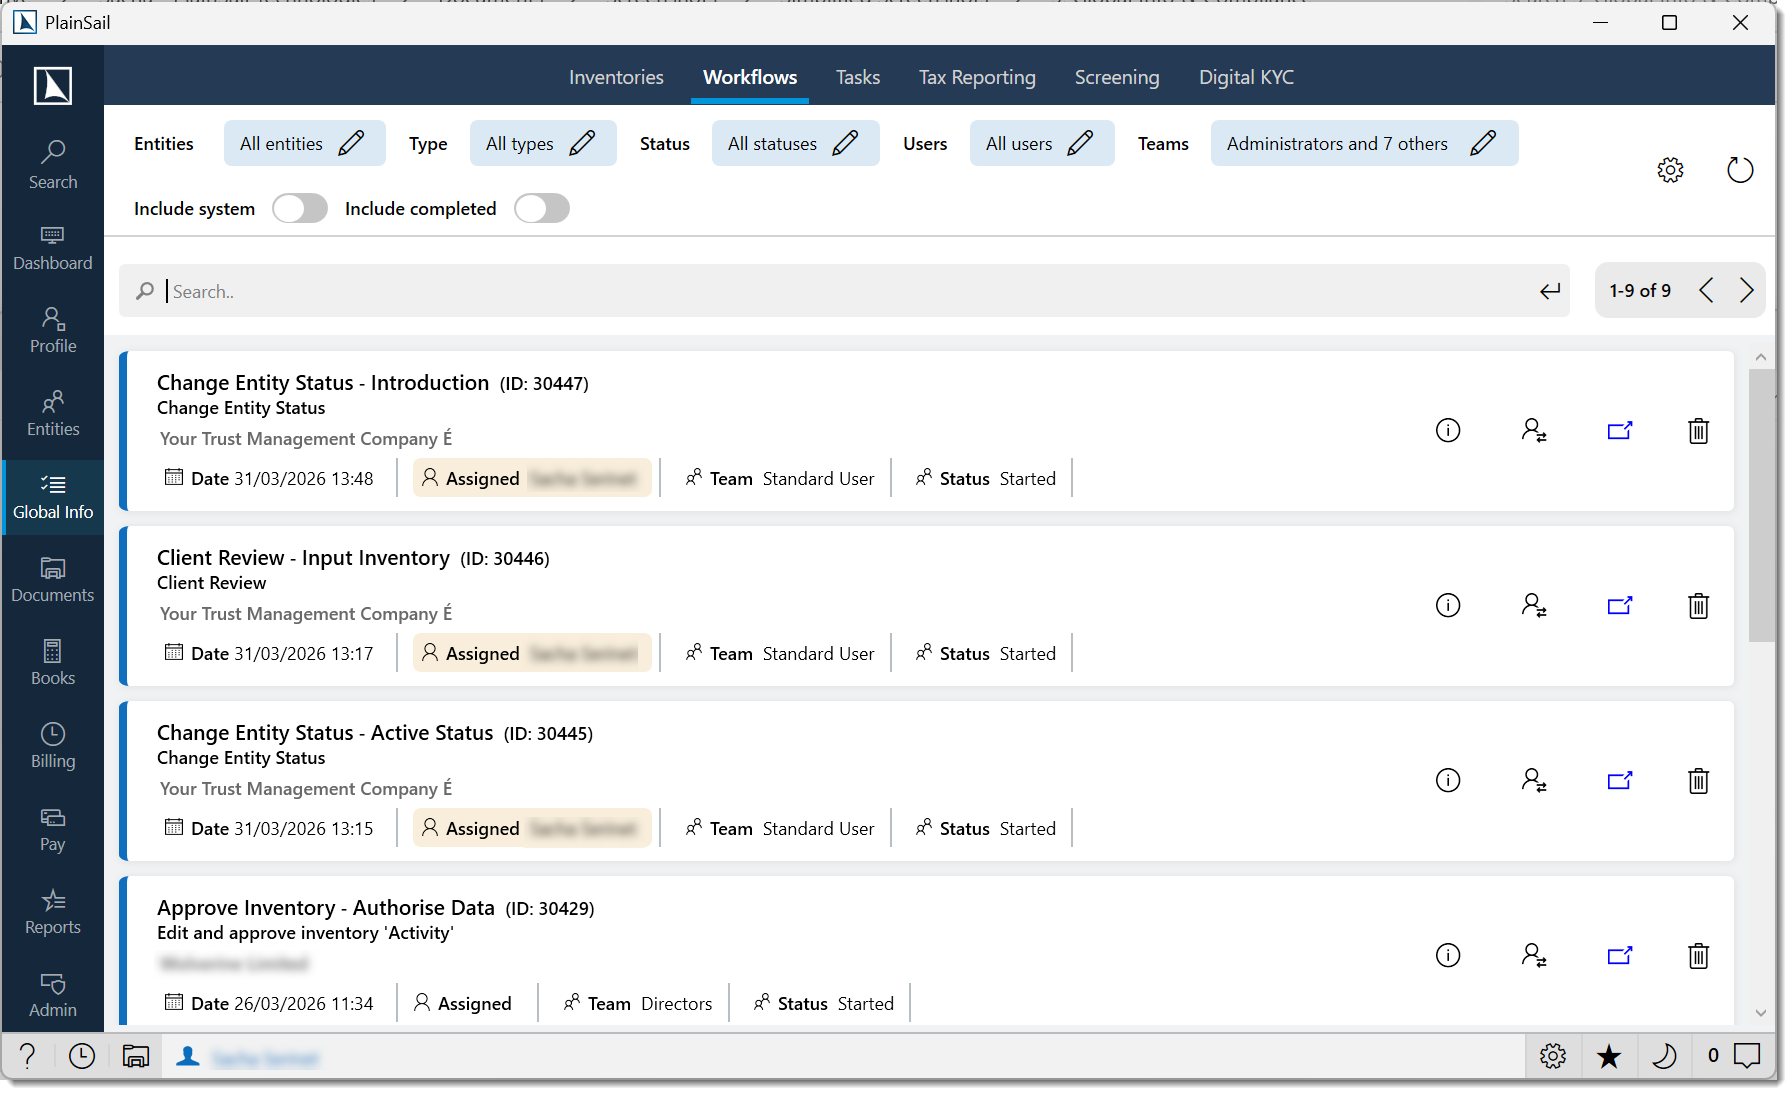
The workflow steps list
A paginated list (250 items per page by default) showing each active step with:
- Workflow Name – the workflow instance and current step name.
- Entity – the entity the workflow relates to.
- Type – the workflow template (e.g. Approve Bank Account, Client Review, Payment Request).
- Status – Active, Completed, Cancelled, or Error.
- Assigned User / Team – who is responsible for this step.
- Start Time – when the step was locked by a user.
- Can Open – whether you can process this step.
Workflow Filtering
The workflow list provides extensive multi-select filters, all persisted per user across sessions:
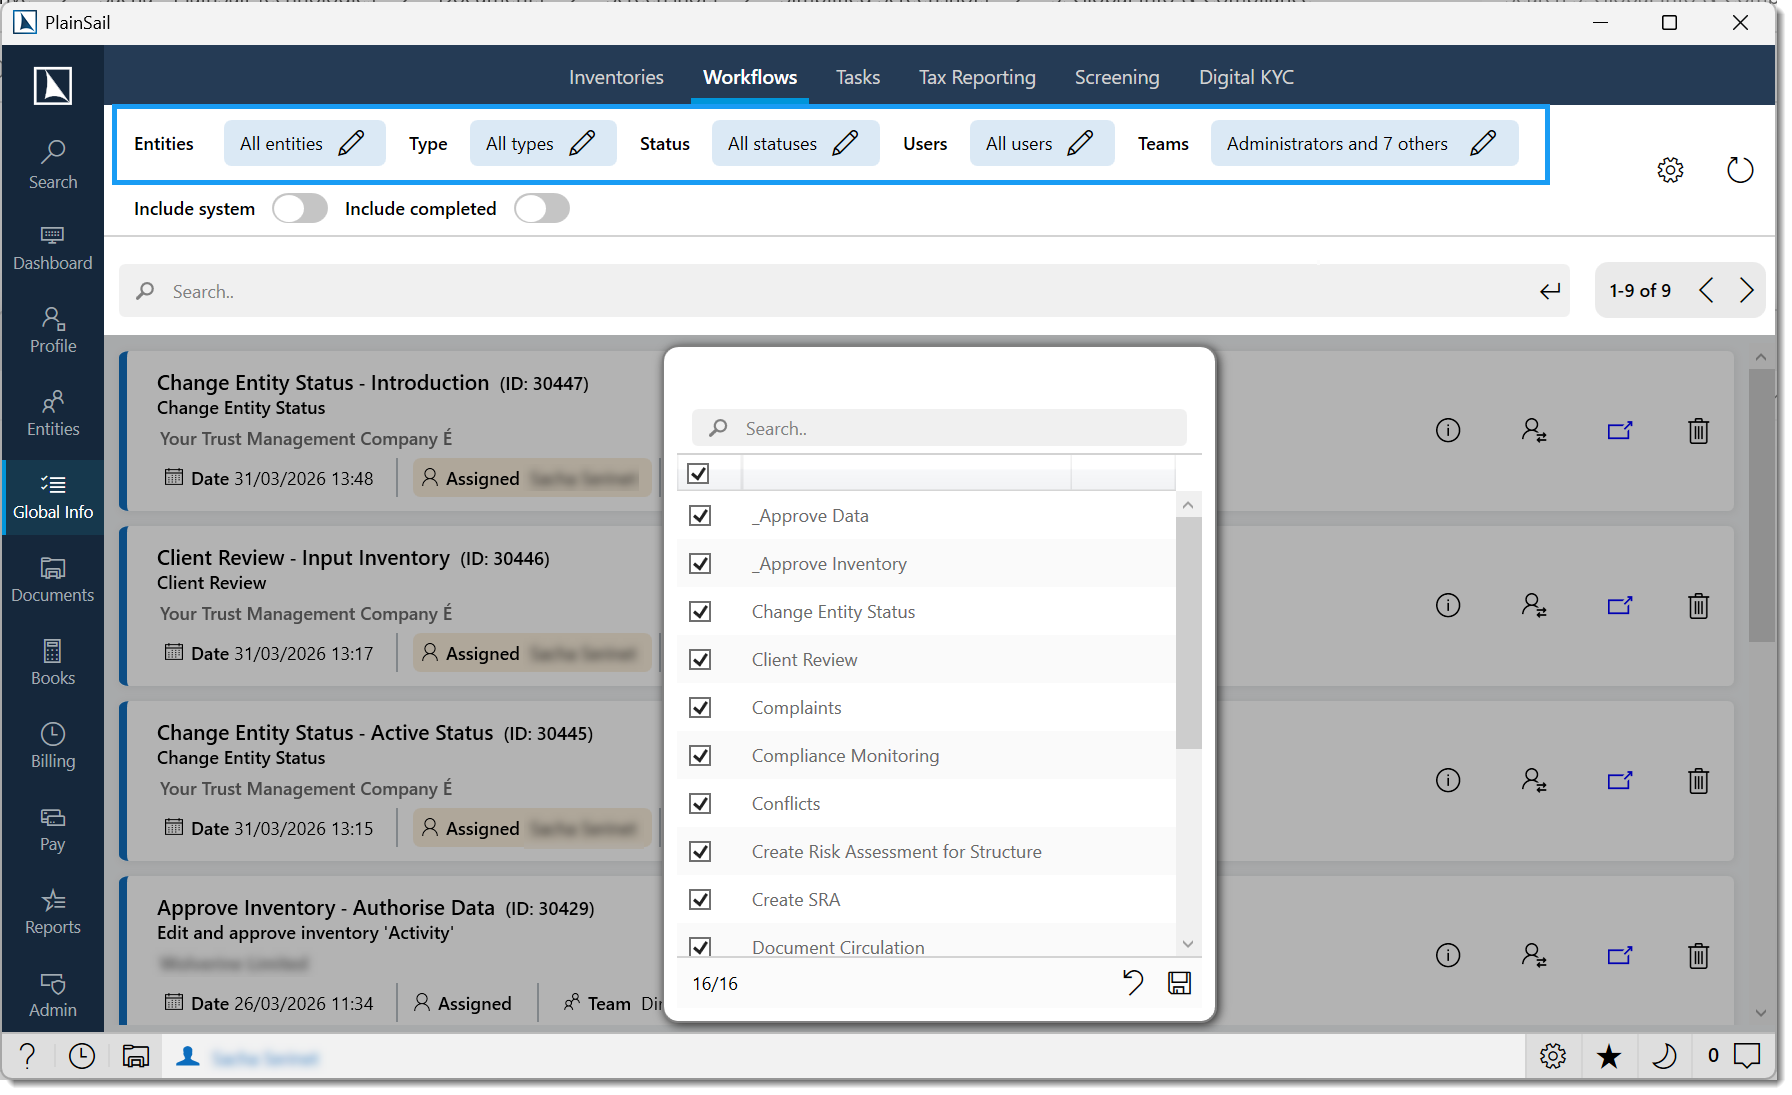
- Entities – select which entities' workflows to display.
- Workflow Types – select which template types to display.
- Statuses – select which statuses to include.
- Users Assigned – filter by assigned user. Includes a "No user" option for unassigned steps.
- Teams Assigned – filter by team. Defaults to only the current user's teams. Includes a "No team" option.
- Show Completed Steps – toggle to include finished steps.
- Show Autonomous Steps – toggle to include system-processed steps.
- Search – free-text search across workflow and step details.
Click a filter label (e.g. "All entities") to open the picker popout.
Check or uncheck items and click Save.
The list refreshes automatically. Selections are saved to the database.
A Refresh Required indicator appears when new workflow steps have been created since the last load. Press F5 to refresh.
Workflow Actions
Opening a workflow step
Click a workflow step row. If it's available to you (assigned directly or to your team), the step editor opens in a new window.
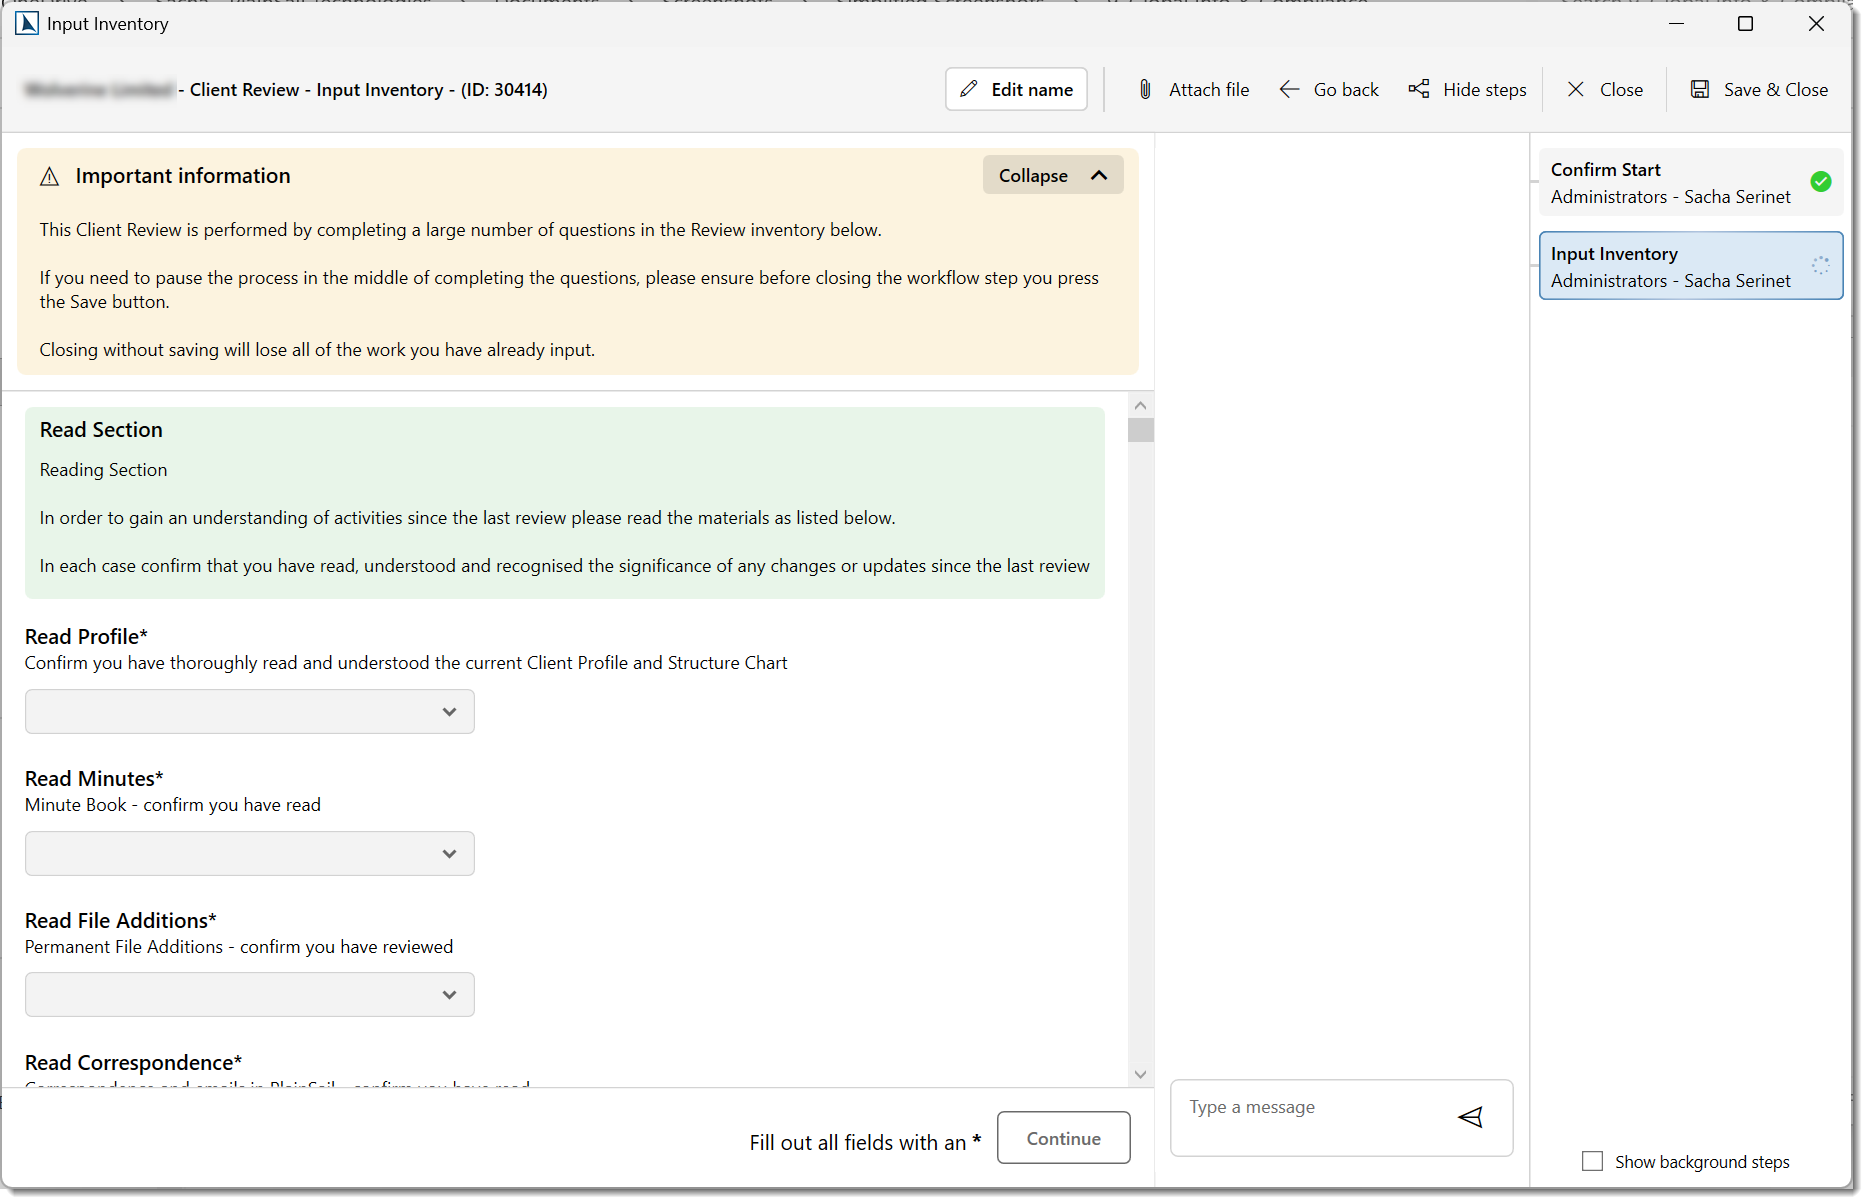
The step is locked to your user account while you work on it.
Complete the required actions (fill forms, approve/reject, upload documents).
Click Complete to advance the workflow, or Cancel to release the lock without completing.
Reassigning a step
Select a step, click Reassign, search for the new user, and confirm. You can only reassign steps that are not currently being worked on.
Cancelling a workflow
Select a step, click Cancel Workflow, enter a reason, and confirm. Only active (non-completed) workflows can be cancelled. If the workflow is locked by another user, you're offered the option to force-cancel by unlocking.
Viewing workflow data
Click View Data to open a JSON viewer showing the workflow's internal data and template configuration – primarily used for troubleshooting. Error messages are displayed here if the workflow has an error status.
Configuring workflows
Administrators can click Configure to open the workflow configuration dialogue for global settings. Requires the Administrator role.
Tasks
Tasks (scheduled user tasks / to-do items) are individual work items assigned to users, optionally associated with entities. They can be one-off or recurring, with due dates, categories, and comments.
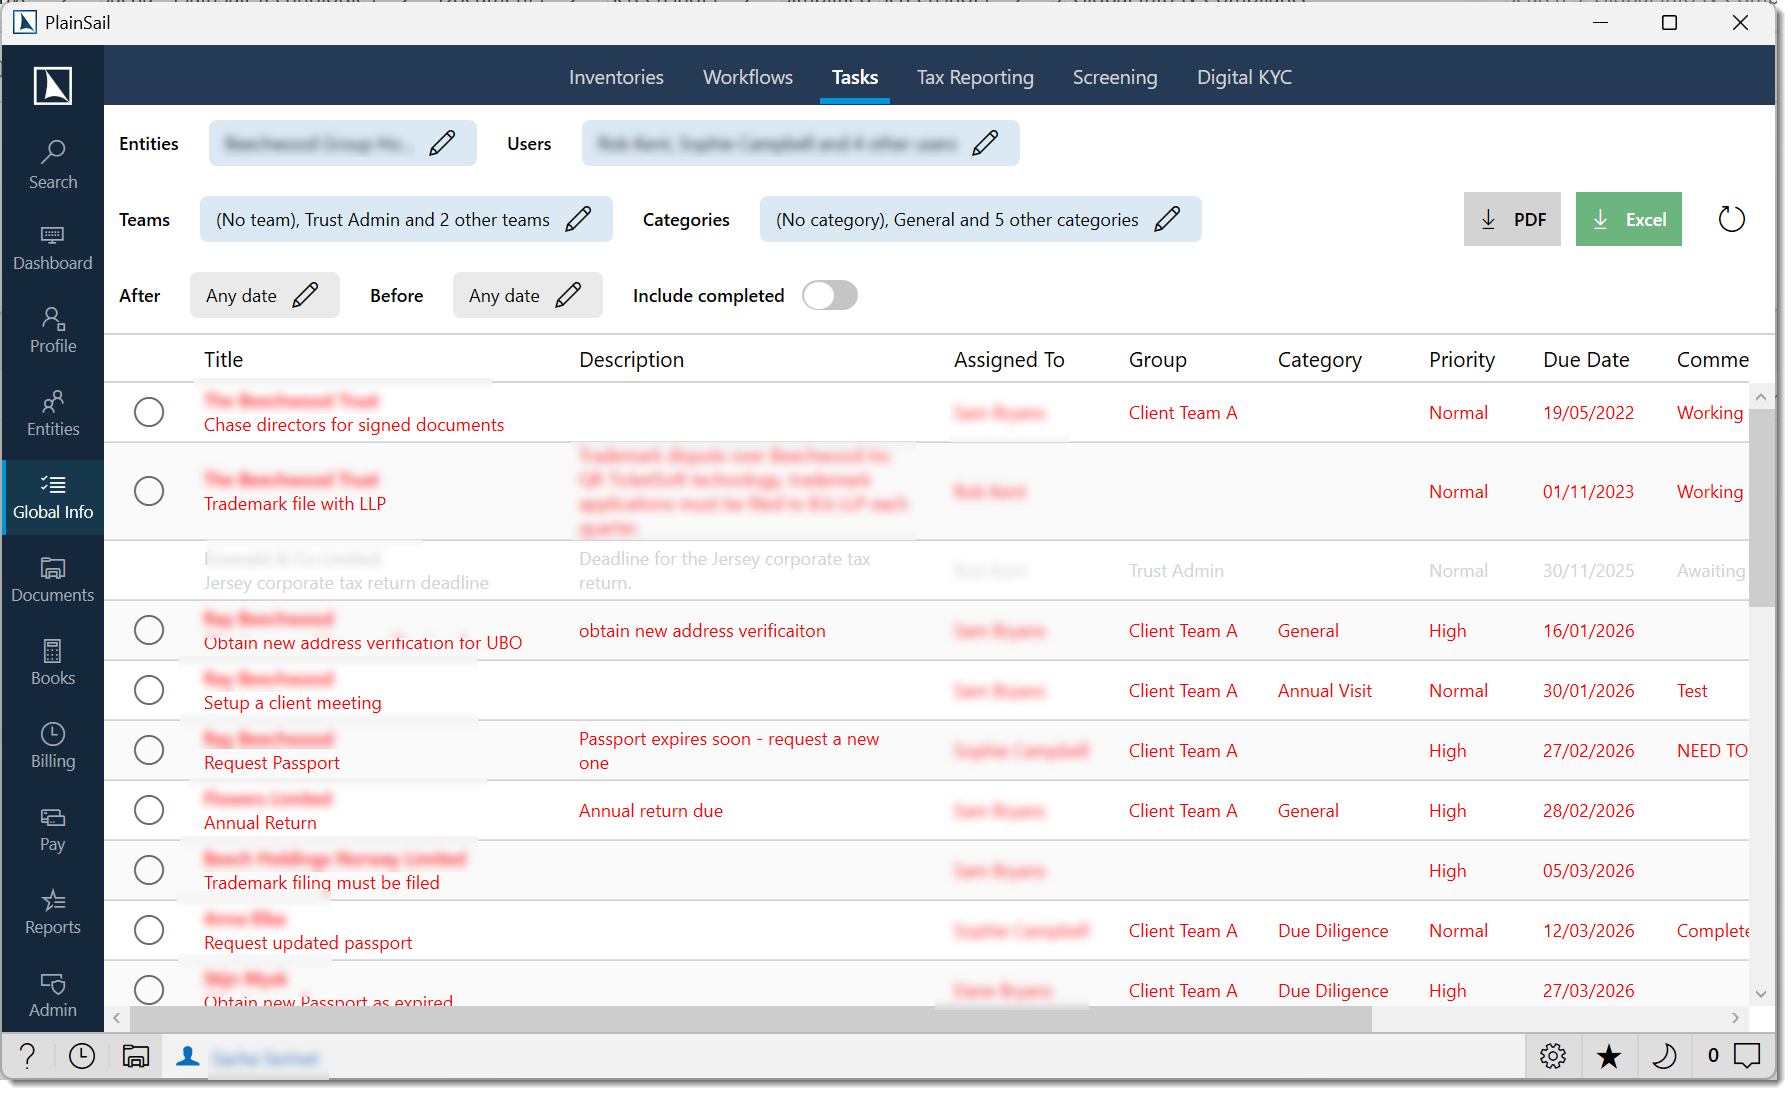
Navigate to Global Info > Tasks. The list shows tasks ordered by due date.
Task list columns
- Title – the task name/description.
- Entity – the entity the task relates to (may be blank for non-entity tasks).
- Assigned User – the user responsible.
- Team – the team/group the task belongs to.
- Category – the task category.
- Date – the due date.
- Status – pending or completed.
- Comment – notes or comments.
Filtering tasks
- Entities – select which entities' tasks to show.
- Users – select which users' tasks to show.
- Teams – select which teams' tasks to show. Without the
Tasks_ViewOtherTeamsrole, only your own teams appear. - Categories – select which task categories to include.
- After / Before – date range filters. Click to open a date picker.
- Include Completed – toggle to show completed tasks (off by default).
Filter selections are persisted per user and restored on the next visit.
Creating a task
Navigate to an entity’s Tasks tab (or Global Info > Tasks).
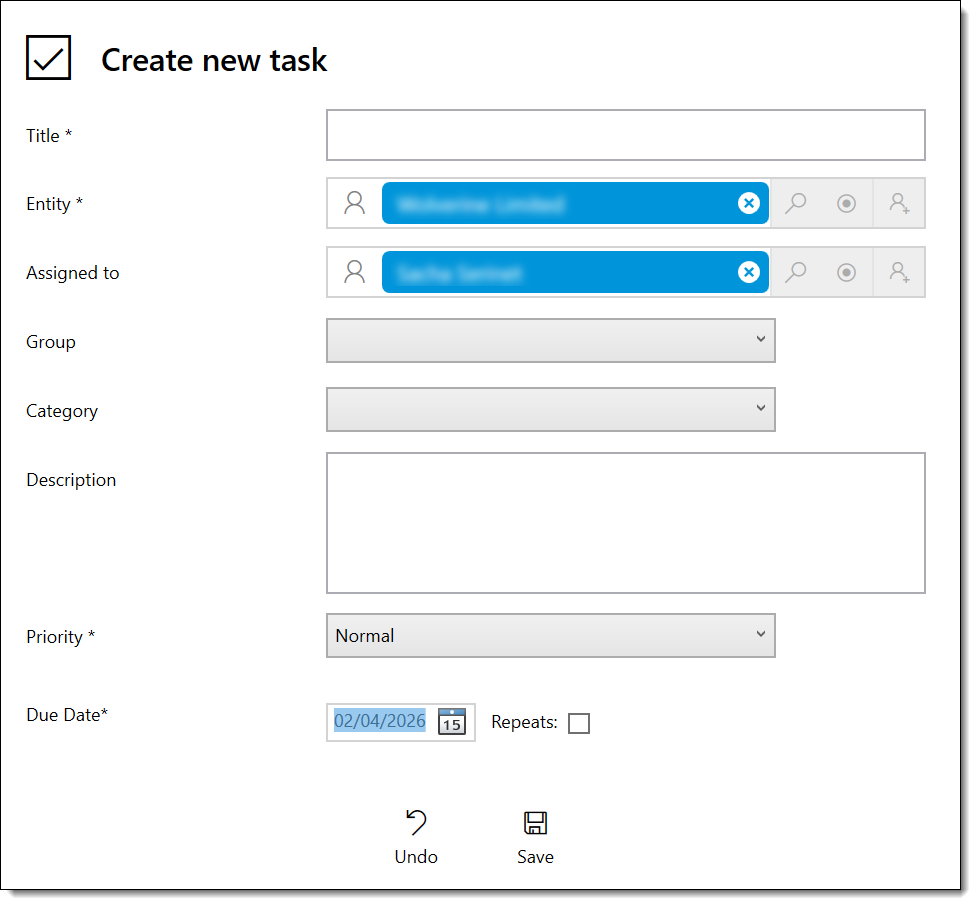
Click Add Task (or the + button on the Dashboard My Day widget).
Complete the fields:
| Field | Required | Description |
|---|---|---|
| Title | Yes | Brief description of the task (max 500 characters). |
| Description | No | Detailed description of what needs to be done. |
| Entity | Yes (from entity context) | The entity the task relates to. Pre-filled when creating from an entity’s Tasks tab. |
| Assigned To | No | The user responsible. Defaults to yourself if not set. |
| Team | No | The user group the task is assigned to. |
| Category | No | Task category (from UserTaskCategory list). |
| Priority | No | Low, Medium, High, or Urgent. |
| Due Date | No | When the task should be completed. |
| Comment | No | An initial note on the task. |
Click Save.
Task actions reference
| Action | How | Description |
|---|---|---|
| Complete | Click the circle icon on the task. | Marks the task as completed. Adds an automatic completion comment. |
| Edit | Click the pencil icon. | Opens the task editor to modify any field. |
| Add Comment | Click the note icon. | Adds a comment to the task’s history. |
| Delete | Select the task and press Delete. | Removes the task. Requires UserTasks_Delete role. |
Task category configuration
Navigate to Admin > Utilities > Manage Categories.
Find the UserTaskCategory category type.
Add, edit, or remove categories.
Categories appear as options when creating or editing tasks.
Task Actions & Export
- Mark as Completed – toggle a task's completion status. Adds a timestamped note. Click again to revert to incomplete.
- Edit Task – opens the task editor popout. Modify title, assignment, date, category, or comment. Click Save or Close.
- Edit Comment – opens a text input to update the comment field directly.
Exporting
- Export to Excel – exports the current filtered task list to an Excel spreadsheet.
- Export to PDF – exports to a PDF document.
Tax Reporting (FATCA / CRS)
The Tax Reporting tab manages regulatory tax reporting obligations under FATCA (Foreign Account Tax Compliance Act) and CRS (Common Reporting Standard). It provides a pipeline view from pending reports through to filed submissions.
Navigate to Global Info > Tax Reporting.
TaxReport_View to view. TaxReport_Administer to configure and manage.
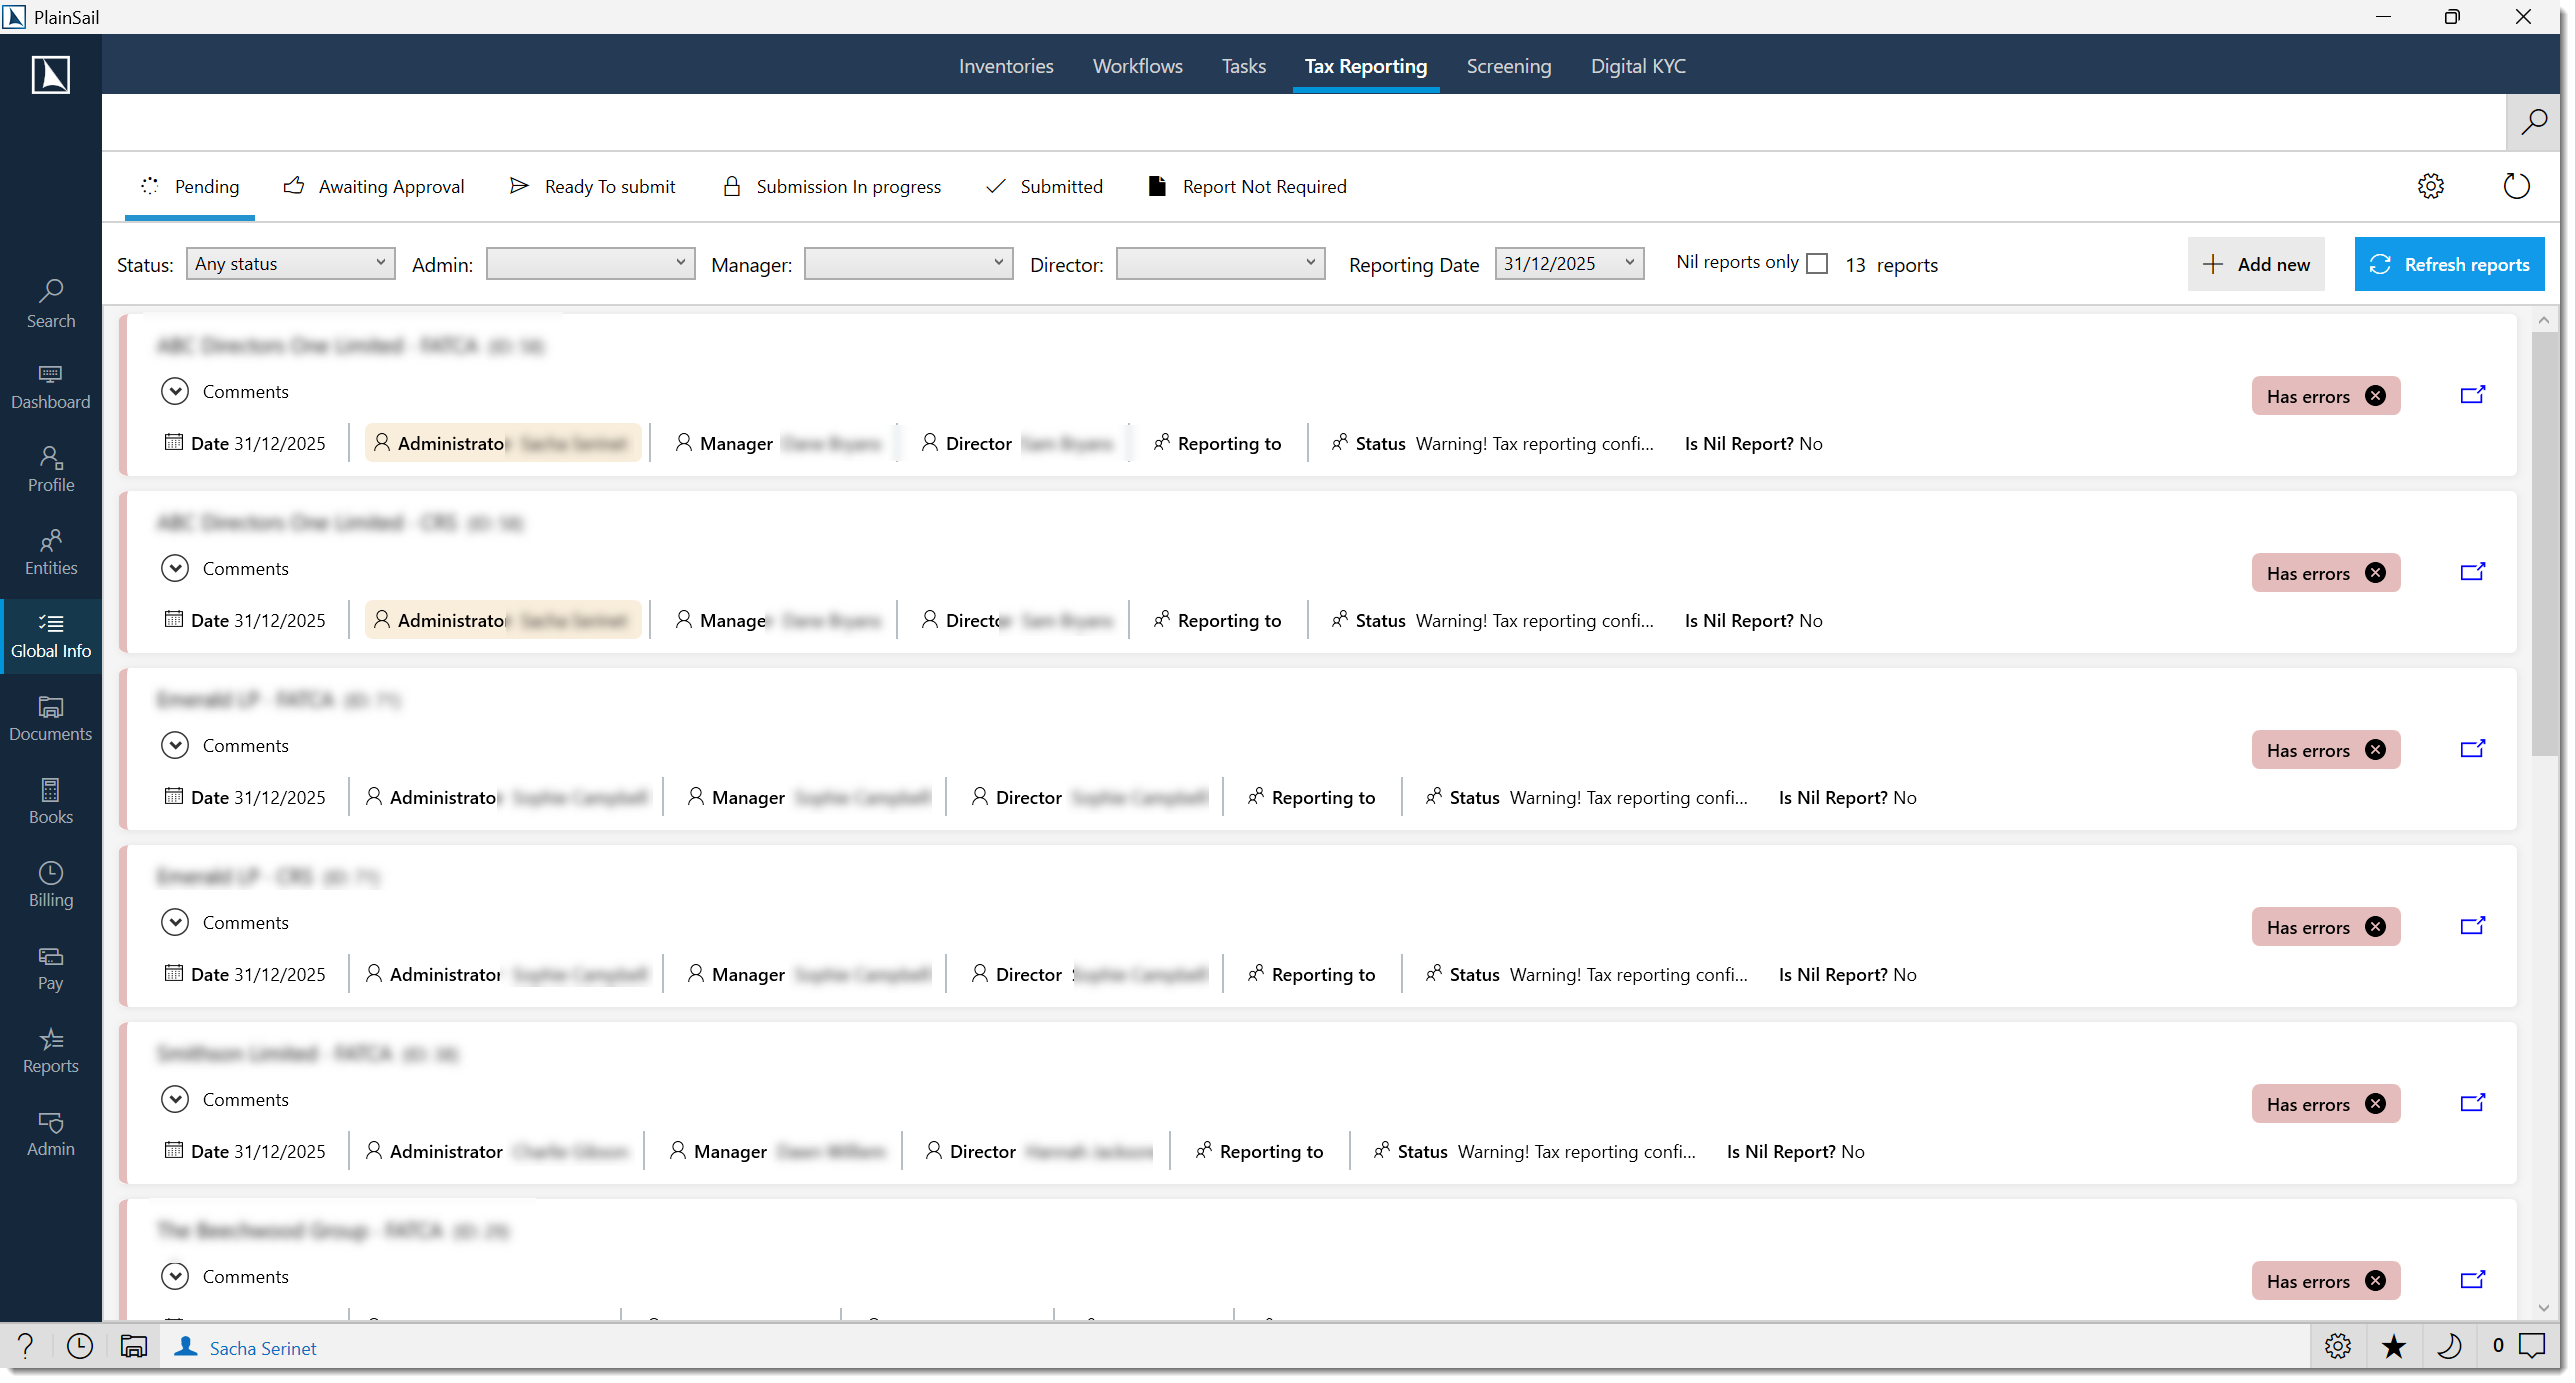
Pipeline views
The screen is divided into tabs representing each stage of the reporting pipeline:
- Pending – entities with unfinished obligations (New, Report Produced, Report OK, Report Warnings, Errored, Rejected by Approver). Includes a side panel for administration/configuration if authorised.
- Approvals – reports verified and awaiting final approval (status: Verified).
- Report Not Required – entities where no report is needed (No Report Required, Not Required by Customer).
- Ready to Submit – approved reports ready for inclusion in a submission batch.
- Submission In Progress – batches currently being assembled.
- Submitted – filed submissions with download and tracking.
Pending report actions
Each pending row shows entity name/type, jurisdiction, report status, year, and any validation warnings. You can:
- Click a report to open it for review and editing.
- Generate reports for entities.
- Verify and approve reports before submission.
- Send reports for peer review/approval.
Settings & administration
From the Pending view, administrators can access the settings panel (click Show Settings) to configure tax reporting jurisdictions, report generation parameters, and submission endpoints and credentials.
If the configuration has issues, a validation message appears at the top of the screen describing what needs correcting.
Tax Submissions
Ready to Submit
The Ready to Submit view shows approved reports ready for filing. Select reports to include in a submission batch, then create and finalise the batch.

Submitted
The Submitted view shows completed filings. You can view submission details and included reports, download submitted XML files, and track submission status.

Configuration sub-screens
Accessible from the Admin ribbon:

- Tax Reporting Obligations (Admin > Tax Reporting > Obligations) – define which entities have reporting obligations and for which jurisdictions.
- Tax Reporting Configurations (Admin > Tax Reporting > Configurations) – report generation settings, templates, and parameters.
- Tax Reporting Administration (Admin > Tax Reporting > Administration) – system-wide settings (endpoints, credentials, scheduling).
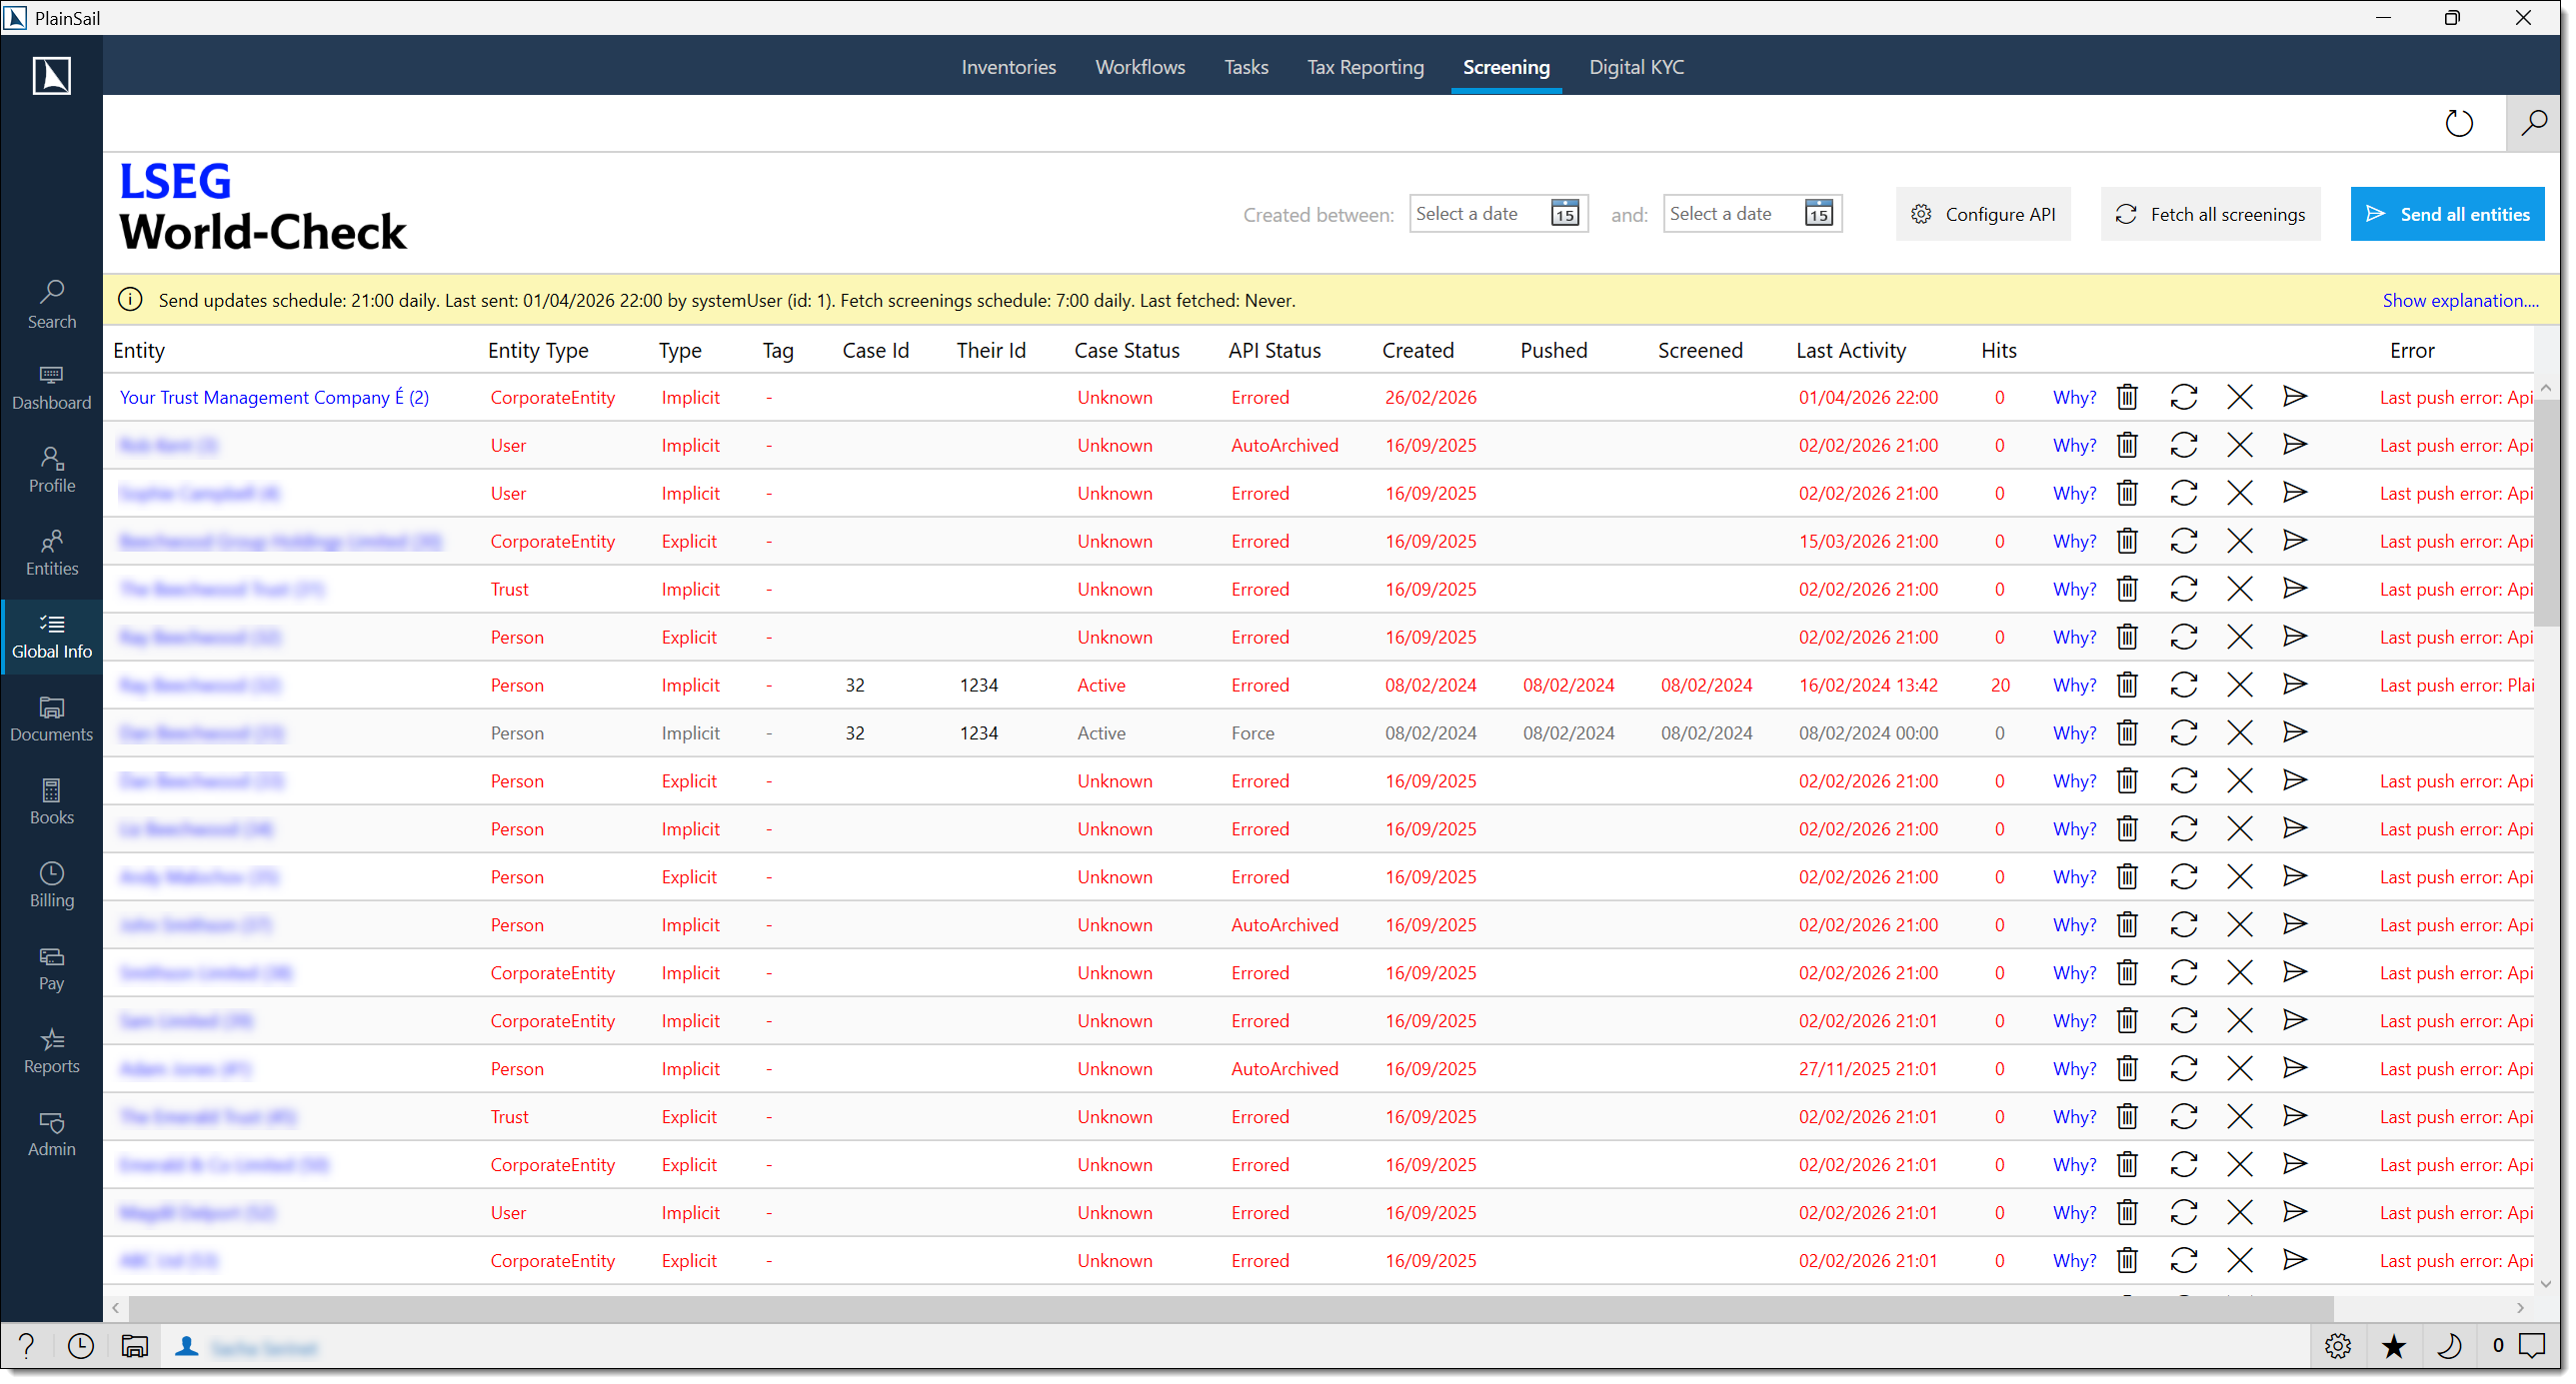
Screening
The Screening tab manages external background checks and ongoing monitoring of entities through third-party providers – LSEG World-Check (global screening) and RiskScreen (risk-based screening). Screening can operate in API mode (automated) or manual mode.
Navigate to Global Info > Screening.
Screening_View to view. Screening_Administer to configure and manage.
The screening list
Each row shows:
- Entity Name / Type – the entity being screened.
- External System ID – the case reference in the provider's system.
- Case Status – Active, Archived, etc.
- Screening Tag – a classification tag.
- Created Date – when the record was created.
- Last Push / Pull Error – any errors from the most recent data sync.
Filtering
- Search – text search across entity name, type, screening tag, external ID, and archived status.
- Created Start Date / End Date – filter by creation date range. A Clear button resets.
Screening provider comparison
| Provider | Constant | Description | Best For |
|---|---|---|---|
| LSEG World-Check | RefinitivWorldCheck | Industry-standard PEP, sanctions, and adverse media screening database. Comprehensive global coverage. | Organisations requiring deep coverage and regulatory-grade screening. |
| RiskScreen | RiskScreen | Alternative screening provider with PEP, sanctions, and watchlist coverage. | Organisations preferring a different provider or requiring multi-provider coverage. |
| Manual File | ManualFile | Manual file-based screening for cases where automated screening is not possible. | Ad hoc screening or jurisdictions not covered by the automated providers. |
Provider configuration
Navigate to Admin > Configuration.

Set the screening provider and API credentials.
Test the connection.
Screening Actions
Individual actions
- Screen Now – queue an entity for immediate rescreening. Creates a background task.
- Sync Now – synchronise screening data from the API/portal for a specific entity.
- Archive – archive the entity on the screening portal, setting its status to inactive. Does not affect the entity record itself.
- Unarchive – reverse an archive action, reactivating the entity on the portal.
- Delete Screening Entry – permanently delete the external screening record. Use with extreme caution – only when the case doesn't exist in the provider or has an incorrect external ID.
- Show Reason – view why the entity was last screened (type and related entities).
- Copy Errors – copy push/pull error details to clipboard for troubleshooting.
- Navigate to Entity – open the entity's profile.
Bulk operations
- Queue All Changes – adds all changed entities to the background processing queue. Creates a queued task.
- Fetch All Screenings – retrieves latest screening information for all active entities from the provider.
- Create New Cases – finds screening candidates since the last sync, creates new cases, and queues them. Can take up to two minutes.
Screening candidates
When you click Create New Cases, the system identifies screening candidates based on:
- Entities marked as “Requires Screening” – a flag on the entity record indicating the entity needs periodic screening. Changing this flag requires the
Screening_ChangeRequiresScreeningrole. - New entities since the last sync – entities created since the last screening batch was run.
- Entities with expired screening – entities whose last screening date is older than the configured screening frequency (e.g. annually).
The system finds all entities matching these criteria, creates screening cases with the configured provider, and queues them for processing.
API statistics
The screen shows scheduling and last-run information for both the send-updates and fetch-screenings processes, including timestamps and the user who triggered each.
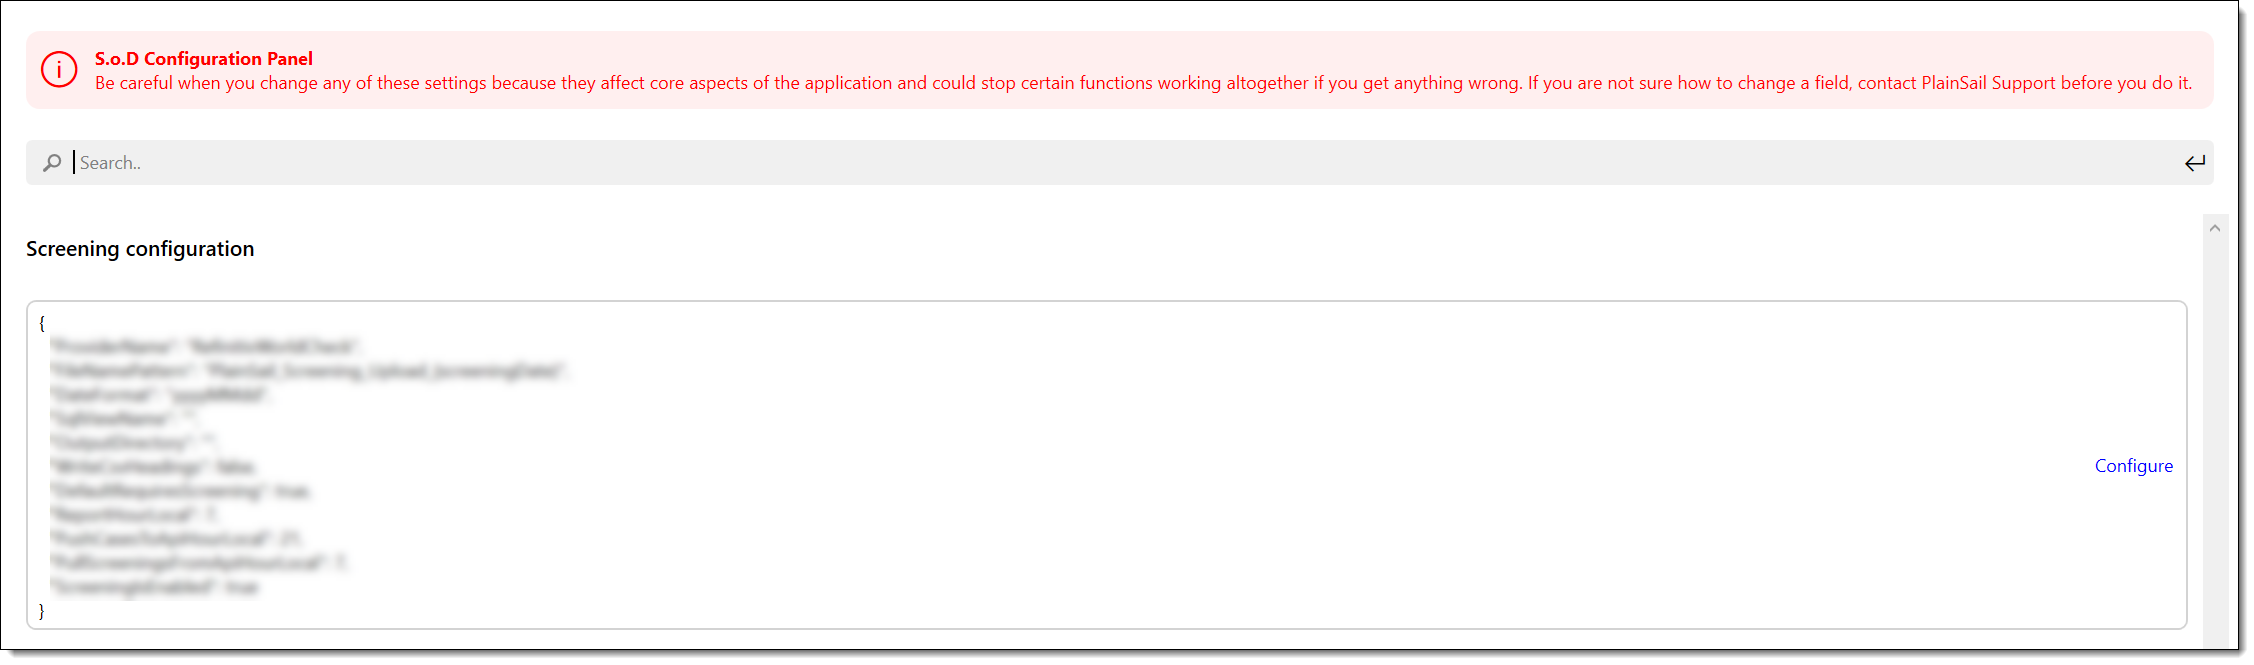
Configuration
Click Configure Screening API to open the provider-specific configuration (RiskScreen credentials or LSEG World-Check credentials). Requires Screening_Administer.
Digital KYC
The Digital KYC tab manages electronic identity verification for individuals through Tiller or MeshID. Individuals upload identity documents and complete liveness checks via a web portal, with results flowing back into the application.
Navigate to Global Info > Digital KYC.
DigitalKyc_View to view. DigitalKyc_Administer to configure. DigitalKyc_CreateResetVerification to create/reset verifications.
The verification list
- Entity Name / Type – the individual being verified (typically Person).
- Verification Status – Pending, In Progress, Completed, Failed, etc.
- Verification Link – the URL sent to the individual.
- Last Error – any error from the latest API interaction.
- Closed – whether the verification is closed/completed.
Filtering
- Search – text search across entity name, type, and verification status.
- Include Completed – toggle to show closed verifications (off by default).
Actions
- Reset Verification – reset an individual's verification, clearing all uploaded data. Tiller only. Requires
DigitalKyc_CreateResetVerification. - Resend Invite – resend the invitation email. Tiller only.
- Delete Verification – delete a verification record from the portal. MeshID only.
- Copy Error – copy error details to clipboard.
- Copy Verification Link – copy the verification URL for manual sharing.
- Navigate to Entity – open the entity's profile.
Bulk operations
- Fetch All Verifications – retrieves latest verification info for all active verifications from the provider.
- Process Completed Verifications – processes completed KYC verifications (store documents, update entity records).
Processing completed verifications
When a Digital KYC verification is completed, the Process Completed Verifications action performs the following:
| Action | What Happens |
|---|---|
| Store documents | Identity documents (ID photos, proof of address, selfie images) are saved to the entity’s CDD document workspace under a “KYC” label. |
| Update entity records | The entity’s contact fields are updated with verified data: full name, date of birth, address, nationality, ID document number, and expiry date. |
| Set verification status | A “Verified” status is set on the entity record with the verification date, provider name, and reference number. |
| Create timeline entry | A timeline entry is created recording the KYC verification event. |
API statistics & configuration
The screen shows scheduling and last-run timestamps for the fetch and process operations. Click Configure Digital KYC API to open provider-specific settings (Tiller or MeshID credentials). Requires DigitalKyc_Administer.
Supported KYC providers
| Provider | Constant | Description |
|---|---|---|
| Tiller | Tiller | Digital identity verification provider. |
| MeshID | MeshId | MeshID digital identity platform. |
End-to-end KYC setup
Obtain credentials – Register with the chosen KYC provider and obtain API credentials (API key, secret, endpoint URL).
Configure in PlainSail – Navigate to Admin > Configuration > Digital KYC. Enter the provider name, API key, API secret, and endpoint URL.
Test the connection – Click Test to verify connectivity.
Create a verification request:
- Navigate to Global Info > Digital KYC (or entity Profile > KYC tab).
- Click Create Verification.
- Select the person entity to verify.
- The system sends a verification request to the provider.
- The person receives an email/SMS from the provider with instructions to complete identity verification.
Process completed verifications:
- When the person completes verification, the provider sends results back to PlainSail.
- Navigate to Global Info > Digital KYC and find the completed verification.
- Click Process.
- The system stores received documents, updates entity fields with verified data, and sets the verification status on the entity record.
JFSC Registry
The JFSC Registry tab manages Annual Confirmation Statement submissions to the Jersey Financial Services Commission via the JFSC API – for Jersey-registered entities.
Navigate to Global Info > JFSC Registry.
Sub-screens
- Main View – overview of entities requiring JFSC Annual Confirmation Statements.
- Submissions – annual confirmation submissions being prepared or in progress.
- Submitted – completed and filed annual confirmations.
Workflow
Entities requiring annual confirmations are identified by the system.
Confirmation data is assembled and reviewed.
A submission is prepared and validated.
The submission is filed with the JFSC.
The confirmation moves to the Submitted list for record-keeping.
Detailed submission procedure
Assemble Data – Navigate to Global Info > JFSC Registry. The system collects data from entity records:
- Entity name, type, and jurisdiction
- Registered address
- Beneficial owners (from relationships marked as beneficial owners)
- Directors and officers
- Share classes and shareholders
- Dates of incorporation and any changes
Validate – The system runs validation checks:
- All mandatory fields are populated (name, address, beneficial ownership)
- TINs and identification numbers are in the correct format
- Beneficial ownership thresholds are met (e.g. 25% threshold)
- No duplicate entries
Review – Preview the assembled data before submission. Any validation errors or warnings are displayed with links to the affected entity records for correction.
Generate Submission – Click Generate to create the submission file in the format required by JFSC.
Submit – Upload the generated file to the JFSC portal (external to PlainSail) or use the automated submission feature if configured.
Submission format
The submission is generated as a structured data file (typically XML or CSV) conforming to the JFSC’s specified schema.
Cross-Cutting Features
Several features apply consistently across all Global Info sub-tabs:
Entity navigation
From most screens, click Navigate to Entity (or the entity name) to jump to the entity's Profile tab in the Client View. This connection to the Entities module runs throughout Global Info.
Popout panels
Filters, editors, and statistics open in popout panels overlaid on the main screen. Close by clicking Cancel, pressing Escape, or clicking outside the popout.
Data refresh
All screens support manual refresh via the Refresh button or F5. The Workflows screen also shows a "Refresh Required" indicator when other users have created new steps.
Queued tasks
Bulk operations in Screening and Digital KYC create background queued tasks processed by the application service. Monitor them from Admin > Queued Tasks. Results appear in the relevant Global Info screen once processing completes.
Configuration plugins
Screening, Digital KYC, and Workflow configuration dialogues use a plugin architecture. The configuration screen depends on which provider is configured in system settings. If the plugin for the configured provider is missing from the deployment, an error message is shown.
Cross-entity reporting
Each Global Info sub-tab provides cross-entity views:
| Sub-Tab | Report Capability |
|---|---|
| Inventories | View all inventories across all entities. Filter by template, status, assigned user. Export to Excel. |
| Workflows | View all workflows across all entities. Filter by template, status, assigned user/team. |
| Tasks | View all tasks across all entities. Filter by assigned user, team, category, date range. Export to Excel. |
| Tax Reporting | View all tax obligations and submissions across entities. Filter by jurisdiction, status, period. |
| Screening | View all screening cases across entities. Filter by provider, status. |
| Digital KYC | View all KYC verifications across entities. Filter by provider, status. |
Generating aggregated reports
Navigate to the relevant Global Info sub-tab.
Apply filters to narrow the data.
Click Export to Excel (available on Tasks, Inventories, and other grid views).
For more complex reports, use Reports > Query Builder to build custom cross-entity queries.
Data export by sub-tab
| Sub-Tab | Export Available? | Method |
|---|---|---|
| Inventories | Yes | Export to Excel button on the grid. |
| Workflows | Limited | No direct export; use Query Builder. |
| Tasks | Yes | Export to Excel button on the grid. |
| Tax Reporting | Yes | Download XML files from the Submissions screen. |
| Screening | Limited | No direct export; use Query Builder. |
| Digital KYC | Limited | No direct export; use Query Builder. |
Permissions Reference
Global Info area access
Entities_View– required for access to the Global Info parent area.GlobalInventories_View– access the global inventories list.
Inventory roles
Inventories_View– view inventories on entities.Inventories_Create– create new inventory instances.Inventories_Edit– edit inventory data.Inventories_Delete– delete inventories.
Task roles
Tasks_View– view tasks.Tasks_Create– create new tasks.Tasks_Edit– edit existing tasks.Tasks_ViewOtherTeams– view tasks for teams other than your own.
Tax reporting roles
TaxReport_View– view tax reports.TaxReport_Administer– configure and manage tax reporting.
Screening roles
Screening_View– view screening records.Screening_Administer– configure and manage screening.
Digital KYC roles
DigitalKyc_View– view digital KYC records.DigitalKyc_Administer– configure Digital KYC API settings, process completed verifications, and manage provider credentials.DigitalKyc_CreateResetVerification– create and reset verifications.
Workflow permissions
Workflow step visibility is assignment-based: a step is visible if assigned to the current user or to a team the user belongs to. Cancellation permissions are defined in the workflow template configuration.
Keyboard Shortcuts
| Shortcut | Context | Action |
|---|---|---|
| F5 | Any Global Info sub-tab | Refresh the data list. |
FAQ
Why does the inventories list reload every time I navigate to it?
The global inventories list reloads from the database each time you open the tab. There is no incremental refresh – this ensures you always see the latest data but may take a moment for large datasets.
Why does the Workflows filter default to only my teams?
The Teams filter defaults to the current user's teams to focus on relevant work. Entity, Type, Status, and User filters default to "all selected". You can explicitly select other teams via the filter picker.
Why can't I export tasks to Excel or PDF?
Both exports require that the Before date, After date, and all filter selections (entities, users, teams, categories) are populated. Ensure every filter is set before exporting.
Why are Archive, Unarchive, and Screen Now buttons greyed out?
These actions are only available when API screening is enabled and the provider supports them. If your screening is configured for manual mode only, these actions are unavailable.
Why can't I see the Reset Verification button?
Reset Verification and Resend Invite are Tiller-only features. If your deployment uses MeshID, you'll see Delete Verification instead. You also need the DigitalKyc_CreateResetVerification role.
Is the JFSC Registry relevant to my deployment?
Only if you manage entities registered in Jersey. The tab may not appear if your deployment does not have JFSC configuration enabled.
What happens if I delete a screening entry?
Deletion is irreversible and can cause duplicate cases if the entity is subsequently rescreened. Only delete entries where the case doesn't exist in the provider or has an incorrect external ID. The UI shows a prominent warning before proceeding.
A workflow step is locked but the other user's application crashed – what do I do?
If it was your own previous session that crashed, the system detects this and offers to cancel the stale lock. If it's another user's lock, ask them to close their session or ask an administrator to force-cancel via the Cancel Workflow action.
Can the Create New Cases screening action be cancelled once started?
No. Once initiated, it runs to completion (up to two minutes). Avoid starting it unless you intend to process all screening candidates.
What happens if the tax reporting configuration is incomplete?
A validation message appears at the top of the Tax Reporting screen describing what needs correcting. Reports cannot be generated until the configuration is valid.
How do I create a new task?
Navigate to Global Info > Tasks (or an entity’s Tasks tab) and click Add Task. Fill in the title, entity, assignee, and due date, then save. See the Tasks section above for full details.
How do I set up a screening provider for the first time?
Navigate to Admin > Configuration and enter the screening provider’s API credentials. See the Screening section above for provider comparison and setup steps.
How do I configure digital KYC?
Navigate to Admin > Configuration > Digital KYC and enter the provider credentials. See the Digital KYC section above for the end-to-end setup procedure.
Can I export screening results to a report?
Direct export from the Screening grid is limited. Use the Reports > Query Builder to build a custom screening report. Alternatively, filter the screening list and copy the results manually.
- Inventories & Configuration – inventory templates, review points, and CDD data
- Workflow & Approvals – workflow steps and process management
- Compliance & Tax Reporting – FATCA/CRS reporting pipeline
Test Yourself
Check your Global Info knowledge with these 10 questions covering sub-tabs, compliance, screening, and cross-entity workflows.