Help Centre
Dashboard & Widgets
Your personalised home screen in PlainSail – monitor tasks, workflows, timesheets, documents, and messages at a glance. Customise the layout, add widgets, and stay on top of notifications.
Key points
- The dashboard is the first screen you see after logging in
- Eight widget types are available – tasks, noticeboard, inventories, documents, billing, workflow, Outlook mail, and Outlook tasks
- Customise your layout by unlocking the dashboard and adding or removing widgets
- The Notification Centre provides real-time alerts for documents, workflows, messages, and bookkeeping
- Widget settings like filters and visibility toggles are saved per user and persist across sessions
- Holiday and occasion greetings display automatically during Christmas, New Year, Easter, and weekends
Overview
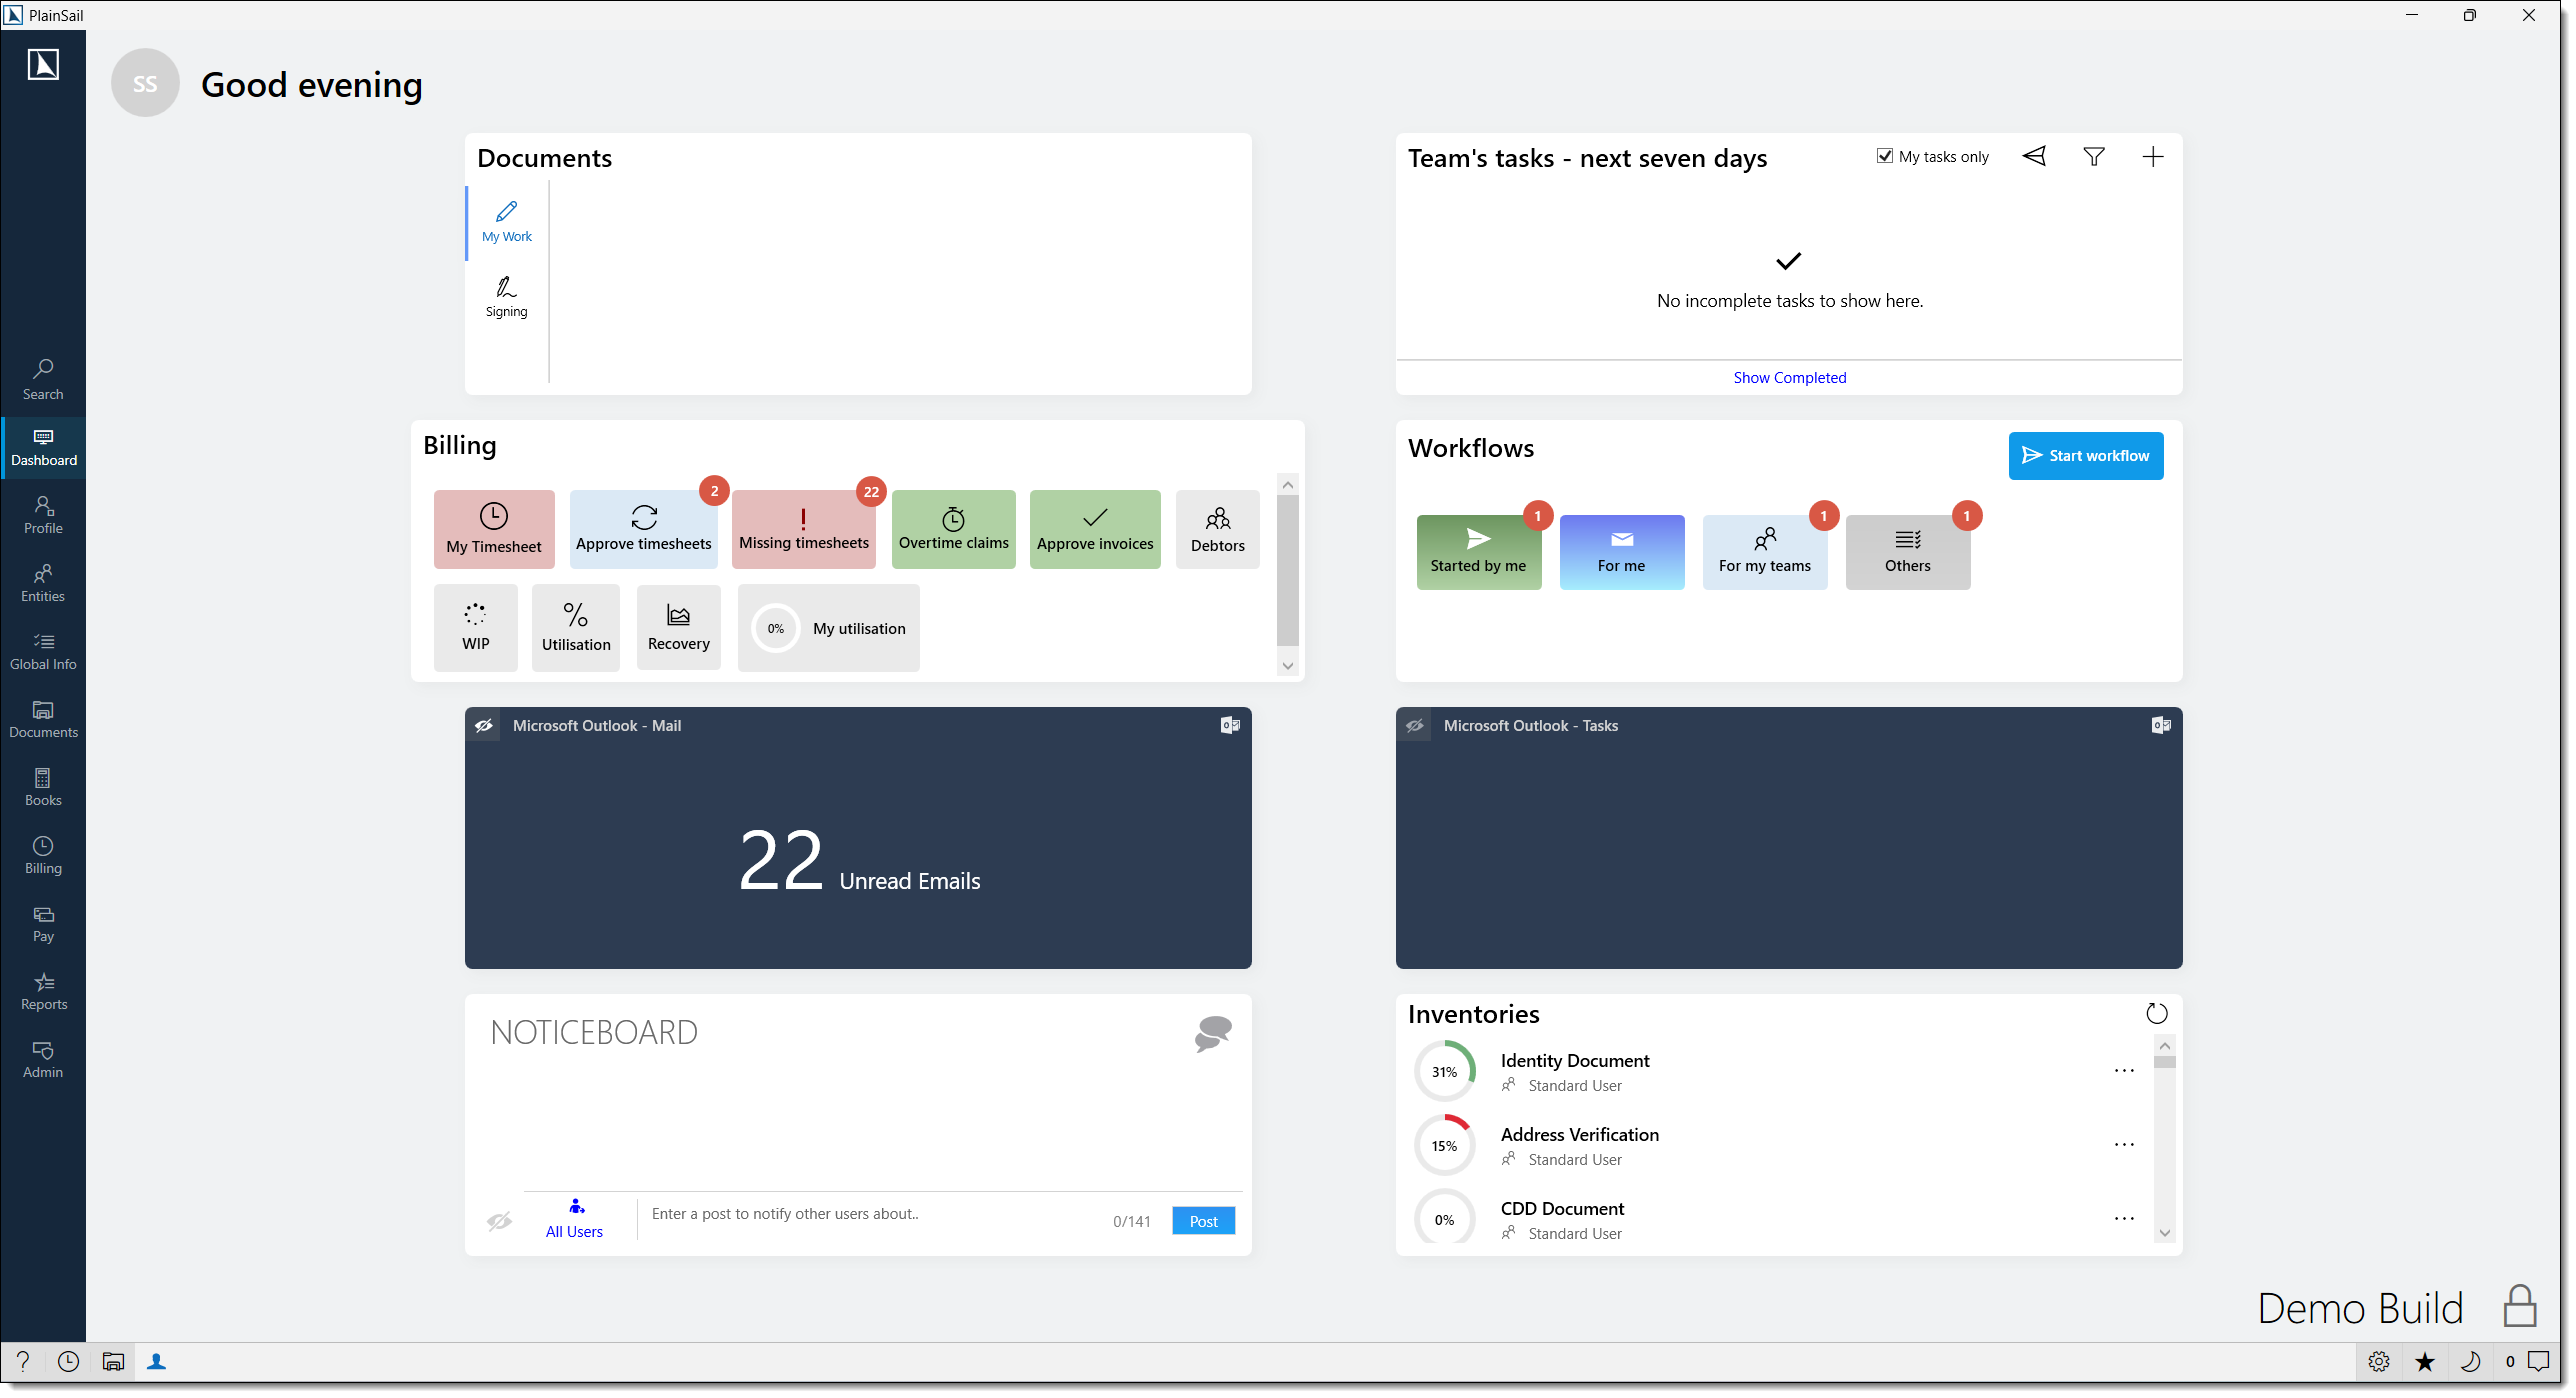
The Dashboard is the home screen of PlainSail. Displayed when you first log in, it serves as a personalised overview of your daily work, communications, tasks, approvals, and key metrics.
The dashboard is composed of widgets – self-contained panels that each display specific information or provide quick access to a particular area. You can customise which widgets appear, rearrange them, and set a personalised background image.
From the Dashboard you can:
- Monitor tasks, workflows, timesheets, documents, inventory items, and messages at a glance
- Interact with Outlook mail, calendar, and tasks (if integration is enabled)
- Post and read noticeboard messages visible to other users
- Launch workflows directly from the workflow widget
- Access quick reports for billing, debtors, WIP, and utilisation
- Use the Notification Centre for real-time alerts and system messages
Dashboard Layout
Return to the dashboard at any time by selecting Dashboard from the main navigation ribbon.

Screen areas
- Header – your profile picture (or initials), a time-of-day greeting ("Good morning/afternoon/evening, [Name]"), and the company name
- Widget grid – a 2-column grid in the centre of the screen. In collapsed/scrollable mode, widgets stack vertically in a single column.
- Footer – company name or logo on the left, customisation controls on the right. During holidays, a themed message replaces the logo.
- Notification Centre – a slide-out panel on the right edge for system notifications
Background image
- Upload a custom background – it is displayed behind the widget grid with a semi-transparent dark gradient overlay for readability
- If no custom image is set, the system administrator may configure a default for all users
- During the Christmas period (16–27 December), a winter-themed background is shown automatically if no custom image is set
Holiday & occasion messages
The dashboard automatically displays special greetings:
- Christmas (16–27 Dec) – "Happy Christmas, [Name], from everybody at PlainSail"
- New Year (1–2 Jan) – "Happy New Year, [Name], we hope you have a great [Year]!"
- Easter (Good Friday) – "Happy Easter, [Name], from everybody at PlainSail"
- Weekend (Friday after 15:00, Saturday, Sunday) – "Have a good weekend, [Name]"
My Day (Tasks) Widget
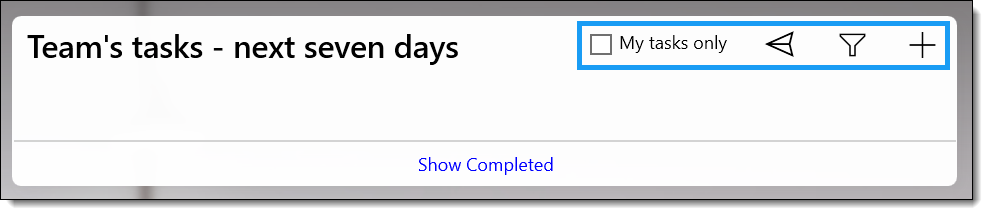
The My Day widget shows tasks due within a configurable number of days, giving you a clear view of what needs attention.
Header controls
- My tasks only – ticked by default; untick to see your entire team's workload
- Created by me – toggle (plane icon) to switch to tasks you created, regardless of assignee
- Filter – change the lookahead period (1–3,000 days). Saved per user.
- Add new – opens the task creation form
Task list
Each task card displays the title, description, comment (italics), due date, priority, assigned user, team, and category. Overdue tasks are highlighted with a red left border.
Quick actions
- Complete – click the circle icon to mark as done (a completion comment is added automatically with your name and date)
- Revert – click the green tick on a completed task to mark it as pending again
- Edit comment – click the note icon to add or update a comment
- Edit task – click the pencil icon to open the editor
- Navigate to entity – click the entity link to jump to that entity's Tasks tab
Noticeboard
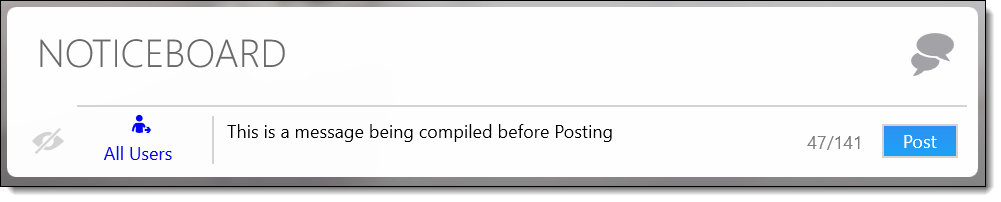
The Noticeboard is an instant messaging-style widget for posting short messages to other users. Messages appear in a chat-bubble format – your messages on the right (blue), others' on the left (grey).
Posting a message
Type your message in the text input at the bottom. Maximum length: 141 characters (a counter shows usage).
Select a recipient – click the recipient area to search for a user or entity. By default, messages go to all users.
Press Post (or Ctrl+Enter) to send. A footer on the message confirms who it was sent to.
If no specific recipient is selected and prior messages exist, a confirmation dialogue asks whether to send to all users or to the most recent sender.
Deleting a message
Click the small "×" on any message – it changes to a DELETE button. Click DELETE to confirm, or press Escape to cancel.
Administrator controls
If you are an administrator, a visibility toggle (eye icon) in the bottom-left allows you to hide the full message list and show only a post count (e.g. "3 Posts"). This setting is saved per user.
Who can post?
Any user can post messages to the Noticeboard widget. Messages can be sent to:
- All users – visible to everyone who has the Noticeboard widget
- A specific user – visible only to the sender and the selected recipient
Who can delete?
- Any user can delete messages from their own view
- Administrators can hide or show the entire Noticeboard using the eye icon toggle
Message persistence
- Messages are stored in the database
- Deleted messages are marked as read and removed from the user’s view, but remain in the database for audit purposes
Inventories Widget
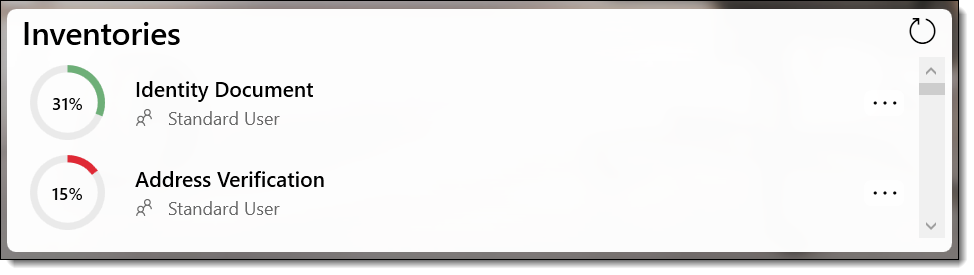
The Inventories widget shows outstanding inventory items assigned to you. Each row displays a circular progress indicator (green when healthy, red when behind), the inventory name, and the assigned user.
Click any row to navigate to the full inventory list filtered for that inventory. A Refresh button and "Last updated" timestamp keep the data current.
Documents Widget
The Documents widget shows documents relevant to you, split into two tabs:
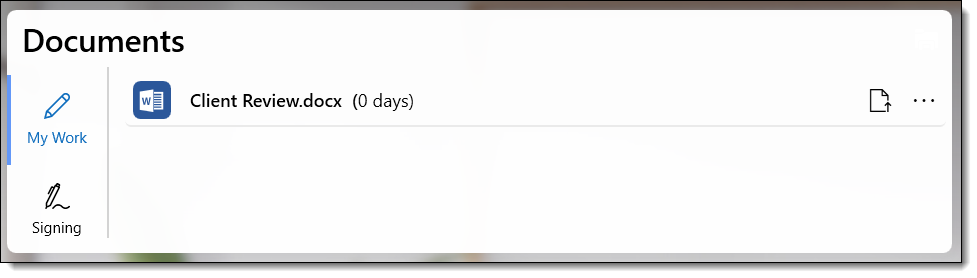
My Work tab
Displays documents you have checked out (currently editing). Click a document to open it from your local cache. If a checked-out file is no longer found at its local path, it is automatically flagged and the check-in process starts.
Signing tab
Displays documents awaiting your approval or signature. Click to navigate to the Document Approvals screen. This tab auto-refreshes when a signing-related notification is received.
Billing Widget
The Billing widget provides a comprehensive overview of your timekeeping and billing responsibilities through a set of colour-coded action tiles.
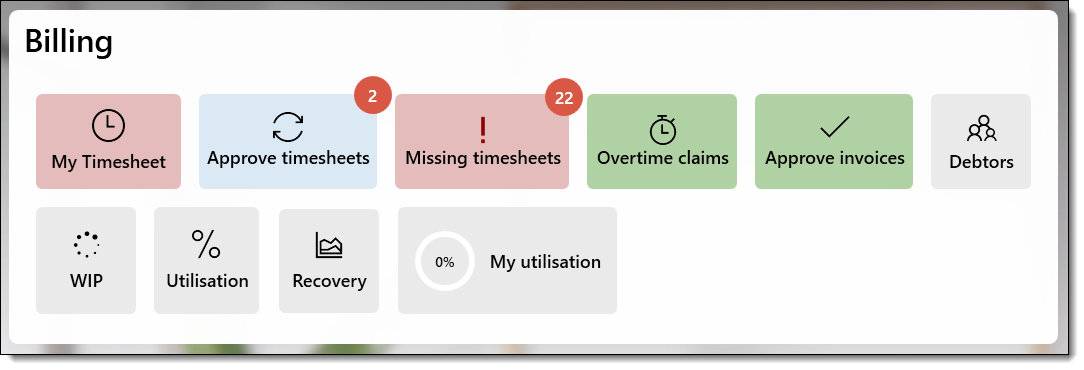
Timesheet tiles
- My Timesheet – opens your weekly timesheet. Colour indicates status: red = no units, blue = some recorded, green = target met
- Approve timesheets – timesheets from your reports ready for approval (red badge shows count)
- Approve days – daily time entries pending month-end approval (visible only when entries exist)
- Missing timesheets – empty or missing timesheets from your reports
- Overtime claims – claims awaiting your approval (turns red when claims exist)
Invoice & reporting tiles
- Approve invoices – count of invoices pending your approval
- Debtors / WIP / Utilisation / Recovery – open the corresponding SSRS report, pre-filtered to your team
- My utilisation – your personal utilisation percentage as a circular progress indicator. Click to view weekly statistics.
Workflow Widget
The Workflow widget shows all workflows relevant to you, grouped into colour-coded summary tiles.
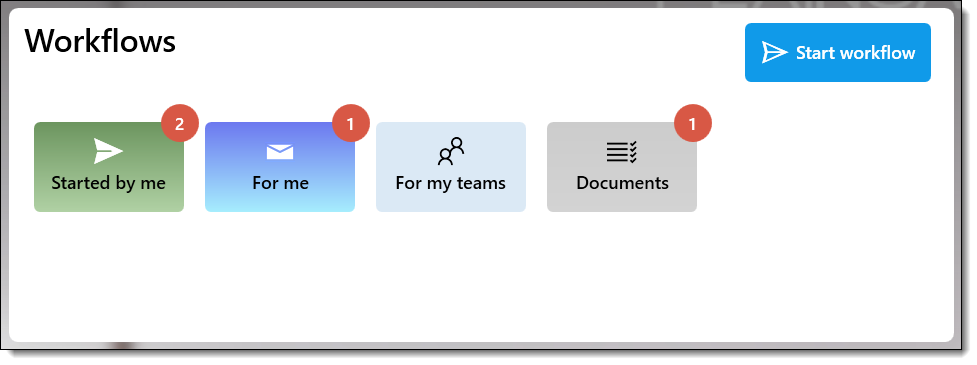
Summary tiles
- Started by me (green) – workflows you initiated
- For me (blue) – steps currently assigned directly to you
- For my teams (orange/blue) – steps assigned to any team you belong to
- [Category name] (grey) – one tile per workflow category showing steps assigned to you or your teams
Working with workflow steps
Click a summary tile to view the list of matching workflow steps.
Click a step to open it in a separate window for completion. If another user has already actioned the step, you'll receive a message.
Completed steps can automatically chain to the next step if it is assigned to the same user.
Starting a new workflow
Click the Start workflow button (blue, with a send icon) to select a workflow template and launch it. Once launched, the first step opens in a new window if applicable.
Outlook Integration
Two widgets connect PlainSail with Microsoft Outlook. Both require a local Outlook installation and the integration to be enabled.

Outlook Mail widget
- Displays up to 10 unread emails and upcoming calendar items (1 day past to 5 days ahead)
- Open – click an email or calendar item to open it in Outlook
- Mark – toggle action mode to reveal Delete and Mark as Read options
- A visibility toggle lets you hide the email list and show only the calendar
Outlook Tasks widget
- Displays up to 4 incomplete tasks due within the next 4 days
- Open – click to open in Outlook
- Complete – mark as done in Outlook
- Remove – delete the task from Outlook
Setup requirements
Microsoft Outlook must be installed locally (desktop version, not web).
The PlainSail Outlook Add-in must be installed (deployed by your IT administrator).
Outlook integration must be enabled in the application settings.
What the integration provides
- Outlook Mail widget – shows up to 10 unread emails from your inbox and calendar events from 1 day past to 5 days ahead
- Outlook Tasks widget – shows up to 4 incomplete tasks due within 4 days
- Email saving – the Outlook Add-in allows you to save emails and attachments directly from Outlook into PlainSail’s document management system, linked to specific entities
Known limitations
- Outlook Web (OWA) is not supported – only the desktop Outlook application
- If Outlook crashes or is busy, the widgets may stop refreshing. Use the manual Refresh button.
- Emails cannot be dragged directly from Outlook into PlainSail’s document library. Use the Add-in or copy/paste to the filing tray.
Customising the Dashboard
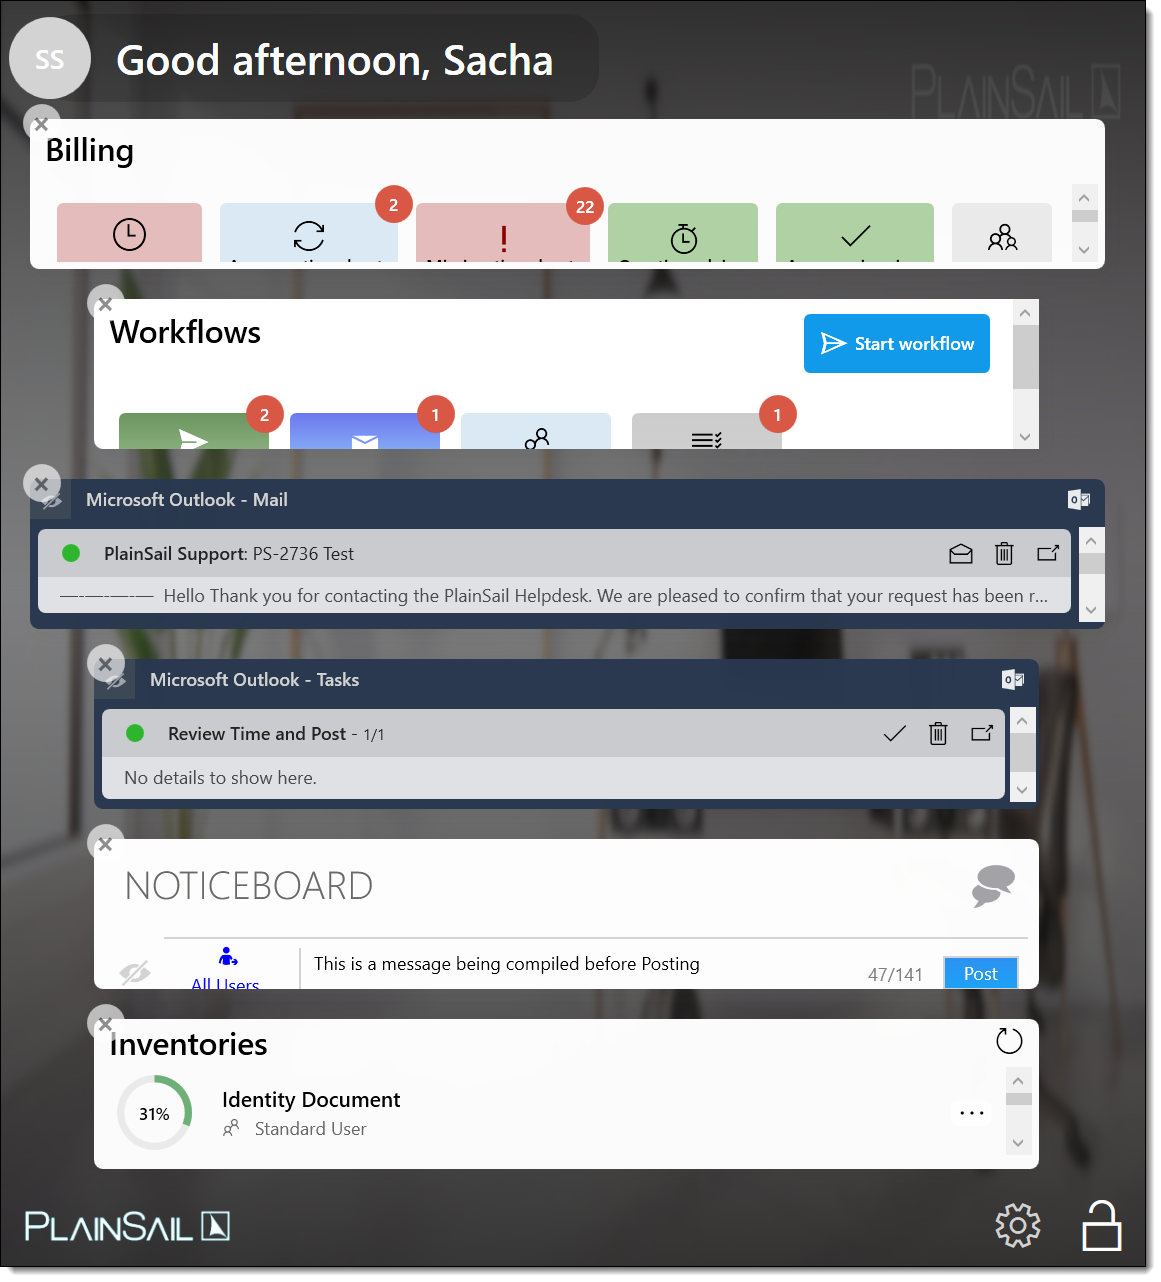
Entering edit mode
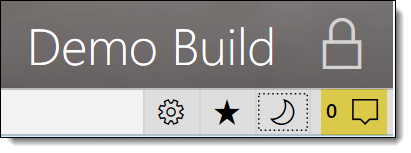
Click the lock icon in the bottom-right corner. The padlock changes to "unlocked".
The background darkens, widgets switch to a single-column layout, and each widget gets an × removal button.
A settings gear icon appears next to the lock icon – click it to open Dashboard Settings.
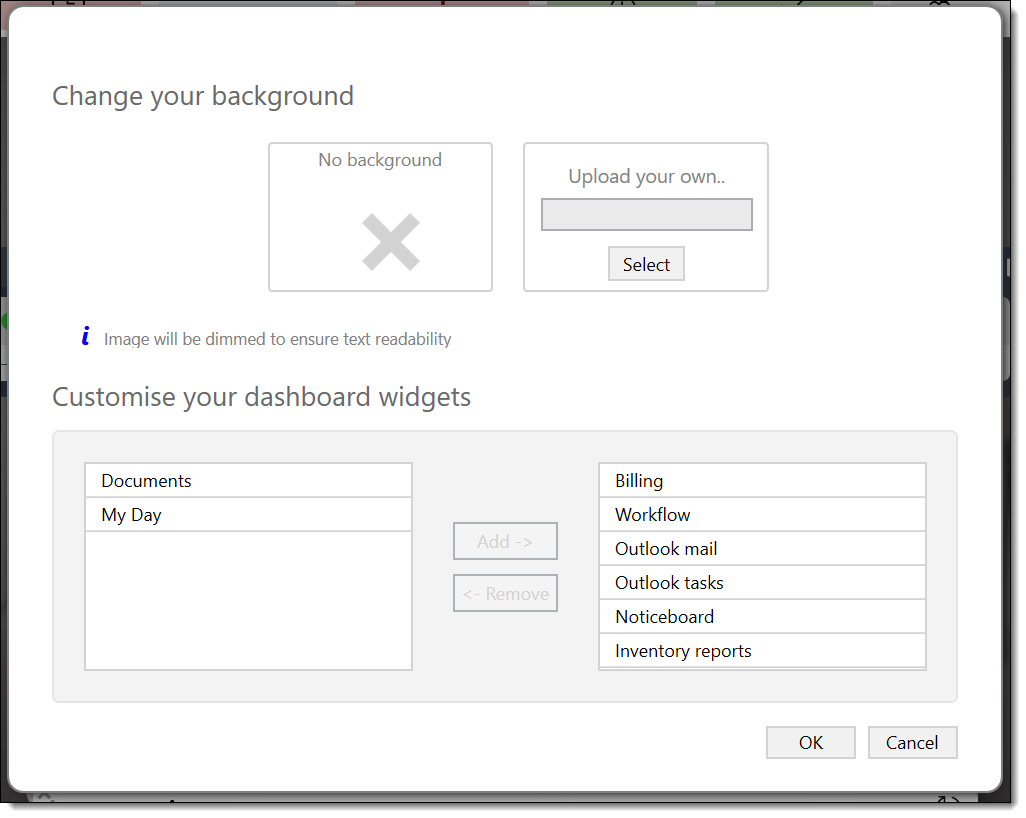
Dashboard Settings panel
The settings panel has two sections:
- Background Image – choose No background (uses admin default) or Upload your own (JPEG, JPG, PNG, BMP, JPE; auto-compressed for display)
- Widget Selection – a dual-list selector with Available Widgets (left) and Selected Widgets (right). Drag between lists to add or remove. The order in "Selected" determines the display order.
Click Save to apply, or Cancel to discard. Then lock the dashboard to exit edit mode.
Locking the dashboard
Click the lock icon, or press Escape or Enter. The arrangement is saved to your user profile and restored at next login.
Adding a widget
Click the lock/unlock icon (bottom-right) to enter edit mode.
Click the settings gear icon that appears.
In the Dashboard Settings panel, find the widget in the Available Widgets list (left).
Move it to the Selected Widgets list (right).
Click Save.
Click the lock icon to exit edit mode.
Removing a widget
Enter edit mode (click the lock icon).
Click the × button on the widget you want to remove.
Lock the dashboard.
Reordering widgets
Enter edit mode.
Open Dashboard Settings (gear icon).
Reorder widgets in the Selected Widgets list.
Click Save.
Resizing widgets
Widgets cannot be individually resized. They fill the available space in a 2-column grid. When the window is narrow, they stack in a single column.
Resetting to defaults
There is no “reset to defaults” button. To restore the default widget set, manually add or remove widgets via Dashboard Settings. Ask your administrator what the default set is.
Dashboard sharing & admin-configured defaults
- Individual dashboards – each user has their own widget configuration. There is no way to share a dashboard layout with another user.
- Admin-configured background – the system administrator can configure a default background image for all users who have not set their own.
- Admin-configured widget set – there is no admin mechanism to force a specific widget set on users. Users with the
Dashboard_ChangeWidgetspermission can customise freely. Users without this permission see the default set and cannot change it.
Widget refresh intervals
All widgets load in parallel to minimise waiting time. There is no automatic periodic refresh – widgets refresh on specific events or manual triggers.
| Widget | Refresh Trigger |
|---|---|
| My Day (Tasks) | On dashboard load; manual refresh button |
| Noticeboard | On dashboard load; automatically after posting a message |
| Inventories | On dashboard load; manual refresh button |
| Documents | On dashboard load; automatically when a signing notification is received |
| Billing | On dashboard load; automatically when a time record is saved for the current week |
| Workflow | On dashboard load; automatically when workflow step assignments change |
| Outlook Mail | On dashboard load; manual refresh button |
| Outlook Tasks | On dashboard load; manual refresh button |
Notification Centre
The Notification Centre is a slide-out panel on the right side of the application, providing real-time alerts grouped by category.
Opening & closing
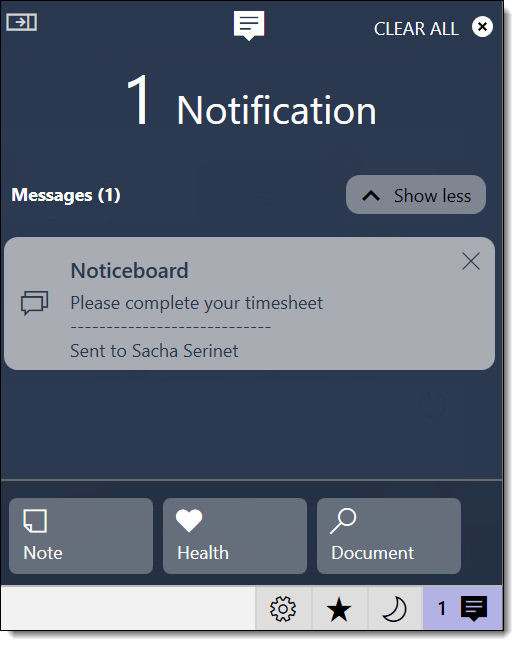
Click the notification bell icon to expand/collapse the panel. The total count of unread notifications is displayed prominently at the top.
Notification groups
- Messages – noticeboard posts, direct messages
- Documents – approvals required, approved/rejected, documents checked out, filing tray
- Inventories – new inventory items created
- Bookkeeping – batch approvals required, rejected, or requiring intervention
- Workflows – workflow steps assigned to you
- Exceptions – system errors (visible to administrators only)
Each group shows its name, item count, and a Show more / Show less toggle. Click a notification to navigate to the relevant screen (e.g. Document Approvals, Inventory List, or the workflow step window).
Clearing notifications
- Individual – click × on a specific notification card
- By group – when a group is collapsed, click × then CONFIRM
- All – click CLEAR ALL at the top, then CONFIRM
- Press Escape at any time to cancel pending deletions
Action bar
Quick-access tools at the bottom of the Notification Centre:
- Back (←) – returns to the previous screen after navigating from a notification
- Note – opens a quick note input
- Health – opens the system health check panel
- Document – opens a document search/viewer by ID
Notification Centre panel icons
The four action bar items at the bottom of the Notification Centre:
| Icon | Name | Action |
|---|---|---|
| Bell | Notifications | Toggles the Notification Centre panel open/closed. The bell icon shows a badge count of unread notifications. |
| Envelope | Messages | Opens the Messages view within the Notification Centre. Shows noticeboard messages and direct messages. Clicking a message navigates to Profile › Messages. |
| Calendar | Agenda | Opens the Agenda view. Shows upcoming calendar events. Clicking an event navigates to the related entity or Profile › Agenda. |
| Checklist | Tasks | Opens the Tasks view. Shows tasks assigned to you that are due soon. Clicking a task navigates to the entity’s Tasks tab or opens the task editor. |
Notification configuration
Notifications are generated automatically by the system – users cannot configure which types of notifications they receive. The notification groups are fixed:
- Messages – noticeboard posts, direct messages
- Documents – approval requests, check-out alerts, filing tray alerts
- Inventories – new inventory items created
- Bookkeeping – batch approval requests, rejections
- Workflows – step assignments
- Exceptions – system errors (administrators only)
Keyboard Shortcuts
| Shortcut | Context | Action |
|---|---|---|
| Ctrl+Enter | Noticeboard message input | Posts the message |
| Escape | Dashboard edit mode | Locks the dashboard (exits edit mode) |
| Escape | Dashboard settings open | Closes the settings panel |
| Escape | Notification Centre | Cancels pending delete confirmations |
| Escape | Noticeboard | Cancels pending message deletions |
| Enter | Dashboard edit mode | Locks the dashboard |
| F5 | Any widget | Triggers a refresh of the widget data (where supported) |
Permissions Reference
The following permissions control access to dashboard features. Permissions are assigned by your system administrator.
| Permission | Description |
|---|---|
Dashboard_ChangeWidgets |
Ability to enter edit mode and customise which widgets are displayed. Without this permission, the lock icon is disabled and the user sees a fixed widget layout. |
GlobalInventories_View |
Required to click inventory items in the Inventories widget and navigate to the global inventory list. |
Billing_EnterTime |
Required for the Billing widget to show the “My Timesheet” tile. |
Billing_HR_ApproveTimeSheets |
Required for the “Approve timesheets” tile to appear in the Billing widget. |
Billing_ViewDebtors |
Required for the “Debtors” report tile in the Billing widget. |
Billing_WIP_View |
Required for the “WIP” report tile in the Billing widget. |
Documents_View |
Required for the Documents widget to be available. |
FAQ
How do I reset my dashboard to the default layout?
Enter edit mode (unlock the dashboard), open Dashboard Settings, move all widgets from "Selected" to "Available", then move back the ones you want. Choose No background to revert to the admin default. Save and lock.
Why can't I see the Outlook widgets?
The Outlook Mail and Outlook Tasks widgets require a local installation of Microsoft Outlook and the integration must be enabled in the system configuration. They do not work with web-based email. If Outlook is installed but the widgets still don't appear, check that they are included in your selected widgets via Dashboard Settings.
Why is my dashboard background entirely red?
A red background with a "WARNING – TEST SYSTEM" banner means you are connected to a test or UAT environment. Switch to the production system for live work.
Can I send a noticeboard message to multiple specific users?
No. You can send to all users or to a single selected recipient. There is no multi-select option for noticeboard recipients.
What's the maximum number of widgets I can add?
There is no enforced maximum, but adding many widgets may reduce readability due to the fixed 2-column grid layout. Select only the widgets most relevant to your role.
Why are some billing tiles missing?
The billing widget's report tiles (Debtors, WIP, Utilisation, Recovery) depend on SSRS reports being correctly installed and configured. Tiles like "Approve days" only appear when entries exist. If a report fails to load, contact your system administrator.
How far ahead does the Outlook Calendar show?
The calendar displays items from 1 day in the past to 5 days in the future. Click any calendar item to open it in Outlook.
Can two users open the same workflow step at the same time?
No. If another user has already opened or actioned the step, you receive a message. The workflow widget refreshes automatically when step assignments change.
Why is my dashboard empty?
Your dashboard has no widgets selected. If you have the Dashboard_ChangeWidgets permission, click the lock icon to enter edit mode, click the gear icon, and add widgets from the Available list. If you don’t have this permission, contact your administrator.
How do I add or remove widgets?
Enter edit mode (click the lock icon), then click the gear icon to open Dashboard Settings. Move widgets between the Available and Selected lists, then click Save.
Why don’t I see the Billing or Workflow widget?
These widgets are available to all users but will show empty if you have no relevant data (e.g. no timesheets, no workflow steps assigned to you). The Billing widget’s specific tiles (like “Approve timesheets”) only appear if you have the corresponding role and direct reports.
- Getting Started – logging in, navigation, and first steps
- Billing & Invoicing – details on the Billing widget tiles and timesheet features
- Workflow & Approvals – understanding workflow steps shown in the Workflow widget
Test Yourself
Think you've mastered the Dashboard? Put your knowledge to the test with this quick 10-question quiz. Select the best answer for each question – you'll get instant feedback and a score at the end.