Help Centre
Entities & Client View
The central hub for managing every person, company, trust, foundation, and partnership your firm administers – from creation and profiling through to relationships, tasks, bank accounts, and compliance.
Key points
- An entity can be a person, company, trust, foundation, partnership, bank, or group
- The Profile tab is your starting screen – it shows status, risk, screening, and key widgets
- Use the Quick Sidebar for recently accessed, favourited, and suggested entities
- Creating entities of any type follows a common workflow – select a type, complete fields, then save
- Relationships, tasks, bank accounts, and safe custody items are all managed from dedicated tabs
- Deleting entities with financial data requires a four-eyes approval workflow
Overview
The Client View is the central area of PlainSail for viewing, creating, editing, and managing entities. An entity represents any individual, organisation, or group that your firm administers, interacts with, or needs to record.
PlainSail supports the following entity types:
- Person – an individual (natural person)
- Corporate Entity – a limited company or corporate body
- Trust – a trust arrangement
- Foundation – a foundation entity
- Partnership – a general, limited, or other partnership
- Bank – a banking institution
- Entity Group – a logical grouping of other entities
- Custom Entity – a configurable entity type
From the Client View, you can browse the full entity list, open profiles to review risk, screening, and relationships, create new entities, manage bank accounts, assign tasks, and access the accounting, billing, and document tabs. This module is used daily by administrators, managers, bookkeepers, and compliance staff.
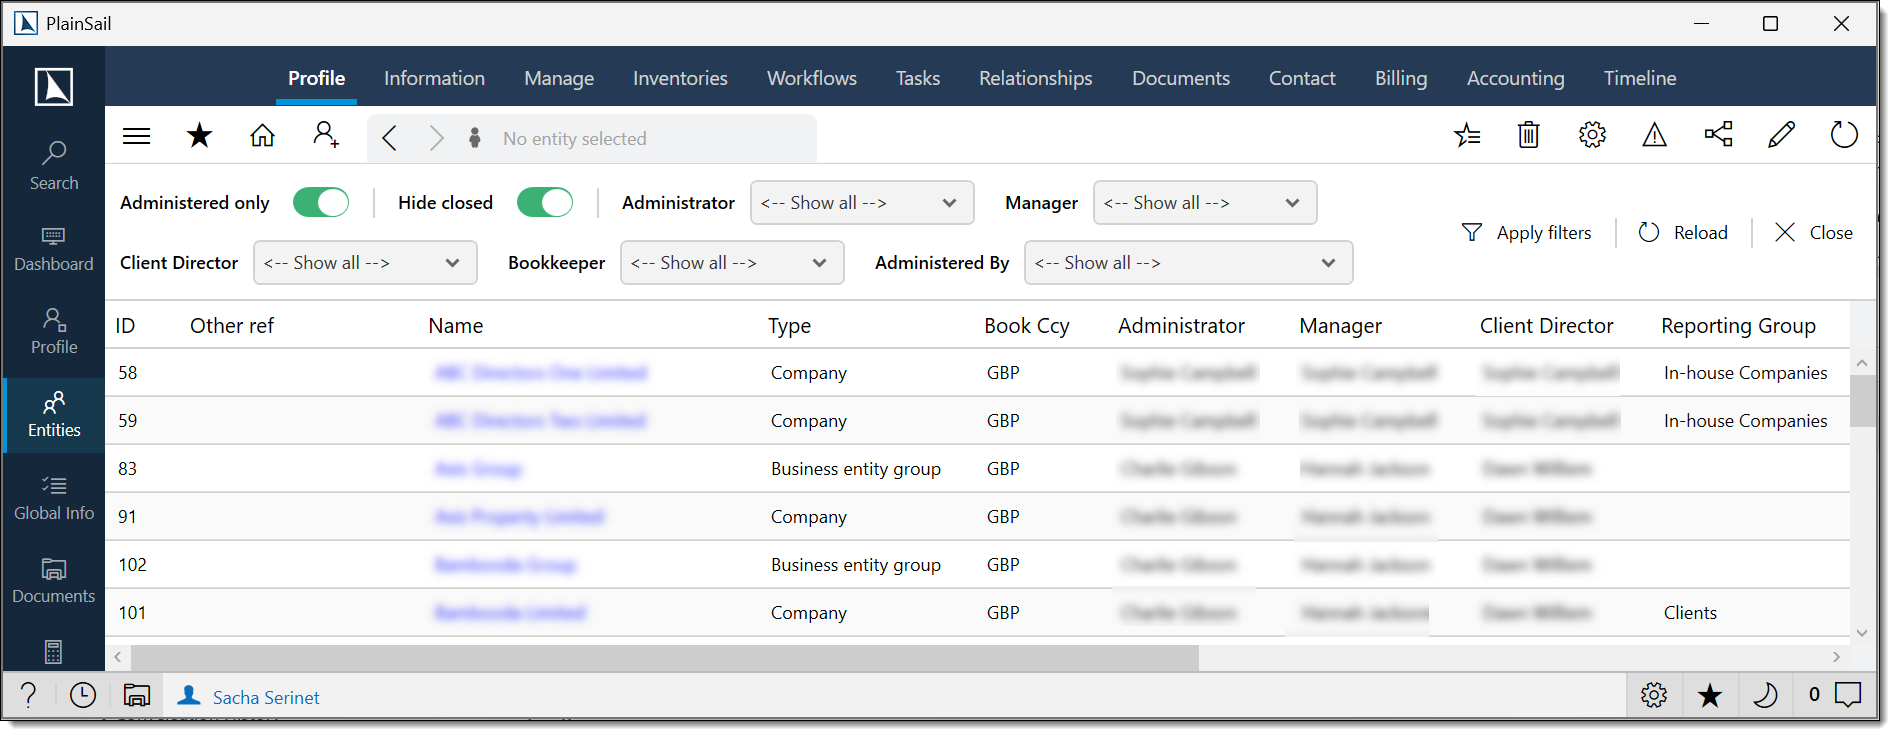
Entity List & Filtering
The List All Entities screen displays every entity available to you in a filterable grid. You must select an entity before any entity-specific tab will display data.

Filter controls
The toolbar at the top of the grid provides powerful filtering:
- Administered only – toggle to show only entities marked as administered
- Hide closed – toggle to exclude entities with a "Closed" status
- Administrator / Manager / Client Director / Bookkeeper – drop-downs that filter by the assigned responsible party
- Administered By – filter by the organisation that administers the entity
- Apply Filters – applies the selected criteria to the grid
- Reload – reloads all entity data from the database and reapplies filters
Grid columns
The entity grid displays the following columns. Results are sorted alphabetically by entity name after filters are applied:
- ID – unique system identifier
- Other ref – optional legacy or external reference number
- Name – clickable link that navigates to the entity profile
- Type – Person, Corporate Entity, Trust, Foundation, Partnership, Bank, Group, or Custom
- Book Ccy – the entity's base (book) currency
- Administrator / Manager / Client Director / Bookkeeper – assigned responsible parties
- Reporting Group – the entity's reporting group
- Risk Rating / Risk Score – the risk classification and numeric score
- Status – Active, Closed, etc.
Quick Entity Sidebar
A sidebar panel is available within the Entities area, providing fast navigation between entities. It contains three sections:
Recently Accessed
Displays the last eight entities you have viewed, ordered by most recent access. Click any entry to navigate directly to that entity. The list is saved automatically when you close the application and restored at next login.
Favourites
Displays entities you have manually marked as favourites, sorted alphabetically. Toggle the favourite status using the action available on the entity profile. Favourites persist across sessions.
Suggested
Displays entities that are related to the currently selected entity. This list refreshes automatically whenever you navigate to a different entity – a useful way to explore an entity's network.
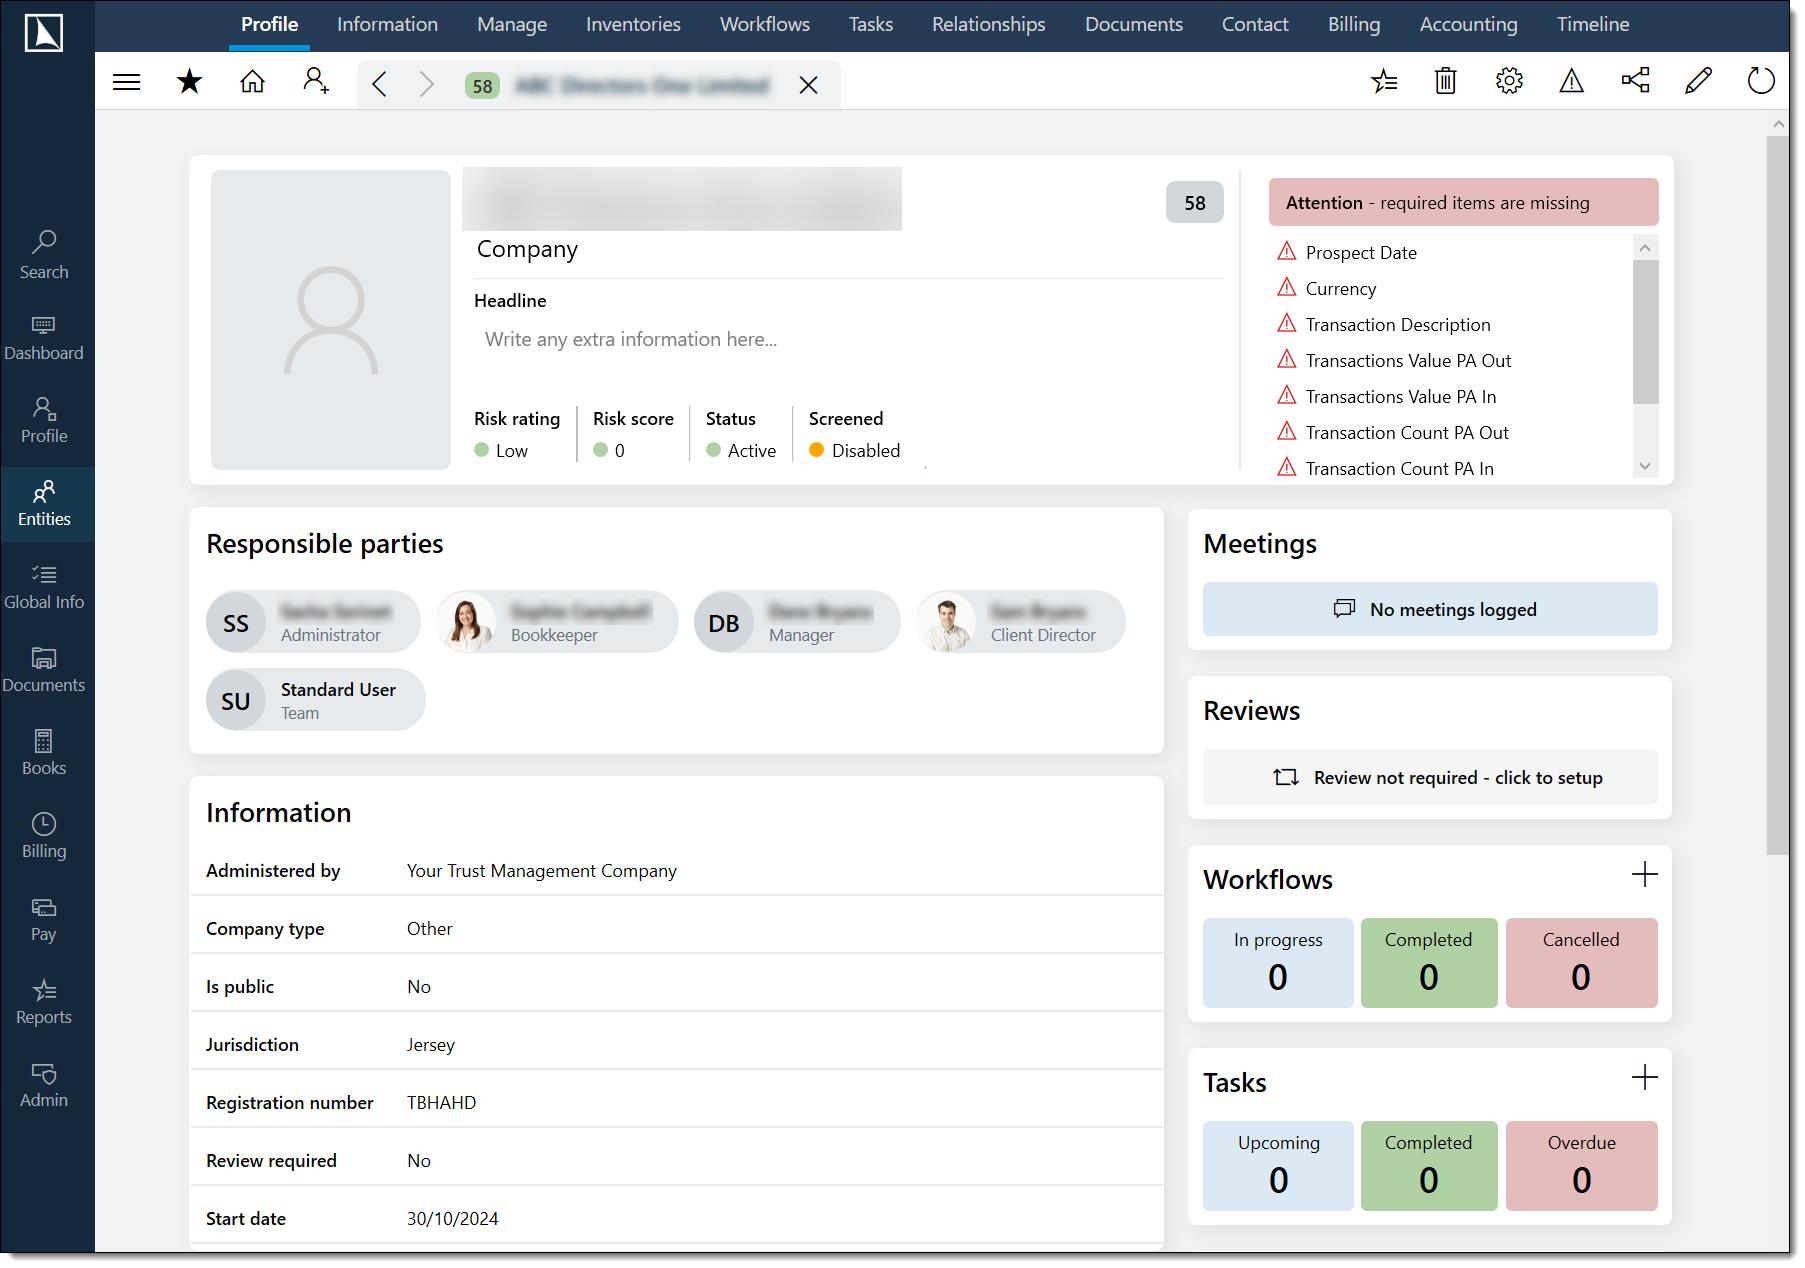
Entity Profile
When you select an entity, the Profile tab is the default view. It's the information hub for the entity, divided into a header area and two columns of widgets.
Header area
The top portion of the profile displays:
- Entity photograph – displayed on the left. Hover to reveal the camera icon for uploading or replacing the image. Right-click to remove it.
- Entity name – displayed prominently in large text
- ID / Reference – a badge showing the system ID and any legacy reference number
- Date of birth – for persons, displayed next to the reference badge with a balloon icon
- Entity type – shown below the name (e.g. "Corporate Entity", "Trust")
- Headline – a free-text field for important notes. Save and Undo buttons appear when you make changes. You must select Save to persist the headline.
Status indicators
Below the headline, the profile displays critical compliance and status information:
- Risk – the entity's risk rating, displayed as a coloured badge
- Entity Status – Active, Closed, or other configured statuses
- Screening Status – green (screened, no issues), orange (not being screened), or red ("WARNING: UNRESOLVED HITS" – click to open the screening portal)
- PEP connections – a red badge appears if the entity has relationships to politically exposed persons. Click to view the list.
- PEP – a separate red badge if the entity itself is classified as a PEP
- Outstanding items – a green tick appears when all required inventory items have been obtained. If items are outstanding, a summary panel displays on the right of the header.
Ribbon actions
The top-right of the Profile tab provides quick-action icon buttons:
- Edit (pencil) – opens the entity editor. Requires Entities Edit permission.
- Structure chart (flow icon) – opens a visual relationship diagram in a separate window
- Warning (triangle) – sets or edits a warning message on the entity. Requires Edit Risk Rating permission.
- Settings (gear) – configures which widgets display and the page layout
- Delete (bin) – initiates entity deletion with confirmation prompts. Requires Entities Edit permission.
Profile Widgets
Below the header, the profile is organised into a left column (information cards) and a right column (activity widgets). Each widget includes a title, an Add new button (where applicable), and a View more link to navigate to the full detail view. Populated widgets are sorted above empty ones.
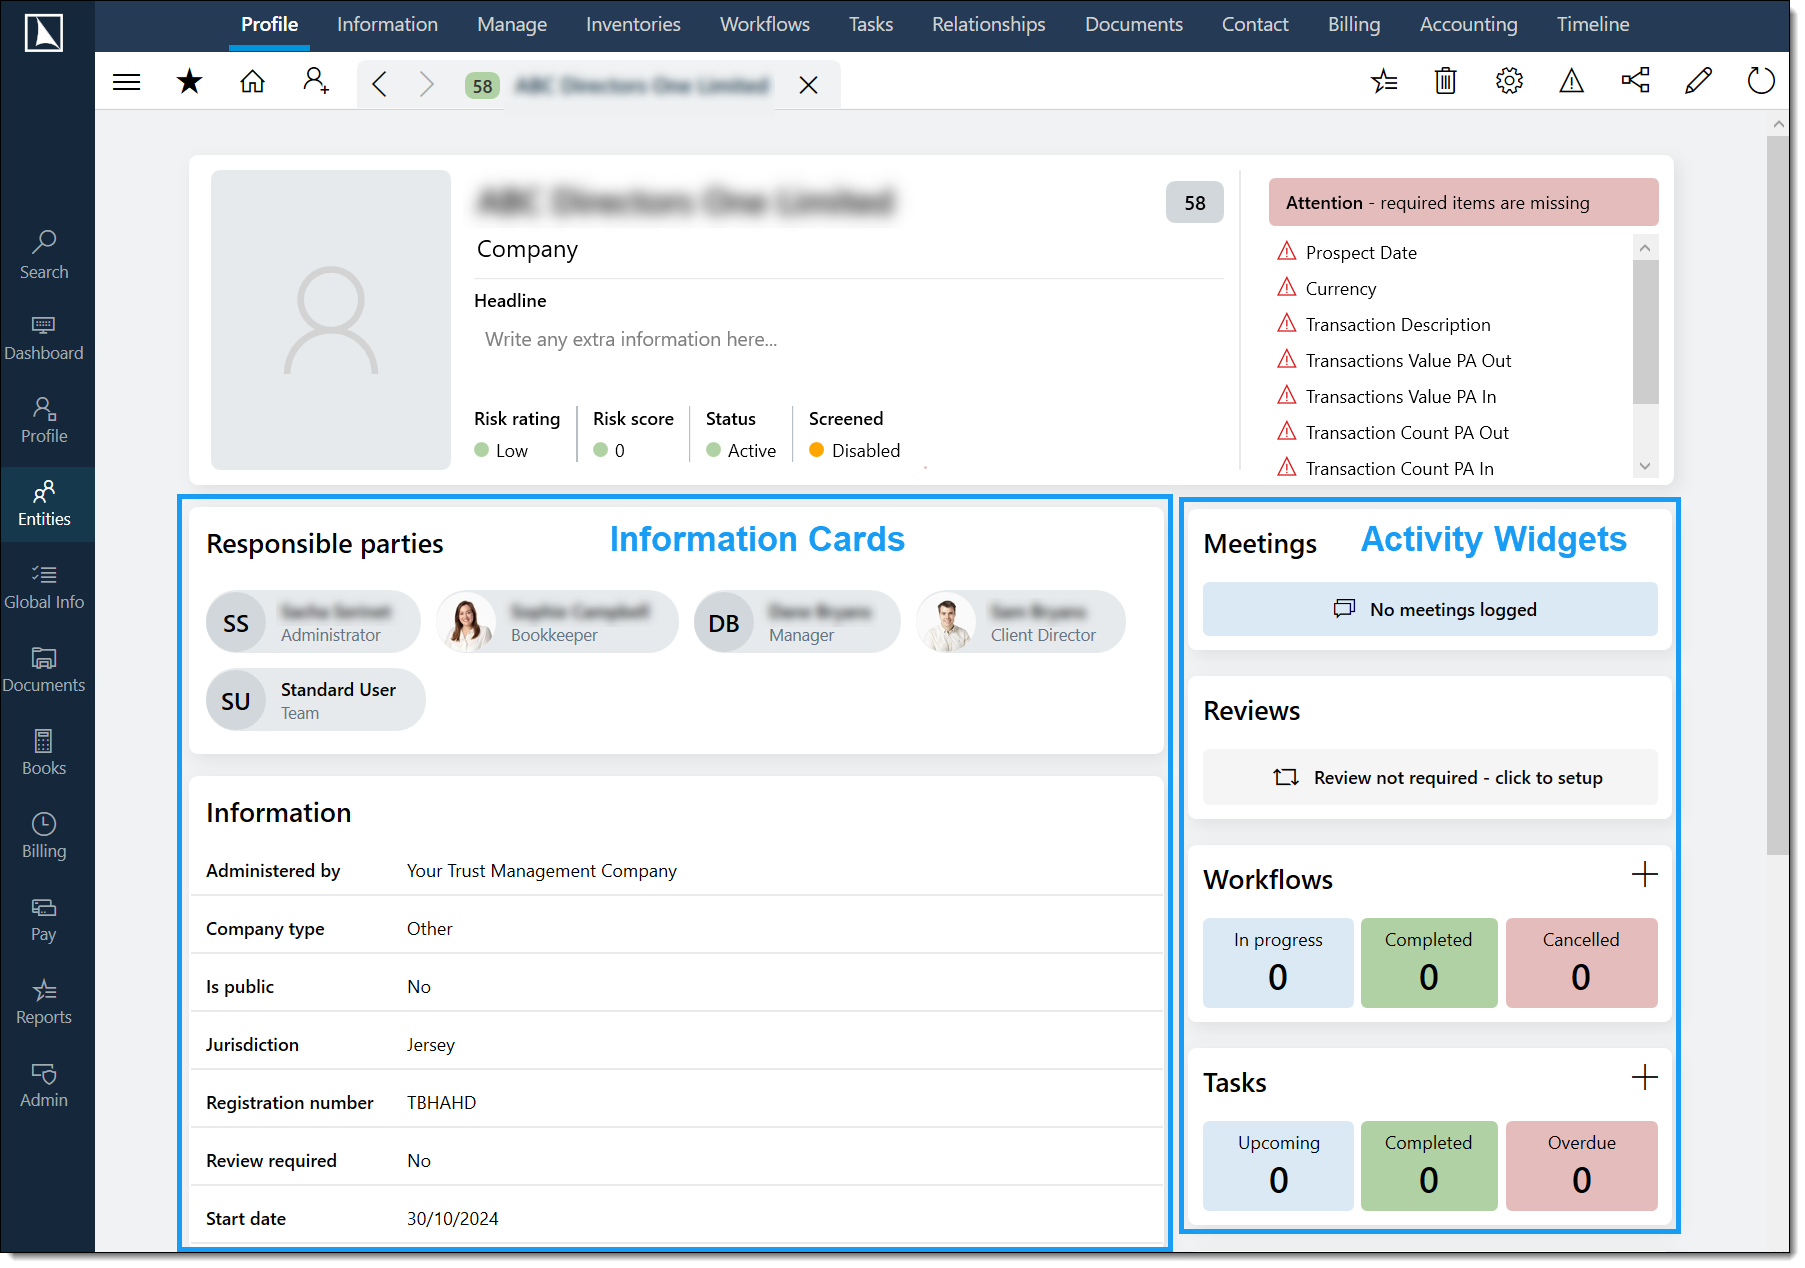
Left column – information cards
- Responsible parties – the administrator, manager, client director, and bookkeeper assigned to the entity
- Information – key entity attributes (jurisdiction, currency, registration number, dates, former names, other nationalities)
- Links – quick navigation links related to the entity
- Custom Profile Page – custom-configured fields set up by your administrator
- Debts – summary of any debts (visible if debts are enabled and you have permission)
- Documents – document shortcuts (visible if document management is enabled)
- Contact – addresses, telephone numbers, and email addresses
- Relationships – summary of the entity's relationships with other entities
- Bank accounts – summary of the entity's bank accounts
- Dates – key dates such as start date, end date, and year-end
- Inventory categories – one widget per configured category, displaying pinned inventory fields
Right column – activity widgets
- Digital onboarding – KYC verification status (if configured)
- Meetings – meeting notes recorded against the entity
- Reviews – review dates for the entity
- Workflows – active workflows linked to the entity (+ button to create new)
- Tasks – tasks assigned to the entity (+ button to create new)
- Groups – entity groups this entity belongs to (edit button to manage membership)
- Latest activity – a feed of recent changes and events (View more opens the full timeline)
- Notes – free-text notes (+ button to add new)
Creating Entities
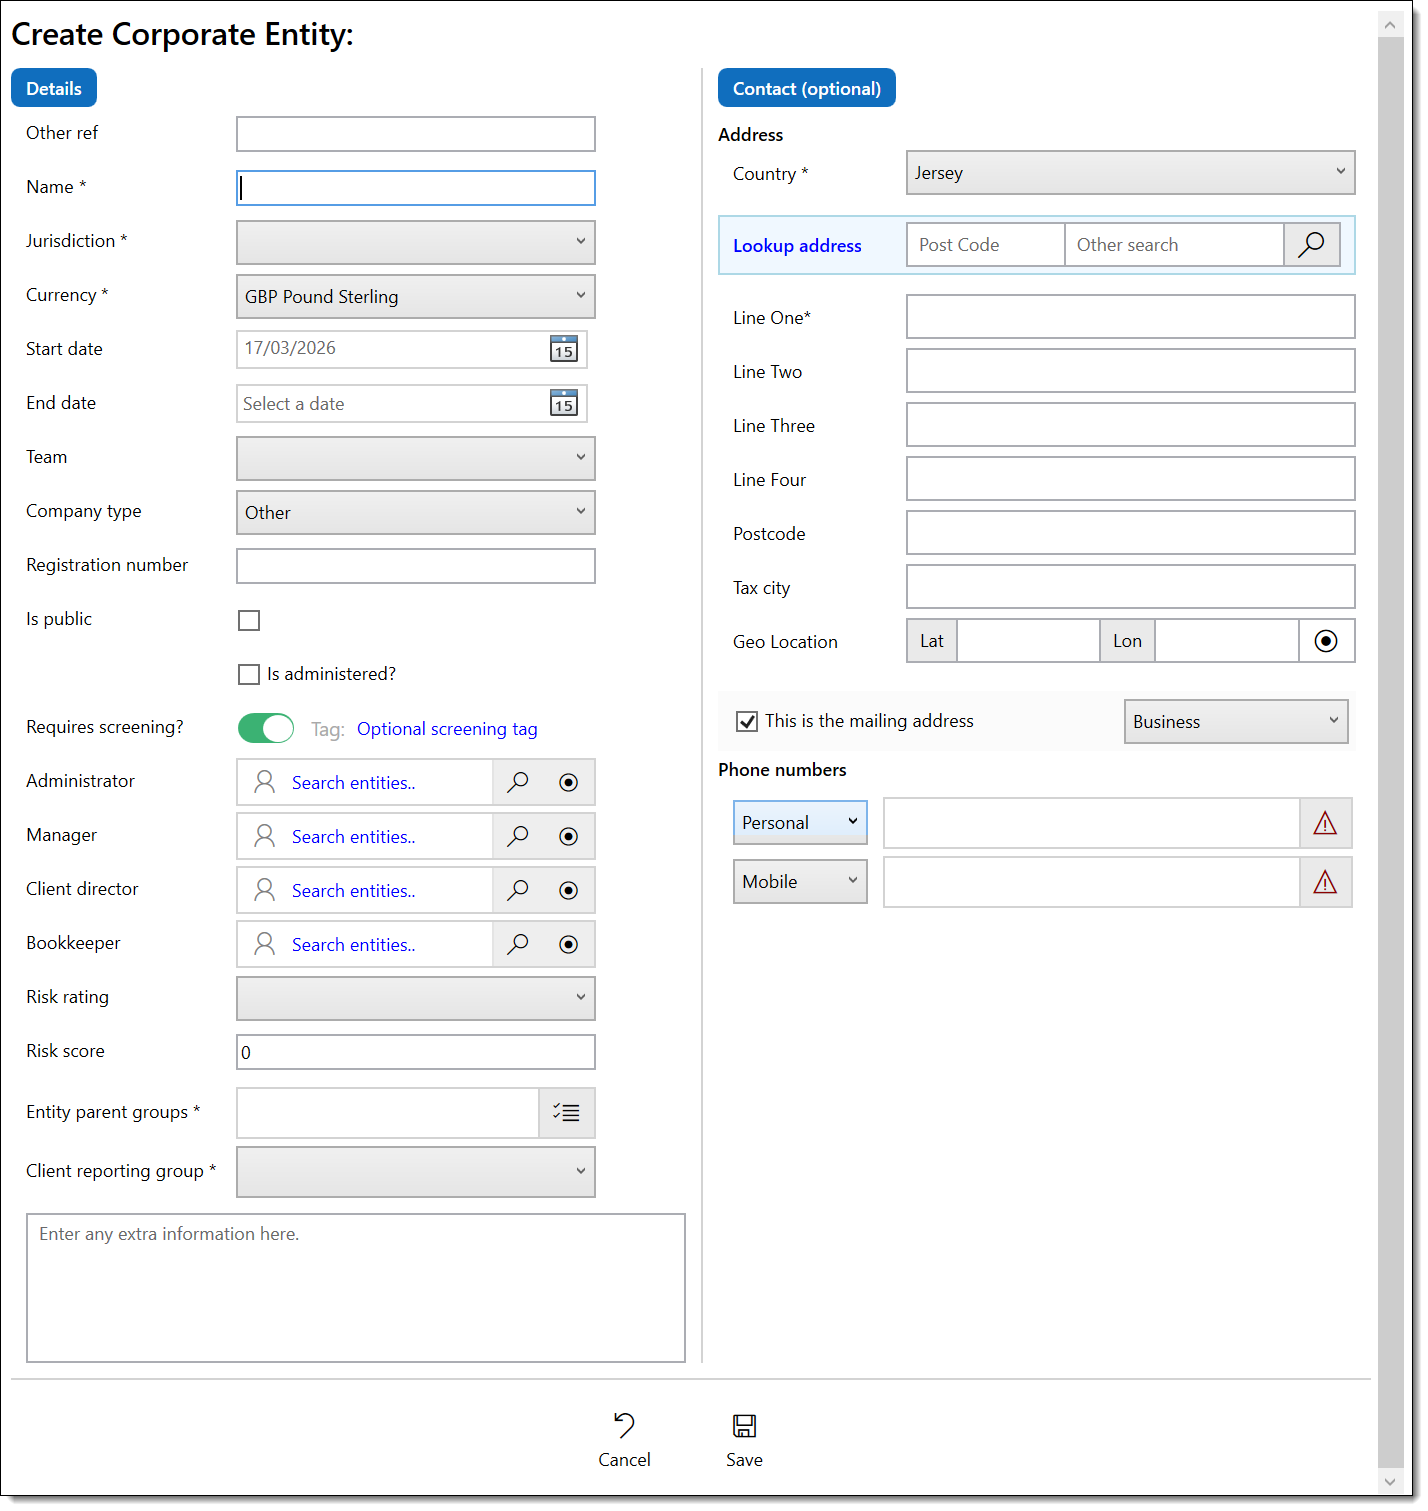
To create an entity, navigate to the Entities area and use the entity creation function from the ribbon. Select the entity type, complete the required fields, and save.
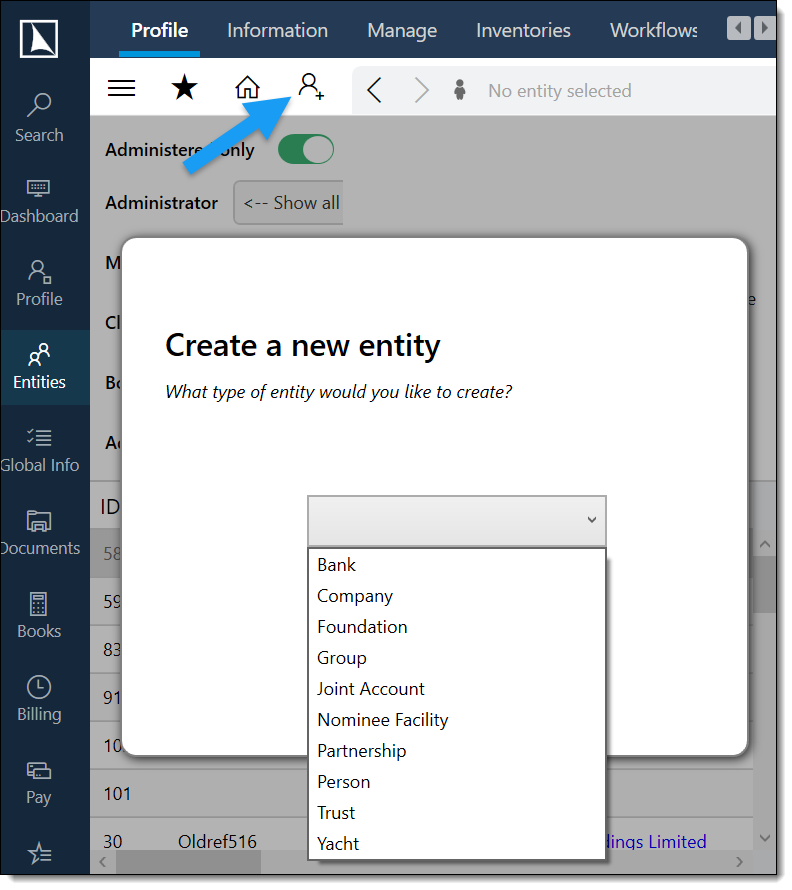
Step-by-step
Navigate to the Entities area and select the create option from the ribbon or navigation controls.
Select the entity type: Person, Corporate Entity, Trust, Foundation, Partnership, Bank, Entity Group, or Custom Entity.
Complete the common fields shared by all entity types (see below).
Complete any type-specific fields (described in the next section).
Optionally configure screening, role assignments, and risk rating.
Select Save to create the entity, or Cancel to discard.
Common fields (all entity types)
- Name (required for most types) – the full legal or registered name. Maximum 500 characters.
- Jurisdiction (conditional) – the legal jurisdiction, required depending on entity type and configuration
- Region – available when the selected jurisdiction has defined regions
- Currency (conditional) – the base (book) currency. Once financial transactions exist, this may become read-only.
- Start date (conditional) – the date of incorporation or commencement
- End date (conditional) – wind-up/cessation date. Requires specific permission and that the entity has no open relationships or accounts.
- Team – the team responsible for the entity
- Other ref – optional legacy or external reference (max 255 characters)
Screening & role assignments
When creating or editing any entity, additional fields are available:
- Requires screening – enables/disables explicit screening. Even if disabled, the entity may still be implicitly screened due to its relationships.
- Administrator / Manager / Client Director / Bookkeeper – assign responsible users
- Risk rating – select from a predefined list (requires Edit Risk Rating permission)
- Risk score – enter a numeric score (requires Edit Risk Rating permission)
Administered entity fields
When the Is Administered checkbox is ticked, additional fields appear for recording administration-specific details such as administered status, administered-by entity, reporting group, and further configured fields. The fields available depend on the entity type and your system configuration.
Entity creation – complete field reference
| Field | Required | Max Length | Notes |
|---|---|---|---|
| Name | Yes (most types) | 500 characters | Full legal or registered name. |
| Jurisdiction | Conditional | – | Required depending on entity type and configuration. |
| Region | No | – | Available when the selected jurisdiction has defined regions. |
| Currency | Conditional | – | Base (book) currency. Read-only once transactions exist. |
| Start Date | Conditional | – | Date of incorporation/commencement. |
| End Date | Conditional | – | Requires Entities_SetEndDate permission. |
| Team | No | – | Responsible team. |
| Other Ref | No | 255 characters | Legacy or external reference number. |
| Is Administered | No | – | When ticked, administered entity fields appear. |
Type-Specific Fields
Each entity type has additional fields beyond the common set. Below is a summary of the most important fields for each type.
Person
- Title – Mr, Mrs, Dr, etc. (max 25 characters)
- First name (required) – max 100 characters
- Middle name – max 255 characters
- Last name (required) – max 100 characters
- Sex (required) – select from a predefined list
- Status (required) – e.g. Alive, Deceased
- Date of birth / Date of death – date of death only visible when status is Deceased
- Occupation – max 255 characters
- Country of birth / Place of birth – select country from list; place is free text
- Nationality (conditional) – plus a link to set other nationalities for saved entities
A link to set former/other names is available for saved person entities. If the person is also a system user, a link to Edit this person as a user appears.
Corporate Entity
- Company type – select from a predefined list
- Registration number – max 100 characters
- Is public – checkbox indicating whether the entity is publicly listed
Trust
- Trust formal name – max 500 characters
Foundation
- Foundation type (required) – select from a predefined list
- Registration number (required) – max 100 characters
- Purpose (required) – max 1,000 characters
Partnership
- Partnership type (required) – select from a predefined list
- Registration number – required when the entity is marked as administered (max 100 characters)
- Is public – checkbox
Bank
- MT940 Header / Footer – only complete if the bank provides data using the MT940 protocol
- Ignore MT940 Headers – tick if the bank sends different headers for different file types (hides header/footer fields)
Entity Group
- Save emails to all members – when enabled, emails saved to the group are saved for all member entities
- Manage members – available for saved groups; drag and drop entities between "in group" and "available" panels
Editing & Photographs
Editing an entity
Navigate to the entity's Profile tab.
Select the Edit button (pencil icon) in the ribbon actions. The edit panel opens as an overlay.
Modify the required fields – the same fields as entity creation are available.
Select Save to apply changes, or Cancel to discard. The profile refreshes automatically.
Uploading or changing a photograph
Hover over the photograph area on the entity's Profile tab. A camera icon appears.
Click the camera icon and select an image file. Accepted formats: JPG, JPEG, BMP, GIF, PNG. Maximum size: 5 MB.
The image uploads and is compressed automatically if it exceeds standard display dimensions. To remove an image, right-click the image area and select Remove image.
You can upload your own photograph if the entity matches your user account. Otherwise, the Entities Edit permission is required.
Four-Eyes Entity Deletion
Deleting an entity requires a four-eyes approval workflow (two users must approve):
Navigate to the entity’s Profile tab.
Click the Delete icon (bin icon) in the ribbon actions.
A confirmation prompt appears: “Are you sure you wish to delete this entity?”
If confirmed, a Delete Entity workflow is launched automatically (using the internal template _Delete Entity).
The workflow creates an approval step assigned to an administrator or a designated approver pool.
The second user reviews the deletion request and either approves or rejects it.
If approved, the entity and all its data are deleted.
If rejected, the entity remains unchanged.
Entities_Edit to initiate deletion and Administrator to approve the deletion workflow step.
Managing Relationships
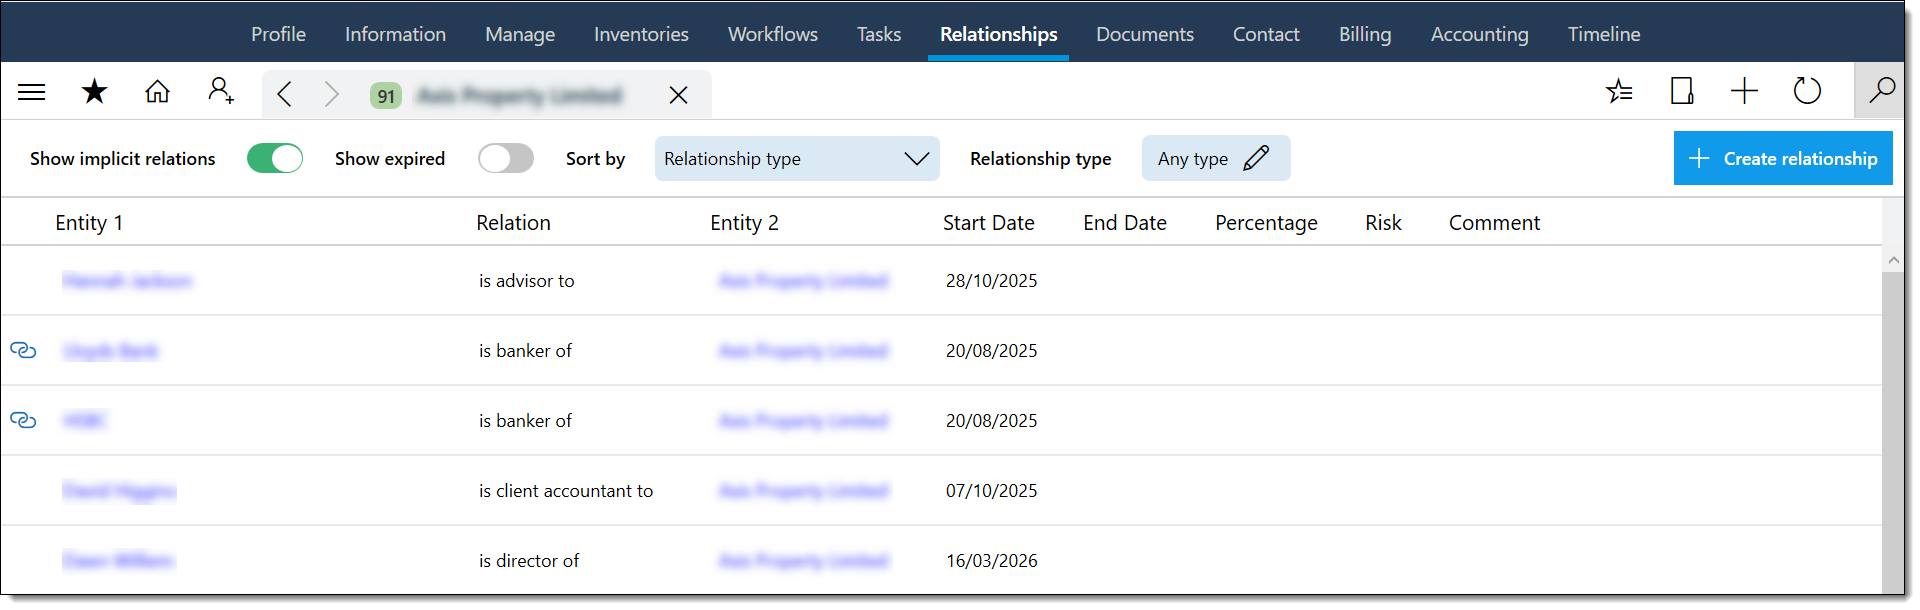
The Relationships tab displays all connections between the selected entity and other entities. Relationships are the backbone of structure charts and compliance reporting.
Toolbar controls
- Show implicit relations – toggle to include inferred relationships (e.g. from share register entries)
- Show expired – toggle to include relationships with an end date in the past
- Sort by – control the display order
- Relationship type – filter by specific relationship types
- Create relationship – opens the creation form (permission required)
Relationship grid
The grid displays Entity 1, relationship type (e.g. "Director of", "Shareholder of"), Entity 2, start date, end date, percentage (for ownership relationships), risk score, and comment. Relationships created in other areas of the system (e.g. through share register entries) are indicated with a link icon and cannot be edited from this screen.
Creating or editing a relationship
The relationship form requires:
- Business Entity 1 and Business Entity 2 (both required)
- Relationship type (required) – e.g. "is Director of", "is Beneficiary of"
- Start Date (required)
- End Date – optional; leave blank for ongoing relationships
- Risk Score (required) – 0 to 999
- Percentage – required if the relationship type has a percentage component (e.g. ownership)
- Comment – free-text notes
A Summary line displays the relationship in natural language (e.g. "John Smith is Director of ABC Ltd"). Select Save to persist, or Send for approval if relationship changes require a workflow approval.
Editing a Relationship
Navigate to the entity’s Relationships tab.
Select the relationship in the grid.
Click Edit or double-click.
Modify the relationship fields (type, start date, end date, notes).
Click Save.
Deleting a Relationship
Select the relationship.
Click Delete.
Confirm the deletion.
Managing Tasks
The Tasks tab lists all tasks for the selected entity. Tasks are displayed as cards showing title, description, due date, priority, assigned user, team, and category.
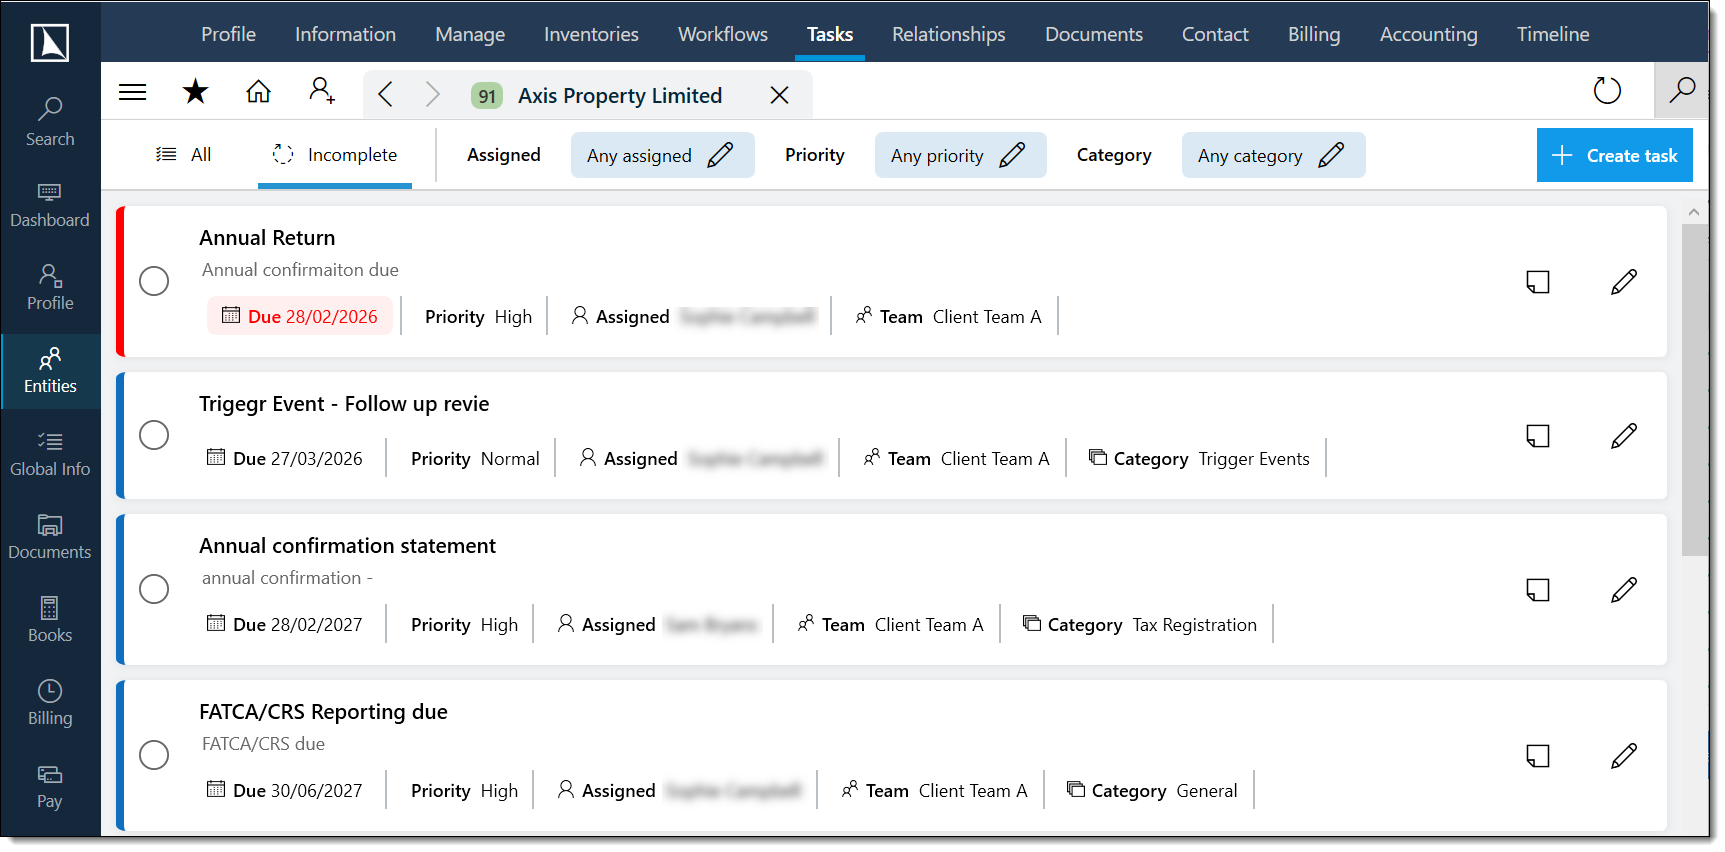
Filtering tasks
- All / Incomplete – switch between all tasks and only outstanding ones
- Assigned / Priority / Category – drop-down filters for more granular views
Working with task cards
- Complete – click the circle icon on the left to mark as completed (green tick). Completed tasks show strikethrough text.
- Note – click the note icon to add or edit a comment (shown in italics)
- Edit – click the pencil icon to modify. Disabled for completed tasks.
Overdue tasks are highlighted in red with a red left border.
Creating a task
The creation form requires:
- Title (required) – a short description of the task
- Entity (required) – pre-populated with the current entity
- Priority (required) – Low, Medium, or High
- Due Date (required)
- Assigned to – optionally assign to a specific user
- Team – optionally assign to a user group
- Category – select a task category
- Description – longer detail about the task
Bank Accounts
The Bank Accounts section (accessible from the Manage tab) lists all bank accounts belonging to the selected entity. You need the Bank Accounts View permission to access this area.
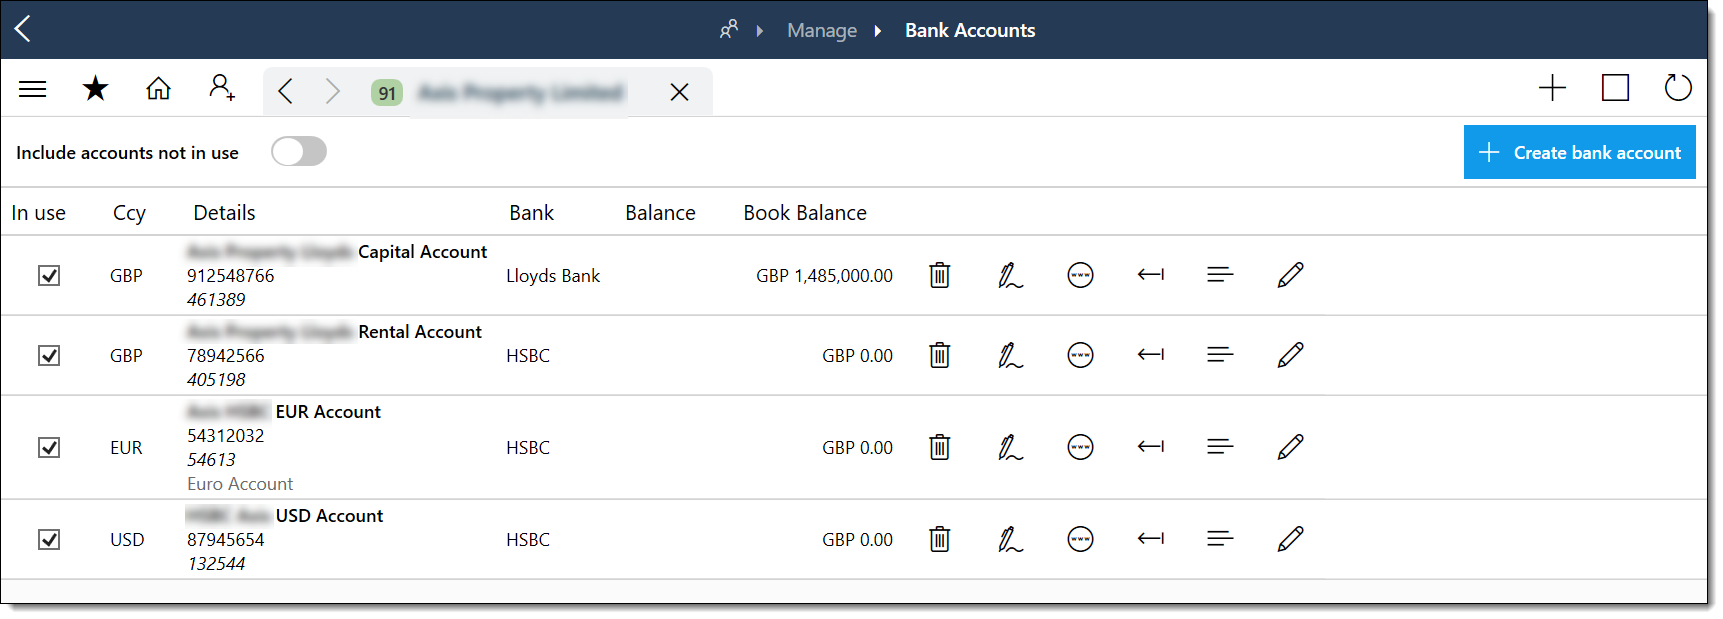
Toolbar
- Include accounts not in use – toggle to show inactive accounts
- Create bank account – opens the creation form (permission required)
Grid columns
- In use – checkbox indicating whether the account is active
- Ccy – account currency code
- Details – account name, code, sort code, IBAN, and description
- Bank – the banking institution
- Balance / Book Balance – cleared balance and book balance with currency
Accounts not in use are highlighted with a pink background. Frozen accounts are highlighted in red.
Row actions
Each bank account row provides icon buttons for:
- Delete – only available if the account is not in use and you have permission
- Signatories – view and manage the signatory list
- Online access – manage online banking credentials
- Import file – import a bank statement file
- Transactions – view the transaction history
- Edit – open the bank account editor
Safe Custody & Shares

Safe custody items
The Safe Custody section lists documents and items held in safe custody for the entity. The grid displays ID, name, folder, type, document date, verification date, expiry date, location, and status.
Status indicators:
- In safe custody – item is securely held
- Checked out – item has been temporarily removed
- Permanently Removed – record retained but item no longer in custody
Available actions for each item:
- Check item in – returns a checked-out item to safe custody
- Check item out temporarily – marks an item as temporarily removed
- Mark as removed – permanently marks the item as removed (record retained)
- Edit – open the editor (disabled for removed items)
- View history – displays the check-in/check-out history
Adding a Safe Custody Item
Safe custody items are managed from the Entities › [Entity] › Manage › Safe Custody tab.
| Field | Required | Description |
|---|---|---|
| Name | Yes | Name of the item held in safe custody. |
| Type | No | Select from predefined safe custody types. |
| Document Date | No | Date of the document or item being held. |
| Verification Date | No | Date the item was verified. |
| Expiry Date | No | Date the item expires (if applicable). |
| Folder | No | A folder reference for organising safe custody items. |
| Location | Yes | Physical storage location of the item. |

Share classes
The Share Classes section (available from the Manage tab) is visible for Corporate Entity and Trust type entities. It allows you to view and manage share classes and issue shares. You need either the Shares View or Shares Issue and Create Classes permission to access this section.
Creating a Share Class
Share classes are managed from the Entities › [Entity] › Manage › Shares tab. You need the Entities_Shares_IssueAndCreateClasses permission to create classes or issue shares.
| Field | Required | Description |
|---|---|---|
| Class Name | Yes | The name of the share class (e.g. “Ordinary A”, “Preference B”). |
| Share Type | Yes | Select from a predefined list (categories: ShareType). |
| Currency | Yes | The currency denomination of the shares. |
| Nominal Value | No | The par value per share. |
| Authorised Shares | No | The total number of shares authorised for this class. |
| Issued Shares | No | The total number of shares currently issued. |
| Voting Rights | No | Description of voting rights attached to this class. |
Issuing Shares
Select a share class.
Click Issue Shares.
Enter the number of shares to issue and the recipient (an entity relationship).
The system updates the issued shares count.
Share Register
The share register shows all issued shares grouped by class, with columns for holder, quantity, date issued, and certificate numbers.
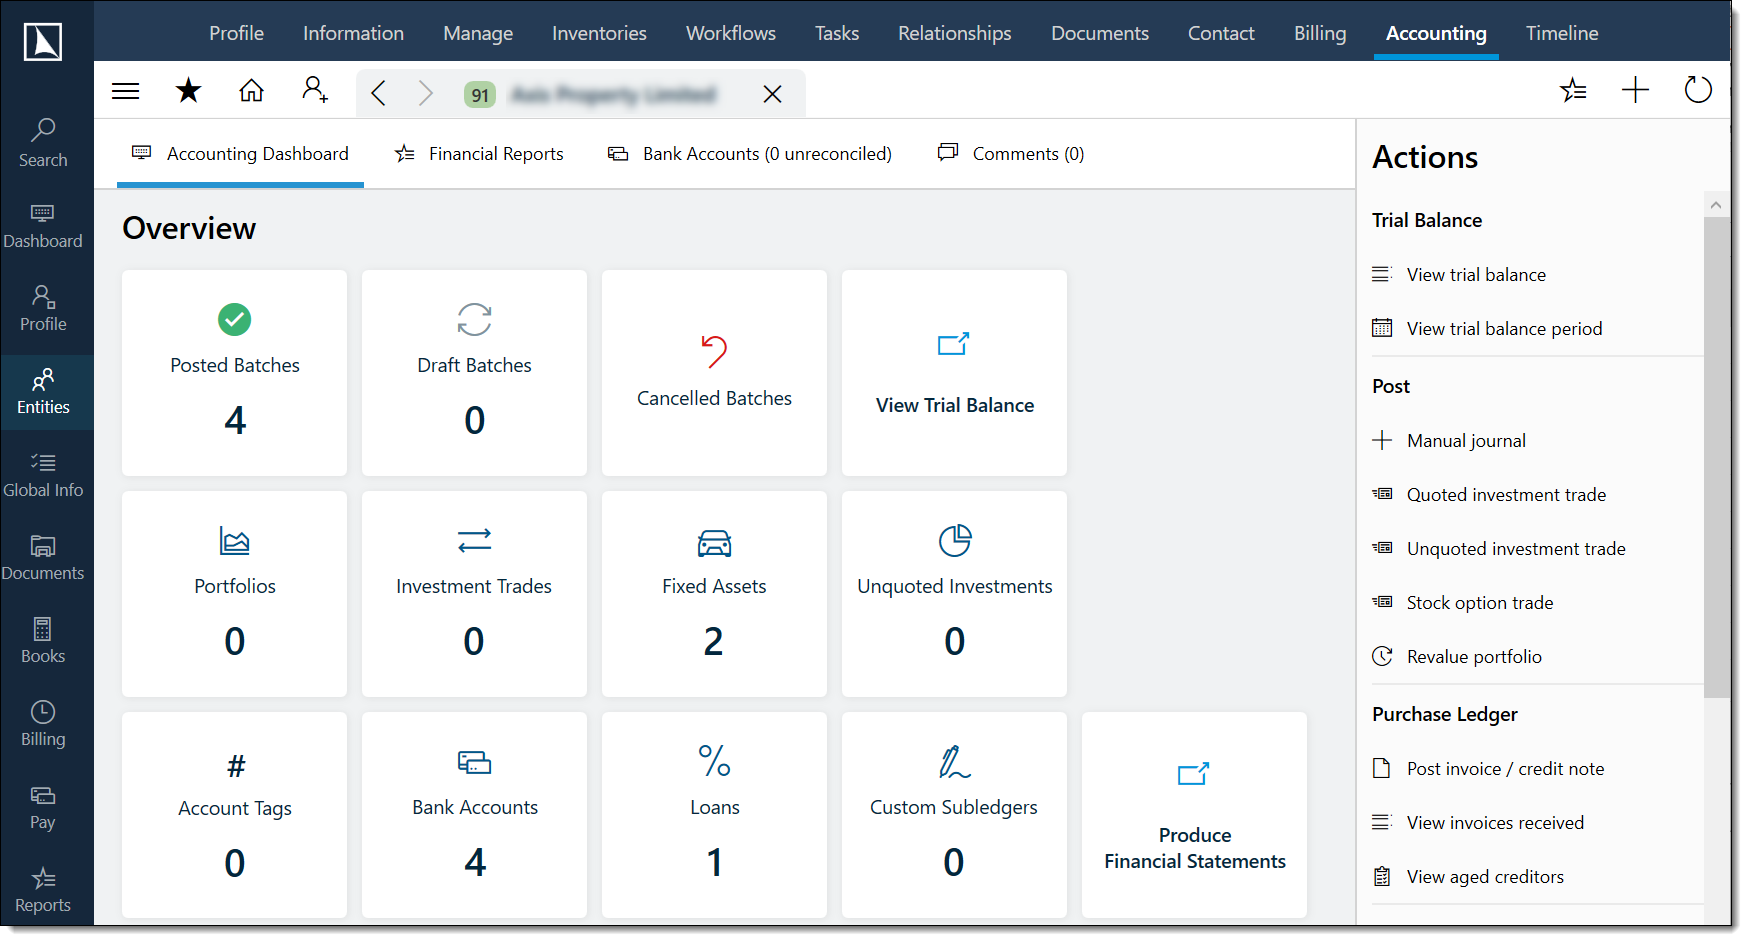
Accounting Tab
The Accounting tab provides access to the entity's financial information. It is divided into sub-views accessible via buttons at the top:
- Accounting Dashboard – overview of financial position
- Financial Reports – access financial statements and reports
- Bank Reconciliation – reconcile bank account transactions
- Notes – accounting-related notes
Initial setup
If a year-end date has not been set, the Accounting tab displays a setup form requiring:
- Base currency – select the entity's book currency
- Bookkeeping start date – the date from which bookkeeping begins (the system closes the year one day before this date)
- Year-end – the day and month of the financial year-end
Actions panel
Once year-end is configured, the actions panel provides access to:
- Trial Balance – view by period or full
- Post – manual journals, quoted/unquoted investment trades, stock option trades, and portfolio revaluation
- Sales Ledger – invoices issued and aged debtors
- Purchase Ledger – post invoices/credit notes, view invoices received and aged creditors
- Closure – lock/unlock periods, manage year-end, change year-end date, FX revaluation, and tax returns
- Account Plan – view and change the entity's chart of accounts
- Subledgers – manage subledger rules
- Imports – import transactions from Excel
Timeline & Structure Charts
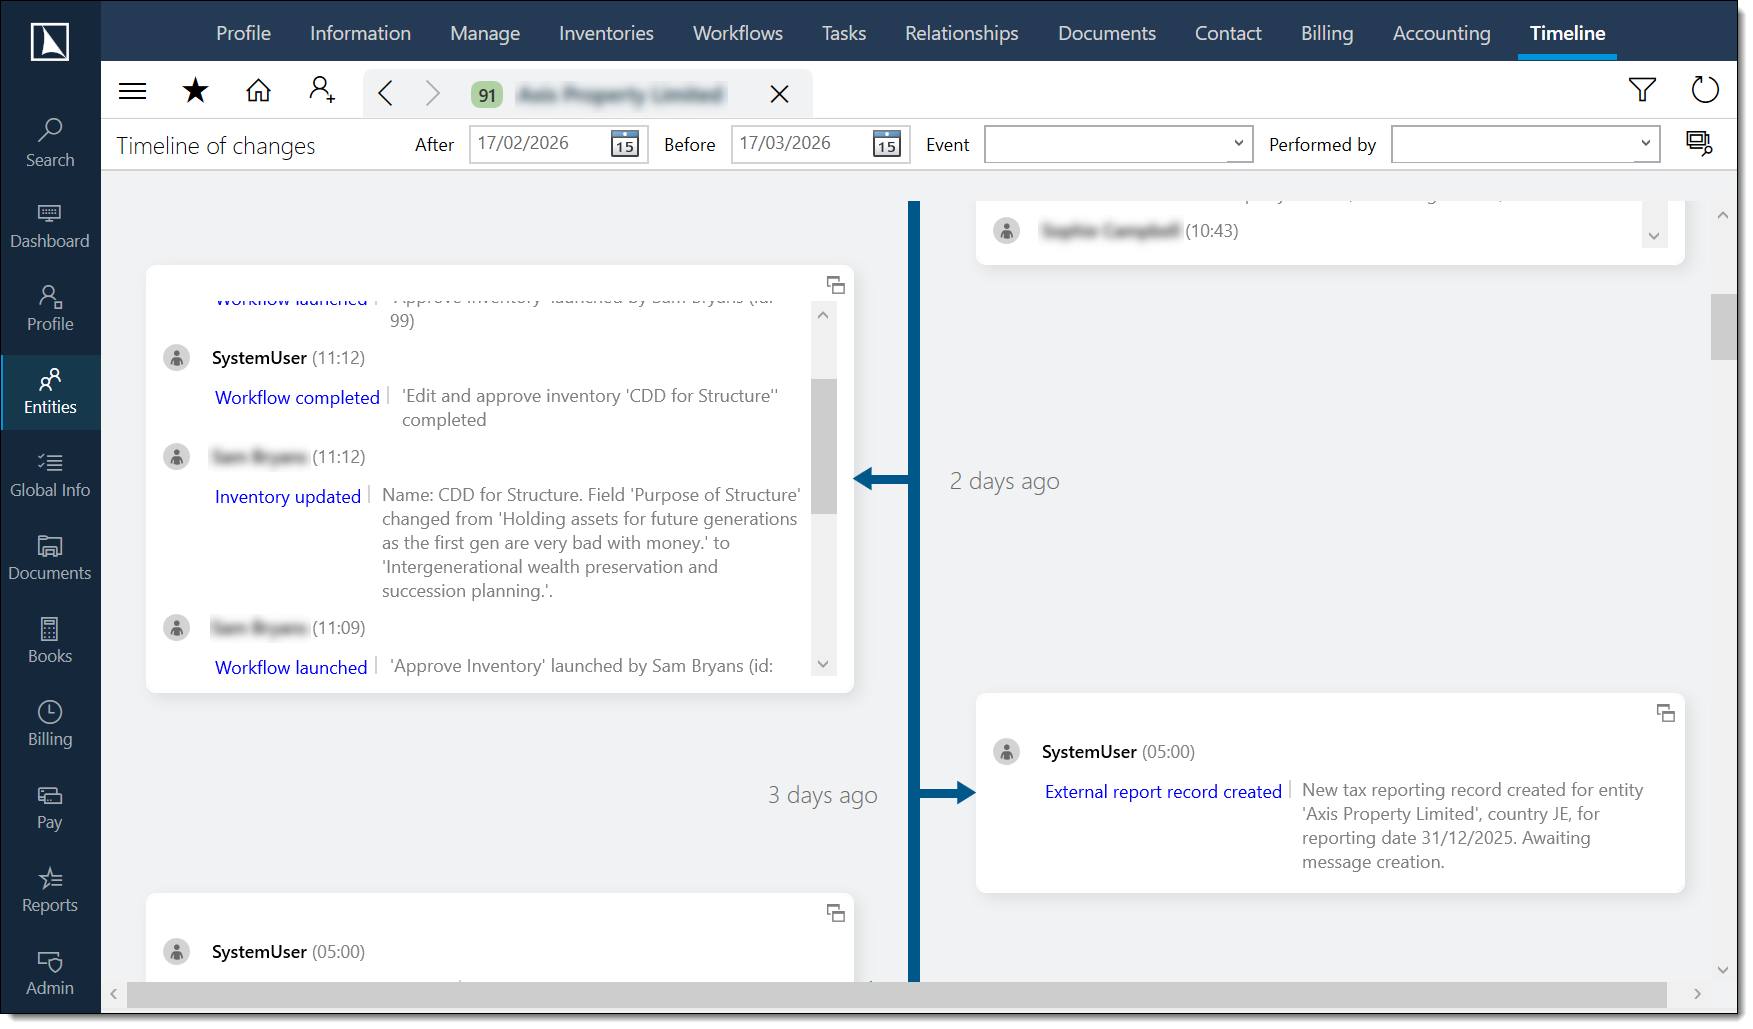
Timeline
The Timeline tab displays a chronological record of all changes and events for the entity, in a tree format grouped by date. Filter the timeline using:
- After / Before – date range filters
- Event – filter by event type (select from drop-down or type to search)
- Performed by – filter by the user who performed the action
Select Search to apply filters and refresh the display.
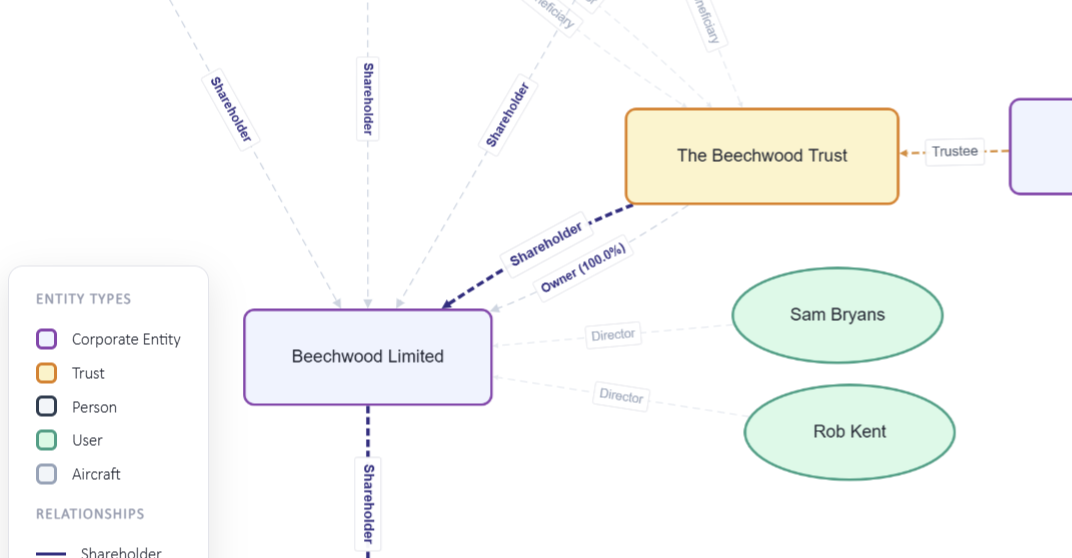
Structure chart
Select the Structure chart icon (flow diagram) from the ribbon actions to open a visual chart of the entity and all its relationships in a separate window. This is invaluable for understanding complex ownership and directorship structures at a glance.
Warning messages
Select the Warning icon (triangle) from the ribbon actions to enter a warning message. When a warning is active, the icon turns blue. Clear the text and save to remove the warning. This requires the Edit Risk Rating permission.
Profile page settings
Select the Settings icon (gear) to configure:
- Which widgets are displayed on the profile page
- Whether to show activity, contacts, summaries, debts, relationships, documents, bank accounts, tasks, and person titles
- The width of the profile page
- Which inventory categories appear as widgets
Settings are saved per user and persist across sessions.
Timeline – what is tracked
The Timeline tab records the following types of changes automatically. You need the Entities_Timeline_View permission to access the timeline.
- Entity profile changes (name, type, status, risk rating, etc.)
- Relationship additions, modifications, and removals
- Document uploads, check-outs, and check-ins
- Inventory launches, completions, and field changes
- Accounting transactions posted against the entity
- Task creation, completion, and assignment changes
- Workflow events
- Contact details changes (addresses, phone numbers, emails)
- Bank account changes
Timeline filtering
Use the date range filter to narrow the timeline to a specific period. Use the category filter to show only specific types of changes (e.g. only document changes). Use the search bar to search for specific text within timeline entries.
Structure Charts – generating
Navigate to the entity’s Profile tab.
Click the Structure chart icon (flow diagram icon) in the top-right ribbon actions.
A new window opens showing the entity at the centre with relationships radiating outward.
Structure Chart features
| Feature | Description |
|---|---|
| Zoom | Use mouse scroll or zoom controls to zoom in/out. |
| Pan | Click and drag on empty space to pan the view. |
| Expand/Collapse | Click a relationship node to expand its own relationships (drill down). |
| Relationship labels | Lines between entities show the relationship type. |
| Entity type icons | Each entity node shows its type (Person, Corporate Entity, etc.) with a distinctive icon. |
Structure charts can be exported or printed from the chart window.
Entity Merging
Merging two entities is available via Admin > Utilities > Merge two entities. This consolidates all data from a source entity into a target entity.
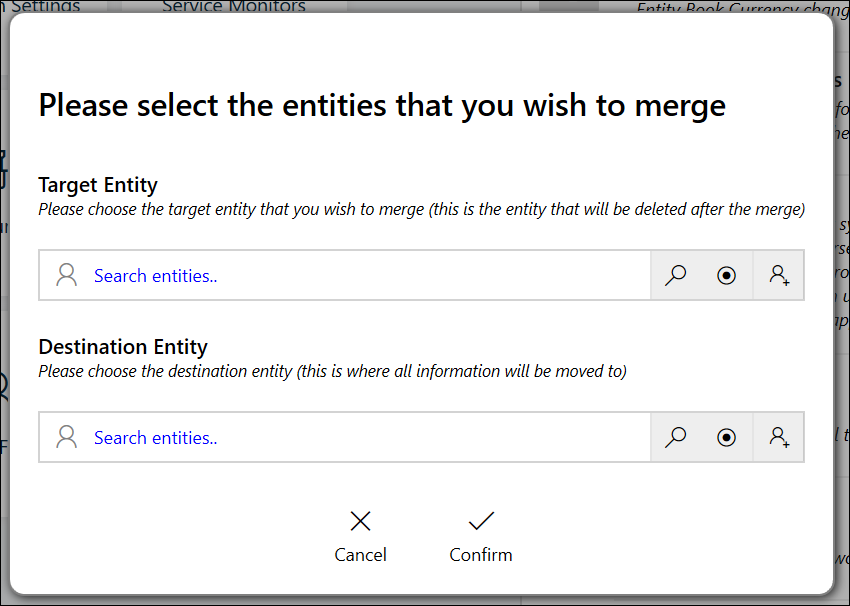
Procedure
Open Admin > Utilities.
Click Merge two entities.
A guided merge popout opens.
Select the source entity – this entity will be absorbed.
Select the target entity – this entity will receive all data from the source.
Review the merge preview showing what will be transferred: documents, relationships, inventories, bank accounts, tasks, workflows, contact details, and accounting data.
Confirm the merge.
The source entity is deleted after all data is transferred to the target.
Administrator or Admin roles to merge entities.
Entity Conversion
Converting an entity changes its type (e.g. Person to Company). This is useful when an entity was created with the wrong type or when the legal structure changes.
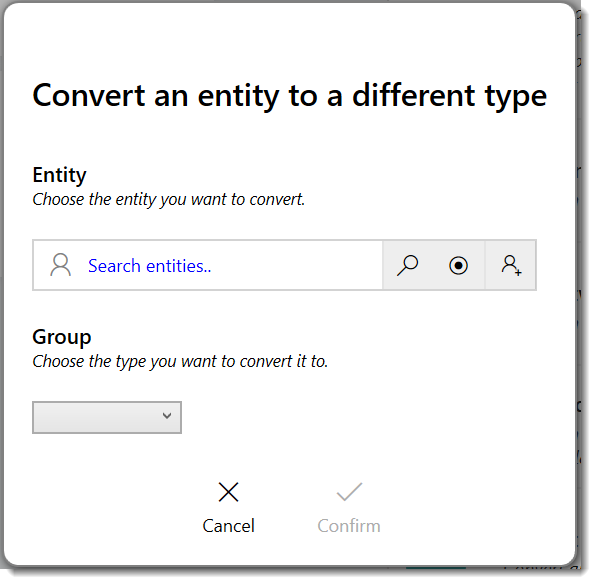
Procedure
Open Admin > Utilities.
Click Convert an entity.
A conversion popout opens.
Select the entity to convert.
Select the new entity type.
Review warnings about data that may not be compatible with the new type.
Confirm the conversion.
Administrator or Admin roles to convert entities.
Archiving & Deactivation
Entities are not “archived” in the traditional sense. Instead, PlainSail provides two mechanisms for marking entities as inactive.
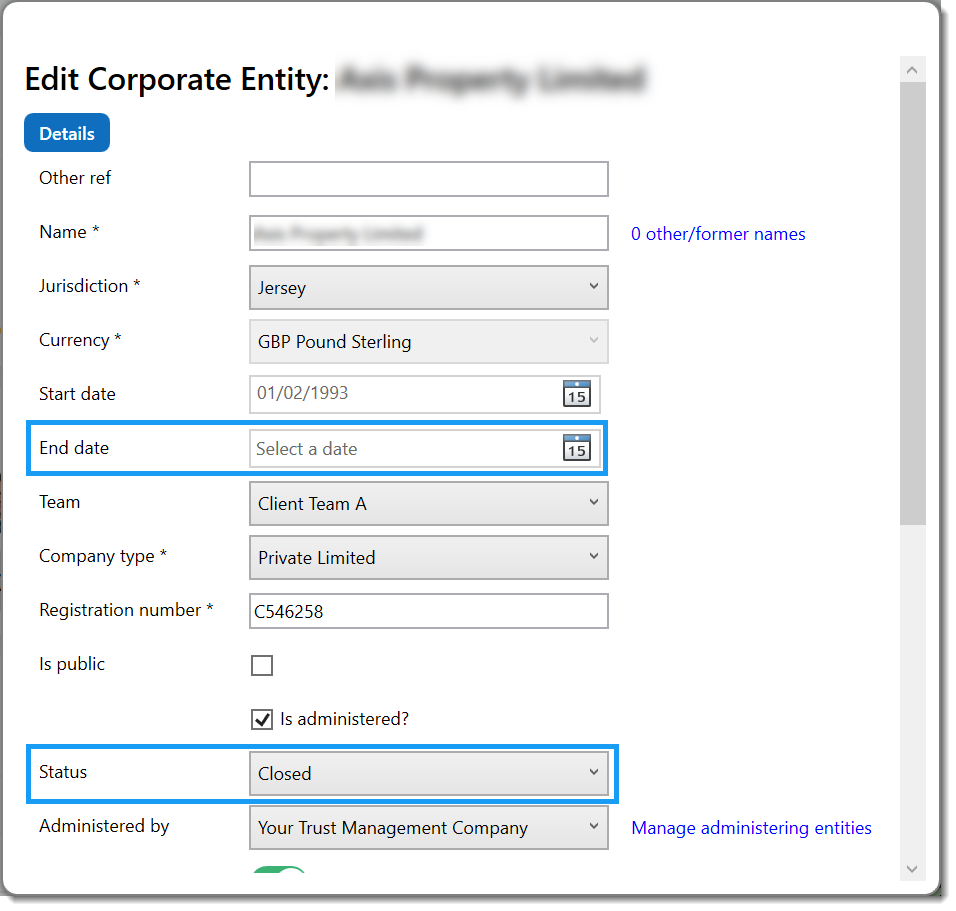
Setting an End Date
Setting an end date marks the entity as wound up or ceased. This requires the Entities_SetEndDate permission, and the entity must have no open relationships or active accounts.
Closing an Entity
Closing an entity changes the entity status to “Closed”. Closed entities can be hidden from the entity list using the Hide closed toggle in the filter toolbar.
Data retention
Closed entities retain all data – documents, relationships, accounting records, and inventories remain accessible. The entity simply no longer appears in default filtered views.
Permissions & Shortcuts
PlainSail enforces role-based access control. If you don't have the required permission for a section, a "Permission Denied" notice is displayed instead of the content.
Key permissions
- Entities View / Edit – access and edit entities
- Relationships View – access the Relationships tab
- Edit Risk Rating – change risk ratings, scores, and warning messages
- Edit Administered Status – change the "Is Administered" flag
- Bank Accounts View – access bank accounts
- Shares View / Issue and Create Classes – access and manage share classes
- Loans View / Debts View / Assets View – access loans, debts, and fixed assets
- Accounting View – access the Accounting tab (further sub-permissions for trial balance, posting, closures, reports, and reconciliation)
- Timeline View – access the Timeline tab
- Billing View / Contact View / Documents View / Inventories View – access the respective tabs
- Payment Methods View / Create – access and create payment methods
- Tax Reporting View – access the Tax Reporting section
- Templates Admin – administer inventory templates
Keyboard shortcuts
- F5 – refresh the current entity profile
- Ctrl+E – open the entity editor
- Ctrl+D – navigate to the Debts tab (requires Loans View permission)
System behaviour
- Changes are not saved automatically – always select Save to persist
- The entity headline is saved independently via its own Save link
- All changes take effect immediately once saved; the entity cache refreshes automatically
- Widgets load in parallel to minimise wait time
- A progress indicator or "Refreshing entity profile…" message appears during loading
Permissions Reference
The table below lists every entity-related permission that controls access to features described in this guide. Permissions are assigned to roles in Admin > Permissions.
| Permission | Description |
|---|---|
Entities_View |
View entities in the Client View. |
Entities_Create |
Create new entities. |
Entities_Edit |
Edit entity profile data and initiate deletion. |
Entities_EditIsAdministeredStatus |
Change the “Is Administered” status. |
Entities_EditRiskRating |
Change risk rating and risk score. |
Entities_SetEndDate |
Set or change the entity end date. |
Entities_Shares_View |
View share classes and share register. |
Entities_Shares_IssueAndCreateClasses |
Create share classes and issue shares. |
Entities_BankAccounts_View |
View bank accounts. |
Entities_BankAccounts_Create |
Create bank accounts. |
Entities_BankAccounts_Edit |
Edit bank accounts. |
Entities_Debts_View |
View debts. |
Entities_Loans_View |
View loans. |
Entities_Loans_Create |
Create loans. |
Entities_Loans_Edit |
Edit loans. |
Entities_Assets_View |
View fixed assets. |
Entities_Assets_Create |
Create fixed assets. |
Entities_Assets_Edit |
Edit fixed assets. |
Entities_PaymentMethods_View |
View payment methods. |
Entities_PaymentMethods_Create |
Create payment methods. |
Entities_PaymentMethods_Edit |
Edit payment methods. |
Entities_Timeline_View |
View the entity timeline. |
Entities_Profile_ViewPracticeManagement |
View practice management entity profiles. |
Relationships_View |
View relationships. |
Relationships_Create |
Create relationships. |
Relationships_Edit |
Edit relationships. |
Contact_View |
View contact details. |
Contact_Create |
Create contact details. |
Contact_EditAddress |
Edit addresses. |
Contact_EditAddressLink |
Edit address links. |
FAQ
How do I delete an entity that has financial data?
Entities with statutory information or financial transactions cannot be deleted immediately. The system prompts you to launch a four-eyes approval workflow that must be approved by another authorised user. If the required workflow template is not installed, contact your system administrator.
Can I change an entity's base currency after posting transactions?
No. Once financial transactions exist, the base currency field becomes read-only. You should set the book currency carefully before posting any transactions.
Why can't I delete a user entity?
User entities cannot be deleted through the Client View. Instead, navigate to Admin → Users and set the user's logon status to disabled, then add them to the Global Excluded group.
How does the entity group email feature work?
When Save emails to all members is enabled on an entity group, any email saved to the group is automatically saved for all member entities.
What does "implicit relationship" mean?
An implicit relationship is one that was not directly created on the Relationships tab – it was inferred from another area of the system, such as a share register entry. These are indicated with a link icon and cannot be edited from the Relationships screen.
How do I set an entity's end date?
The end date can only be set if the entity has no open relationships, bank accounts, or other active records, and you have the appropriate permission. Use the edit form to enter the cessation date.
Why isn't the screening portal opening?
The "Unresolved Hits" warning banner links to an external screening portal. If you do not have permission to view screening results, a message will inform you to contact your compliance team.
What image formats are accepted for entity photographs?
JPG, JPEG, BMP, GIF, and PNG. Files must be between 1 byte and 5 MB. Images are automatically compressed if they exceed standard display dimensions.
How do I merge two entities?
Go to Admin > Utilities and click Merge two entities. A guided popout walks you through selecting a source entity (to be absorbed) and a target entity (to receive all data). Review the merge preview, then confirm. See the Entity Merging section above for the full procedure.
How do I change an entity’s type?
Go to Admin > Utilities and click Convert an entity. Select the entity, choose the new type, review any data-loss warnings, and confirm. See the Entity Conversion section above for the full procedure.
Why can’t I delete an entity?
Entity deletion requires a four-eyes approval workflow. After you initiate deletion, a second user with the Administrator role must approve it. If the workflow is rejected, the entity is not deleted. Additionally, you need the Entities_Edit permission to initiate the deletion request.
How do I export entity data?
Use Reports > Query Builder to create a custom query selecting entity fields. Results can be exported to Excel or CSV. For pre-built exports, check the Reports Dashboard for entity-related reports.
- Document Management – uploading, check-out, templates, and document workflows
- Billing & Invoicing – entity-level billing, fees, and invoicing
- Accounting – entity accounting, trial balance, and financial statements
- Inventories & Configuration – CDD inventories, templates, and review points
Test Yourself
Ready to put your entity management skills to the test? These 10 questions focus on the everyday features and shortcuts that will make you faster and more confident in PlainSail.