Help Centre
Inventories & Configuration
Design, configure, and manage inventory templates in PlainSail – from custom data collections and field types to visibility rules and native screen extensions.
Top hints before you start
- Set a template to “not in use” before making structural changes, then synchronise when ready
- Reuse existing fields by dragging from the right-hand panel rather than creating duplicates
- Field names must be unique across all templates – they are flattened for reporting
- Templates prefixed with an underscore (_) are internal and will not appear in the Launch screen
- Deleting a field from a template permanently removes it from every live inventory using that template
- Use property bags for lookup lists that need to be shared across multiple inventories
Overview
Inventories are one of the most powerful and flexible features in PlainSail. At their core, inventories are structured data collections that can be attached to any entity in the system. They allow your organisation to capture, validate, and report on virtually any type of information – from customer due diligence questionnaires and compliance registers to risk assessments, activity monitoring records, and bespoke data extensions.
Each inventory is based on a template that defines the fields, layout, visibility rules, and behaviour of the data collection. Templates are designed once in the administration area and can then be launched against entities either on demand by users or automatically via workflow triggers. Once launched, an inventory becomes a live instance attached to that entity, pre-populated with any default values and ready for data entry.
Inventories are used extensively throughout PlainSail for:
- Customer Due Diligence (CDD) – identity verification, address verification, PEP and EDD screening, and risk-based CDD questionnaires
- Compliance registers – gifts & benefits, breaches, errors & omissions, conflicts of interest, complaints, and charges
- Risk management – risk factor scoring, risk assessments, and periodic review workflows
- Activity monitoring – transaction profiles, portfolio monitoring, client reviews, and lifecycle timelines
- Extending native screens – adding custom fields to loan facilities, fixed assets, billing projects, and relationships
System Inventories
PlainSail ships with over 37 pre-defined inventory templates covering the most common requirements of trust and corporate service providers. These system templates are designed and maintained by PlainSail to ensure tight integration with built-in reports, workflows, and compliance features.
System inventories are initially locked. This lock protects the structural integrity of the template so that downstream report definitions, workflow steps, and integration points continue to function correctly. While a template is locked, you cannot add, remove, or reorder fields.
If your organisation needs to customise a system template – for example, to add additional fields for a jurisdiction-specific requirement – you can request that PlainSail Support unlocks the template after a validation review. Support will confirm that your proposed changes will not break any dependent reports or workflows before unlocking.
Internal & Workflow Templates
PlainSail supports two special categories of inventory templates that behave differently from standard user-facing inventories.
Internal Templates (underscore prefix)
Any template whose name begins with an underscore character (_) is treated as an internal template. Internal templates are not visible in the Launch Inventory screen that end users see. They are designed for system-level use – for example, to store configuration data, extend native screens (see Generic Extension Inventories), or hold data that is managed exclusively through workflows.
Internal templates still appear in the administration area and can be viewed on entities by users with appropriate permissions, but they cannot be manually launched by standard users.
Workflow-Managed Templates
Templates with the “Has workflow” checkbox enabled can only be edited through a workflow process. When a user opens a workflow-managed inventory, the fields are read-only unless the user is acting within an active workflow step that grants edit access to those fields. This is essential for processes that require controlled, auditable data entry – such as CDD reviews and periodic risk assessments.
Four-Eyes Approval
For additional oversight, you can enable four-eyes approval on a per-template basis. When enabled, any changes to inventories of that template must be reviewed and approved by a second user before they are committed. While an inventory is pending approval, it appears greyed out in the entity’s inventory list to indicate that it is currently in the approval queue.
Creating a Template
To create a new inventory template, navigate to Admin > Inventories > Templates. Click the New Template button to open the template designer.
Template Properties
Every template requires the following configuration:

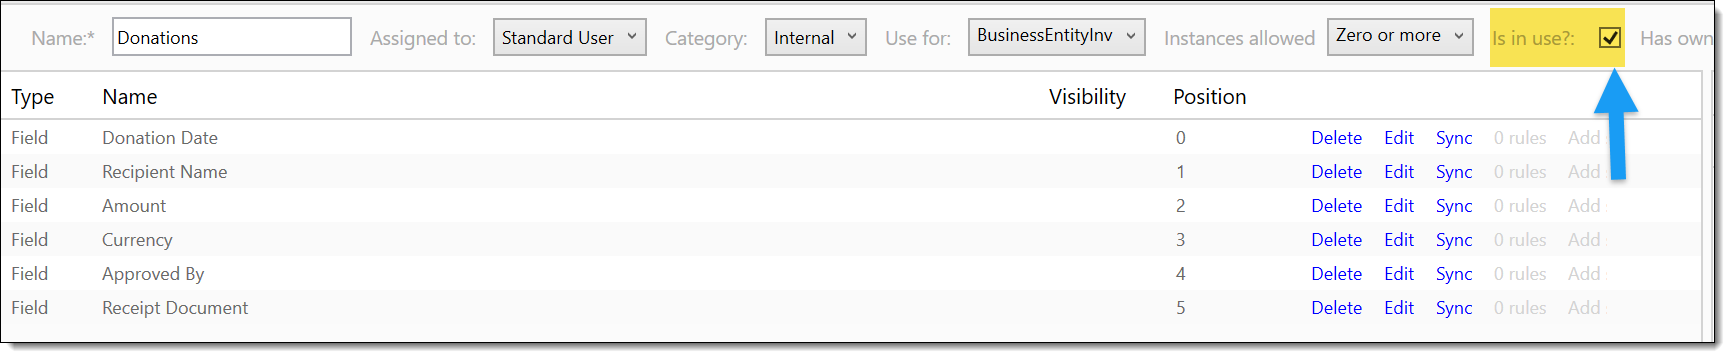
- Name – a clear, descriptive name for the template (e.g., “Donations”, “Board Meeting Minutes”). This name is visible to users when launching the inventory.
- Assigned to – the user group that has access to launch and edit this inventory. Defaults to Standard User, meaning any authenticated user can interact with it.
- Use for – defines where this inventory can be attached. The most common value is BusinessEntityInventory, which allows the template to be launched against any entity. Other options exist for specific object types.
- Is in use – a toggle that controls whether the template is available for launching. Set this to off while making structural changes, then turn it back on when ready.
Instance Modes
The instance mode determines how many times a template can be launched against a single entity:
- Zero or more – the inventory is optional and can be launched multiple times (e.g., one per transaction, one per review period)
- Zero or one – the inventory is optional but can only exist once per entity (e.g., a single tax profile)
- Exactly one – the inventory is mandatory and is automatically created when the entity is set up. It cannot be deleted or duplicated.
- At least one – the inventory is mandatory (at least one instance must exist) but additional instances can be launched as needed
Completion Tracking
The inventory completion percentage is calculated as:
Completed fields ÷ Total required fields × 100
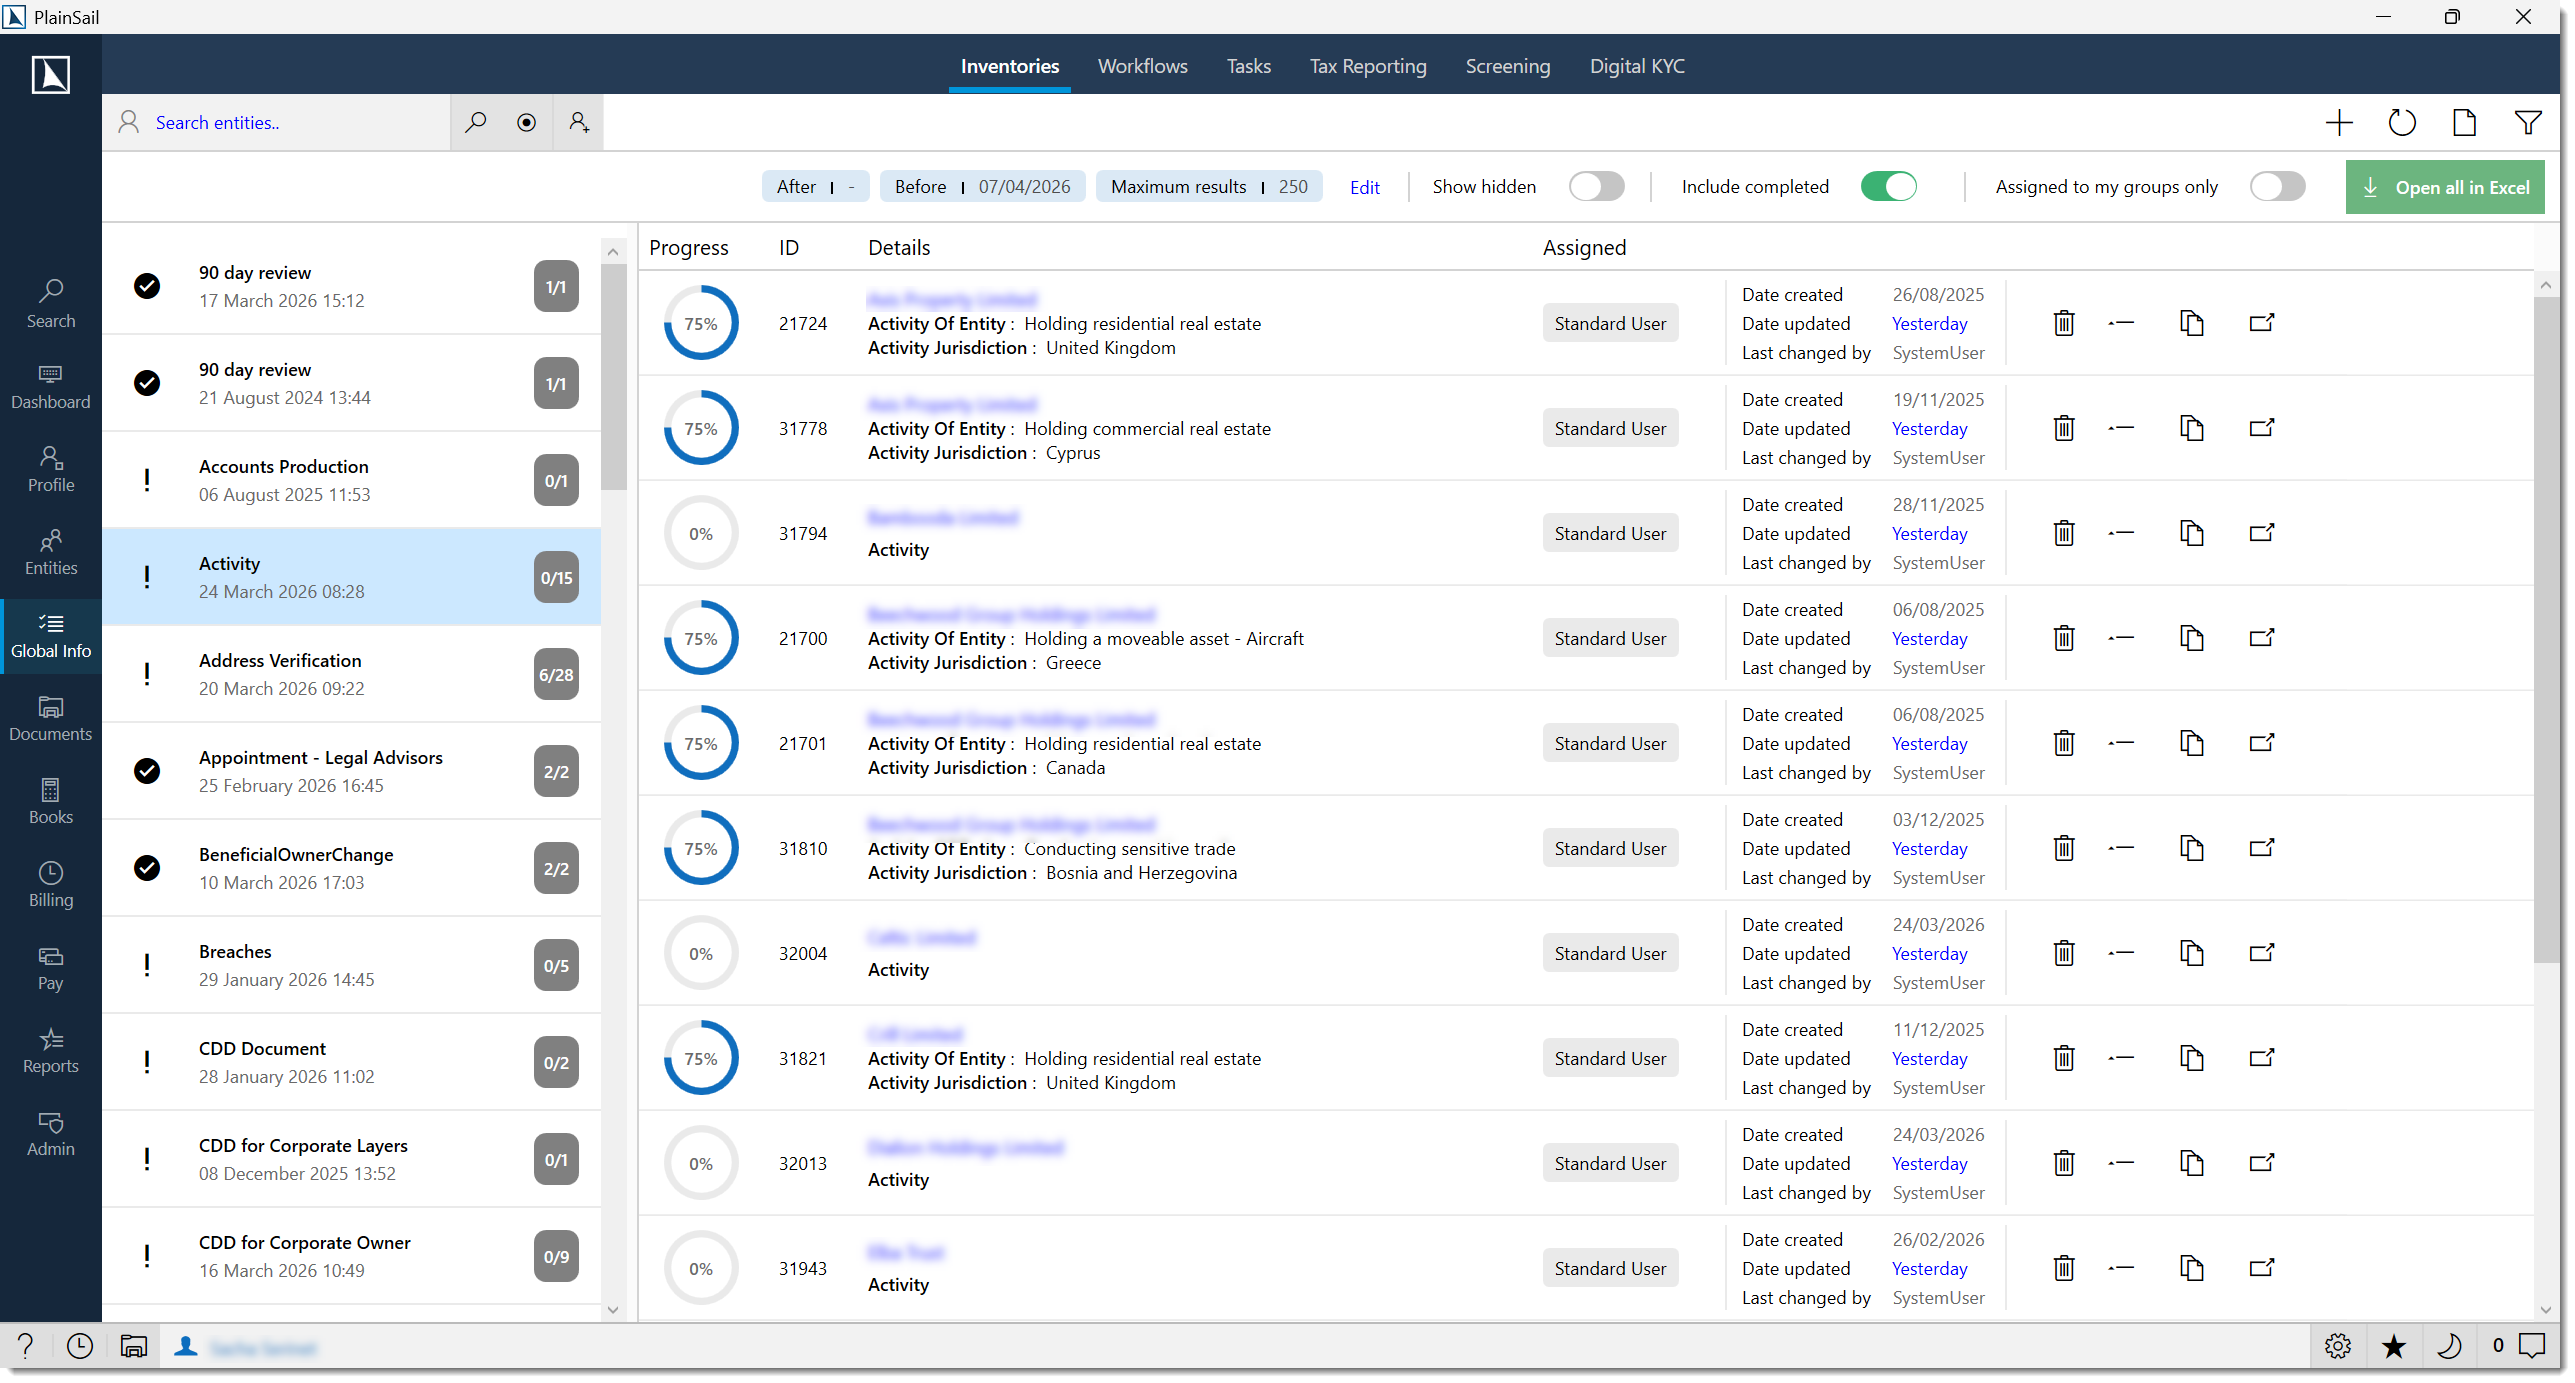
Fields marked as mandatory that have values count as complete. Optional fields do not affect the percentage. The completion percentage is shown in three locations:
- Entity Inventories tab – per inventory instance
- Global Info > Inventories – per inventory per entity
- Dashboard > Inventories widget – per inventory assigned to you
Worked Example: Creating a “Donations” Template
The following walkthrough demonstrates how to create a simple inventory template for tracking charitable donations associated with an entity.


Navigate to the template list
Go to Admin > Inventories > Templates and click New Template.
Set the template properties
Enter the name Donations. Leave “Assigned to” as Standard User. Set “Use for” to BusinessEntityInventory. Choose instance mode Zero or more (since an entity may have multiple donations to record).
Add fields
Add fields for Donation Date (Date type), Recipient Name (Text type), Amount (Decimal type), Currency (Reference > Currency), Approved By (Reference > User), and Receipt Document (Reference > Document). See the Adding Fields section for detailed instructions.
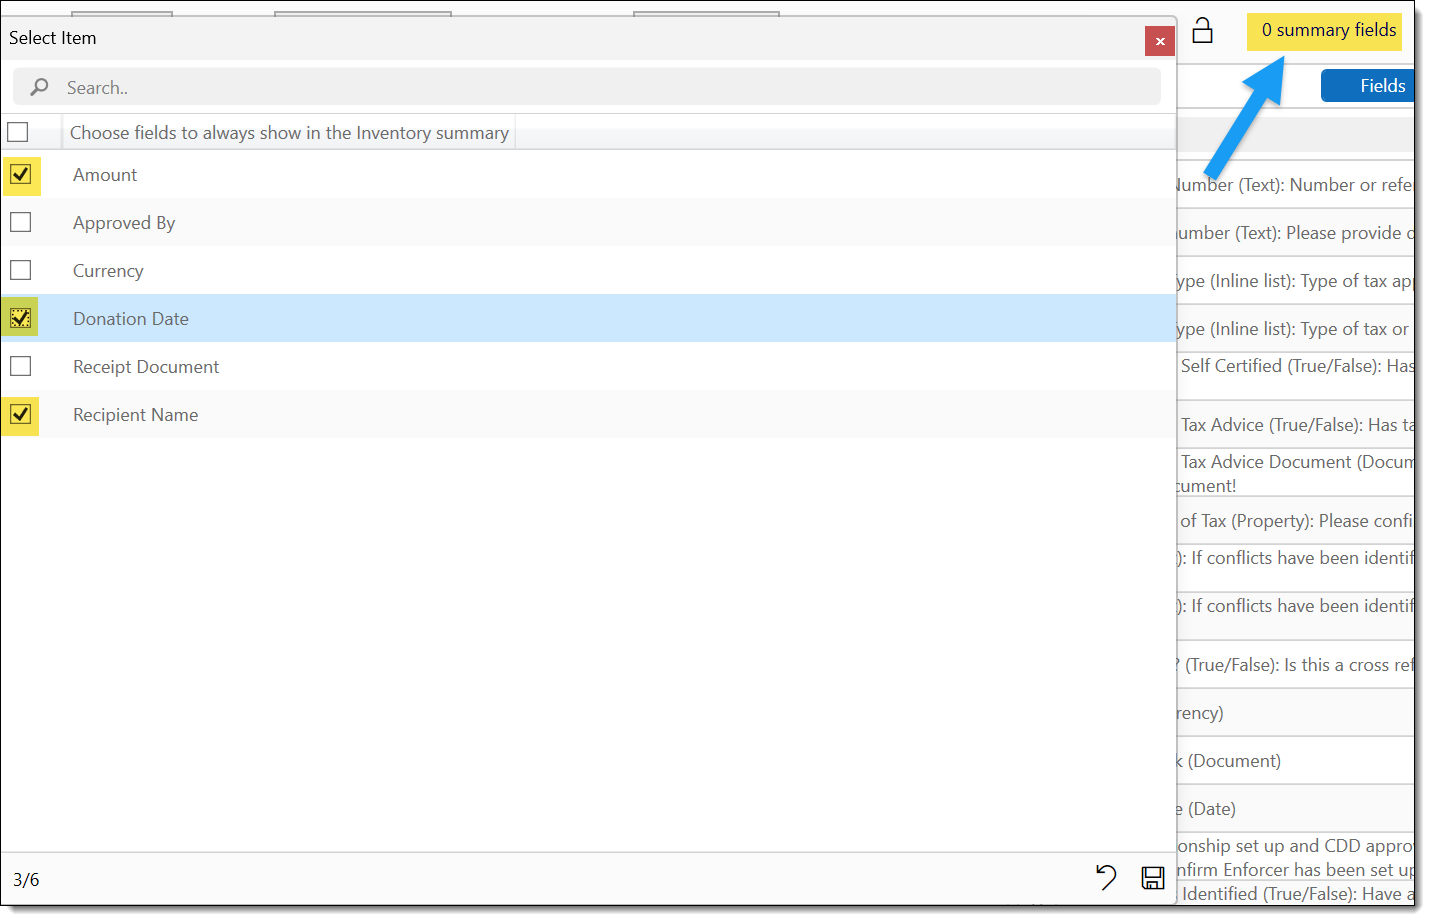
Configure summary fields
Mark “Recipient Name”, “Amount”, and “Donation Date” as summary fields so they appear in the entity’s inventory list without needing to open each record.
Enable the template
Toggle Is in use to on. The template is now available for users to launch from any entity’s Inventories tab.
Bulk Inventory Launch
To launch the same inventory template across multiple entities at once:
Navigate to Admin > Utilities and select the “Add inventory to entities” utility.
Select the template you wish to launch.
Select the entity filter (e.g., all administered entities, a specific entity type, or a custom list).
Click Launch. A background task is created that processes each entity, launching the inventory.
Monitor progress in Admin > Queued Tasks.
Adding Fields
Fields are the building blocks of every inventory template. PlainSail offers two methods for adding fields to a template:
Method 1: Reuse Existing Fields (Recommended)
The right-hand panel of the template designer displays all fields that already exist in the system. You can drag any existing field directly onto your template. Reusing fields is strongly recommended because it ensures consistency across inventories and enables cross-template reporting – since the field definition is shared, reports can aggregate data from multiple templates that use the same field.
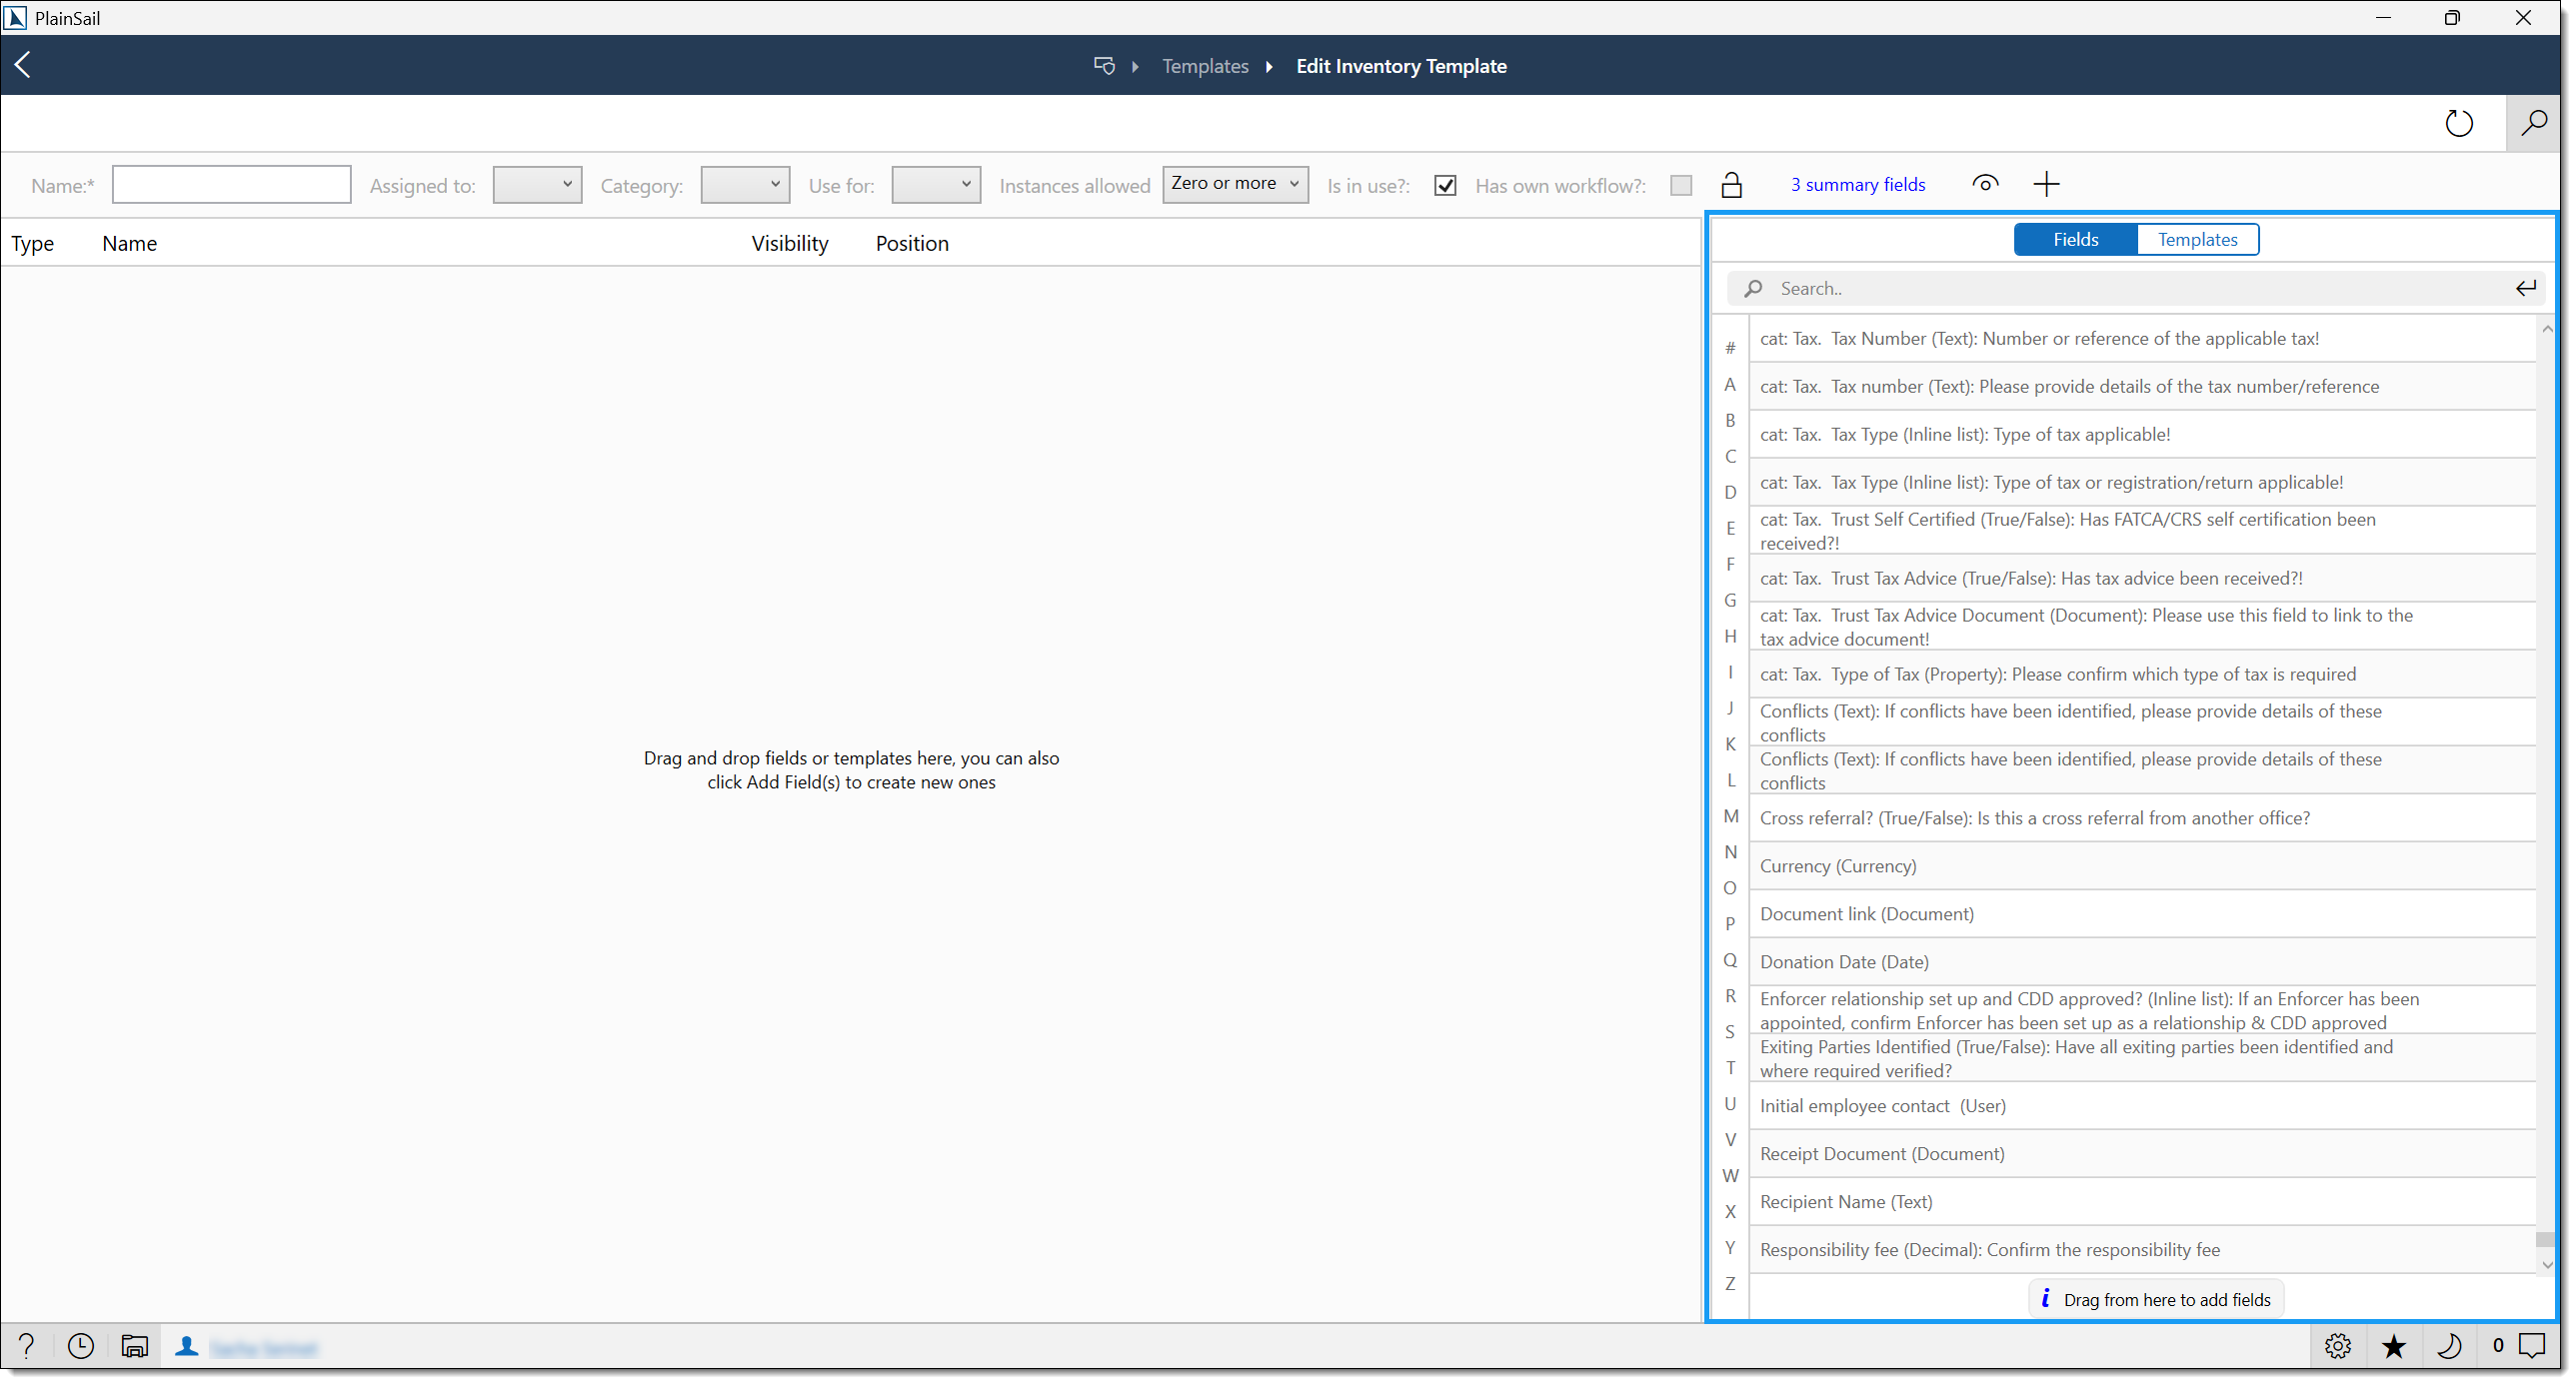
Method 2: Create a New Field
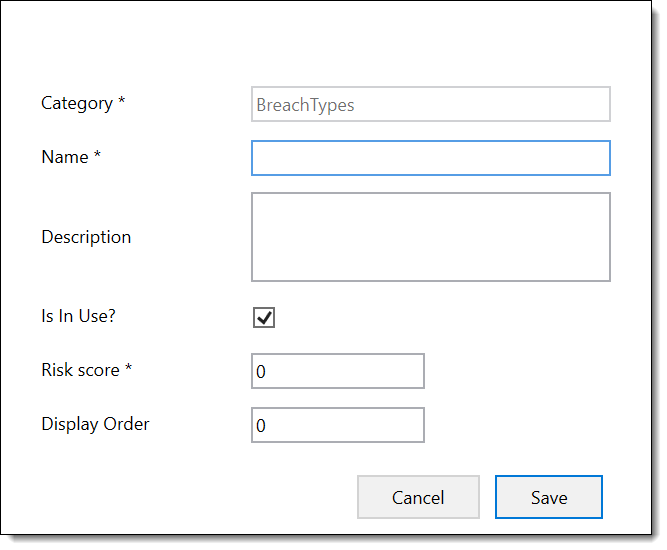
If no suitable field exists, click Add Fields to create a new one. Every new field requires the following properties:
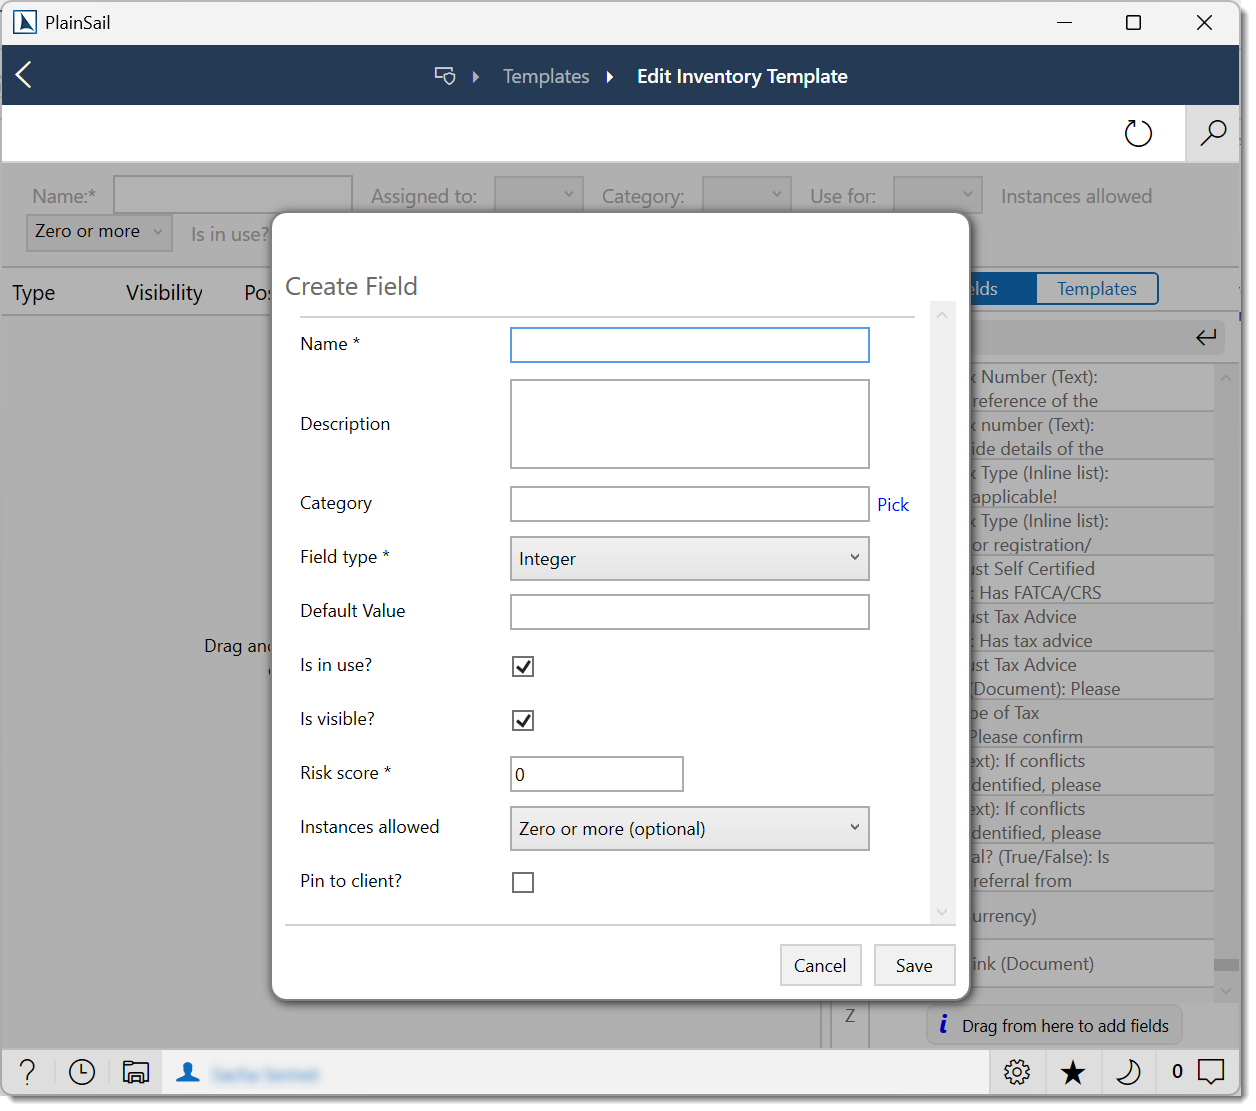
- Name – must be unique across the entire system. Keep names succinct and descriptive (e.g., “DonationAmount” rather than “The amount of the donation in local currency”). Field names are used in reports and integrations.
- Description – a longer explanation shown to users as help text when completing the field.
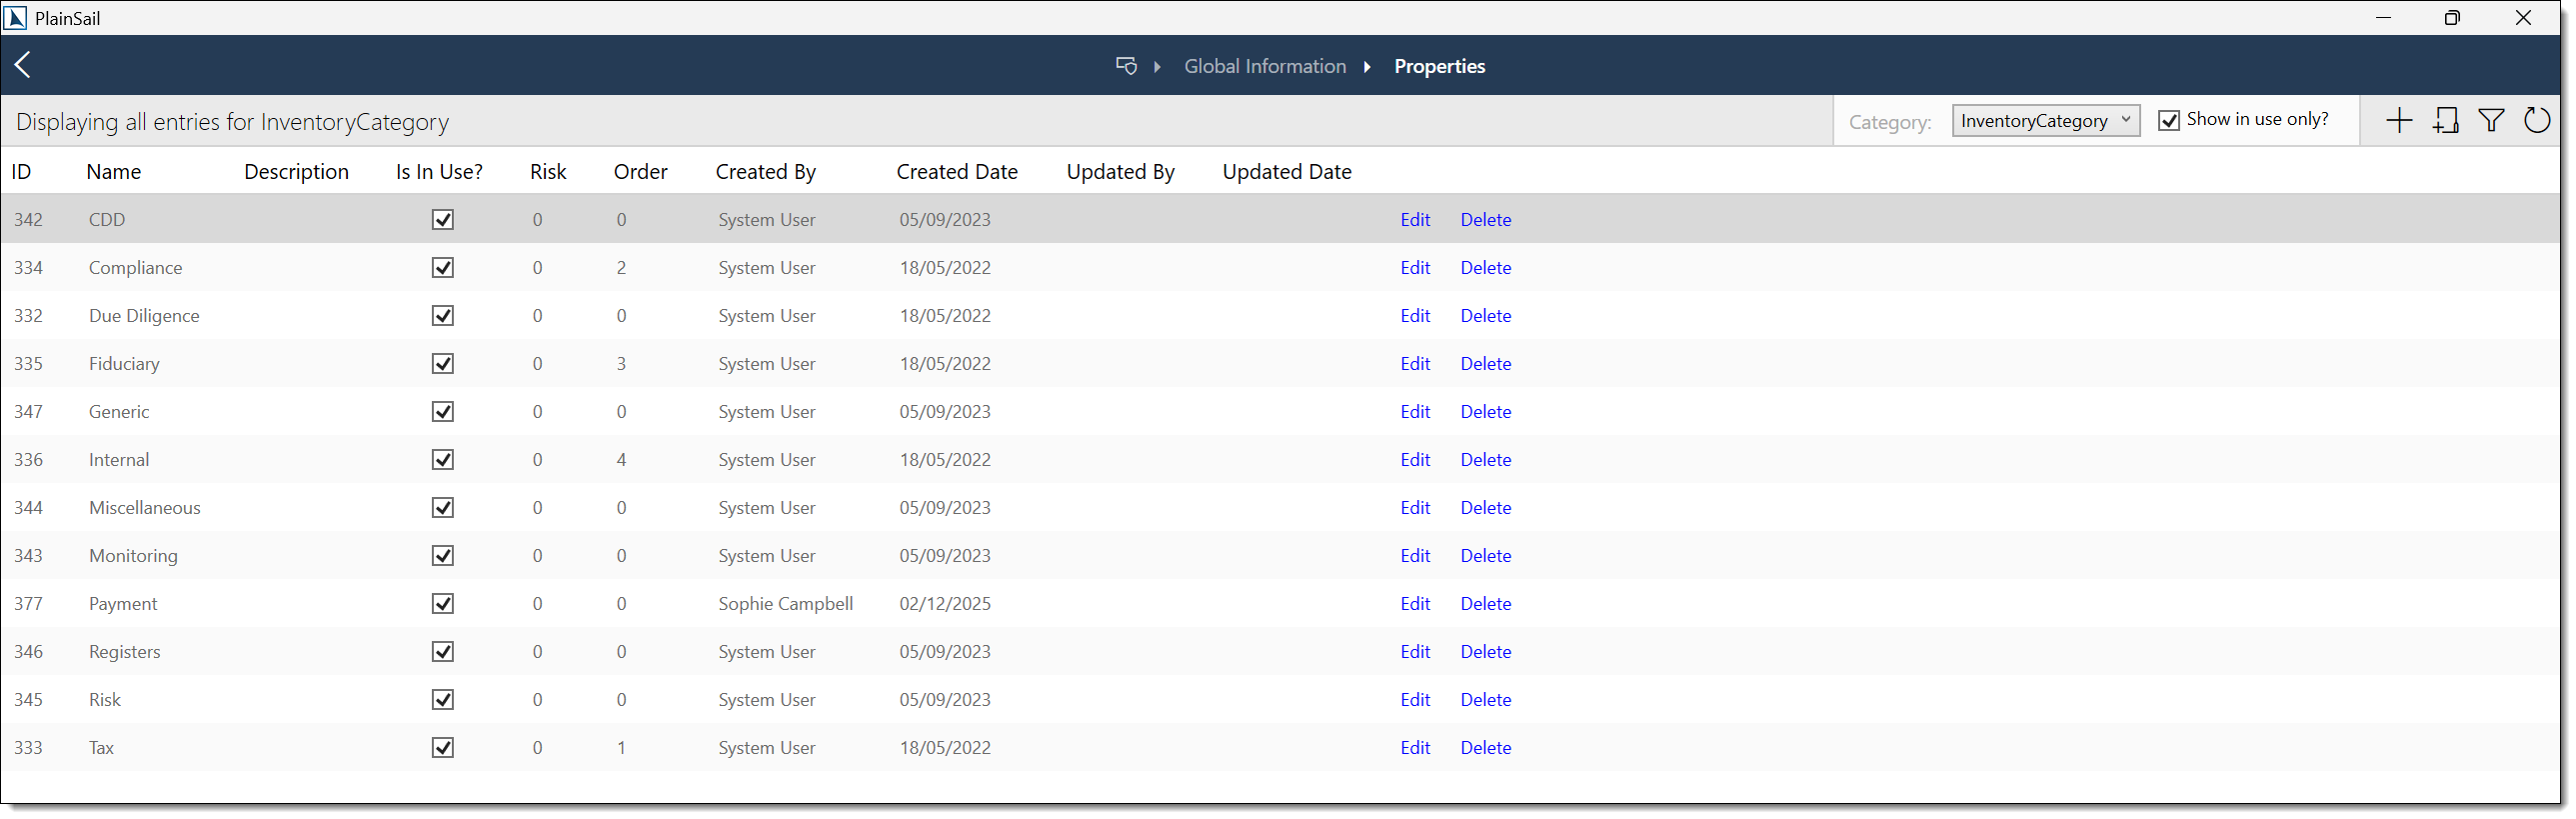
- Category – used to group fields logically in administration views. Categories are managed in Admin > Global Information > Properties.
- Field Type – determines the data type and input control. See below for all supported types.
- Default value – an optional pre-populated value when the inventory is launched.
- Is in use – controls whether the field is active. Deactivating a field hides it from users without deleting any existing data.
- Is visible – controls whether the field is visible by default (can be overridden by visibility rules).
- Risk score – an optional numeric value used in risk calculation inventories. When populated, the field’s value contributes to the entity’s overall risk score.
- Instances allowed – for fields that support repeating values, this sets the maximum number of instances.
- Pin to client – when enabled, the field’s value is displayed on the entity’s Profile page, grouped by category.
Supported Field Types
PlainSail supports the following field types. Choose the type that best matches the data you need to capture:
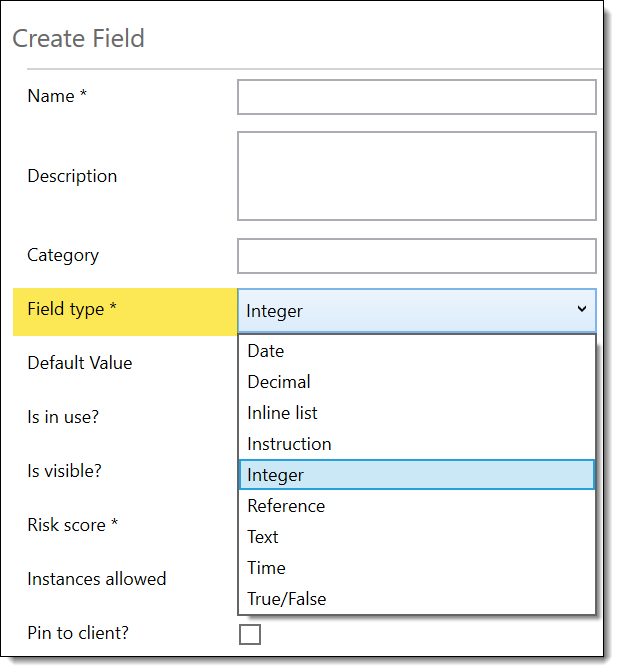
- Date – a date picker control. Stores date values without a time component.
- Time – a time picker control for capturing time-of-day values.
- Text – a free-text input field. Supports single-line and multi-line entry.
- Integer – whole number input with validation.
- Decimal – numeric input supporting decimal places, commonly used for monetary amounts.
- True/False – a boolean toggle or checkbox.
- Instruction – a read-only text block displayed within the inventory. Used to provide guidance, headings, or formatted instructions to users completing the form. Does not capture data.
- Inline List – a dropdown selection control. Supports both single-select and multi-select modes. List options can be defined directly on the field or sourced from a property bag (see Property Bags).
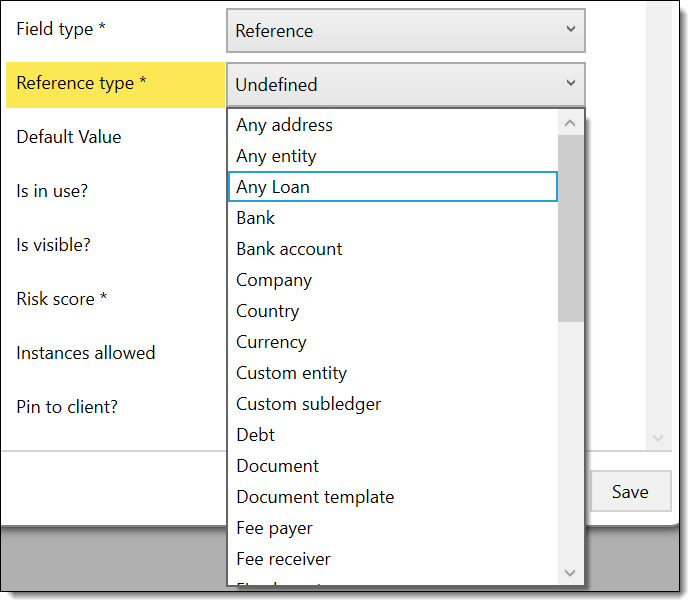
- Reference – a lookup field that links to another record in PlainSail. Reference fields support the following sub-types:
- Any Entity – links to any entity in the system
- Currency – links to a currency record
- User – links to a PlainSail user account
- Document – links to a document stored in the document management system
- Document Template – links to a document template for auto-generation
- Property / Property Bag – links to a property bag item (useful for cascading lookups)
- Address – links to an address record on the entity
- Loan – links to a loan facility record
- Bank – links to a bank record
- Bank Account – links to a specific bank account
- Investment – links to an investment record
Field Visibility & Rules
Visibility rules allow you to dynamically show, hide, or modify fields based on user input. This is essential for building intelligent questionnaires where subsequent questions depend on earlier answers – for example, showing enhanced due diligence fields only when a risk rating is set to “High”.
Fields can be set to hidden by default using the “Is visible” property, and then revealed through rules. Conversely, visible fields can be hidden when certain conditions are met.
Rule Actions
PlainSail supports the following rule action types:


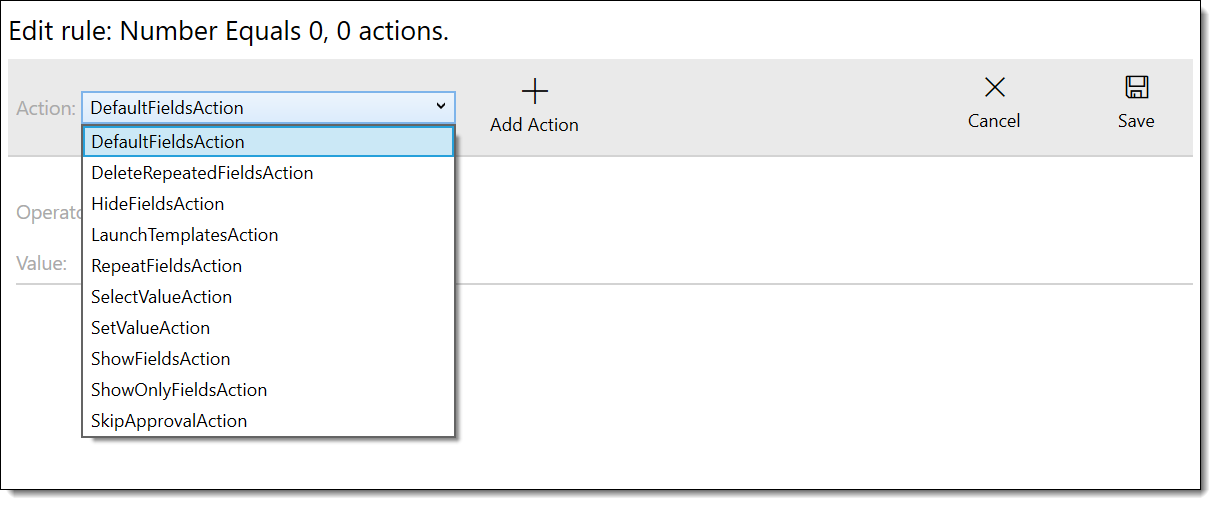
- ShowFieldsAction – displays one or more specified fields when the rule condition is met. Use this to reveal additional questions based on a user’s answer.
- HideFieldsAction – hides one or more specified fields when the rule condition is met. The reverse of ShowFieldsAction.
- DefaultFieldsAction – acts as a fallback rule. If no other rule on the triggering field matches the current value, the DefaultFieldsAction is executed. Use this to reset visibility to a baseline state.
- RepeatFields – dynamically repeats a group of fields based on a numeric or selection value. For example, if a user enters “3” in a “Number of Directors” field, RepeatFields can generate three sets of director detail fields.
- DeleteRepeatFields – removes previously repeated field groups when the triggering value decreases or is cleared.
- LaunchTemplatesAction – automatically launches another inventory template when the rule condition is met. This enables cascading inventories where completing one triggers the creation of related data collections.
- SetValueAction – programmatically sets the value of a target field based on the rule condition. Useful for auto-populating default values or calculated fields.
- ShowOnlyFieldsAction – shows only the specified fields and hides all other fields on the template. This is a more aggressive variant of ShowFieldsAction and is useful for radically different form layouts based on a single selection.
Summary Fields
When users view the list of inventories attached to an entity, they see a compact summary row for each launched inventory. By default, this row shows only the template name and launch date. To surface key data points without requiring users to open each inventory, you can designate fields as summary fields.
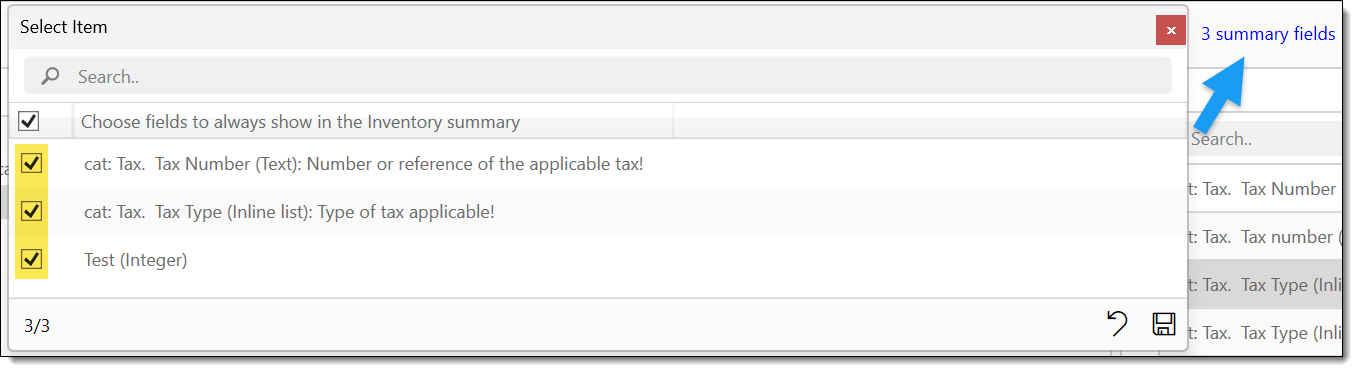
Summary fields are selected in the template designer. When marked, their values appear as additional columns in the entity’s Inventories list view. This is particularly valuable for inventories with an instance mode of “Zero or more”, where an entity may have many instances and users need to quickly identify the right one.
Field Categories & Pinning
Every field in PlainSail belongs to a category. Categories are managed centrally at Admin > Global Information > Properties > InventoryCategory and are used for organising fields in administration views and reports.
Pinning Fields to the Client Profile
When the “Pin to client” property is enabled on a field, that field’s value is displayed directly on the entity’s Profile page. Pinned fields are grouped by their category, creating a structured summary of key inventory data without navigating into individual inventories.
If a template has an instance mode that allows multiple instances (e.g., “Zero or more”), all instances’ pinned field values are displayed on the Profile page. This provides a consolidated view across all inventory instances.
Sections
Sections allow you to group fields within a template by assigning them a shared tag or title. This creates logical groupings within the inventory form.
At present, sections are primarily used by the workflow engine. When an inventory is edited through a workflow, individual workflow steps can be configured to present only the fields belonging to a specific section. This means a multi-step review process can break a large inventory into manageable chunks – each workflow step shows only the fields relevant to that step, while the full inventory is still stored as a single record.
Synchronising Changes
When you modify an inventory template – whether adding fields, changing properties, or adjusting rules – those changes apply only to newly launched inventories by default. Existing live inventories that were launched before the change will continue to use the old template definition.

To push template changes to all existing live inventories, you must synchronise the template. Synchronisation creates a queued background task that updates every live instance of that template across all entities.
Full Template Sync
A full synchronisation updates all fields, rules, and properties on every live inventory. Depending on the number of entities and inventory instances, this may take several minutes to complete. The sync progress is visible in the background tasks queue.
Individual Field Sync
If you have only changed a single field (for example, updated its description or default value), you can synchronise just that field rather than the entire template. This is faster and reduces the load on the background task queue.
Monitoring the Sync Task Queue
After clicking Synchronise, a background task is created. Navigate to Admin > Queued Tasks to monitor progress. The task shows:
- Status – Pending, In Progress, Completed, or Failed
- Progress – a percentage or count of entities processed
- Start / End time – when the task began and completed
Recommended Workflow for Template Changes
Set the template to “not in use”
This prevents users from launching new inventories with the template while you are making changes.
Make your changes
Add, modify, or remove fields. Update rules and properties as needed.
Synchronise the template
Run a full sync to push changes to all existing live inventories. Monitor the background task queue for completion.
Set the template back to “in use”
Once the sync is complete and you have verified the changes on a test entity, re-enable the template for users.
Generic Extension Inventories
Generic extension inventories allow you to add custom fields to PlainSail’s native screens. Instead of launching a separate inventory, the fields defined in a generic extension template appear directly within the native UI of the target object – such as a Loan Facility detail page, a Fixed Asset record, a Billing Project, or a Relationship.
Supported Extension Points
- Billing Projects – add custom fields to billing project records
- Fixed Assets – extend fixed asset records with additional data
- Loan Facilities – capture loan-specific custom information
- Relationships – add custom fields to entity relationship records
Template Naming Convention
Generic extension templates must follow a strict naming convention to be recognised by the platform. The name must begin with an underscore, followed by the object type name, followed by _Generic:
- _LoanFacility_Generic – extends all loan facility records
- _FixedAsset_Generic – extends all fixed asset records
- _BillingProject_Generic – extends all billing project records
- _Relationship_Generic – extends all relationship records
Generic Subtypes
If a native object has subtypes (e.g., Loan Facilities can be of type “Third Party”, “Intercompany”, etc.), you can create type-specific generic extensions by including the subtype name in the template name. The subtype name must have spaces removed.
- _LoanFacility_ThirdParty_Generic – extends only Third Party loan facilities
- _LoanFacility_Intercompany_Generic – extends only Intercompany loan facilities
Standard Inventories
PlainSail’s 37+ built-in inventory templates are organised into the following categories. Each template is pre-configured with appropriate fields, rules, and report integrations.
Due Diligence
- Identity Document – captures passport, ID card, and driving licence details for identity verification
- Address Verification – records proof-of-address documentation and verification status
- CDD Document – stores supporting due diligence documentation
- CDD Required? – determines whether a full CDD process is required for the entity
- CDD for Individual – comprehensive CDD questionnaire for natural persons
- PEP Information – records Politically Exposed Person status, relationships, and screening results
- EDD Information – captures Enhanced Due Diligence details for high-risk entities
- HPP Information – records High Profile Person details and associated controls
- Screening – documents screening results from sanctions, PEP, and adverse media checks
- CDD for Structure – CDD questionnaire tailored for corporate and trust structures
Activity Monitoring
- Transaction Profile – defines expected transaction patterns for ongoing monitoring
- Portfolio Monitoring Required? – determines whether the entity requires portfolio-level monitoring
- Portfolio Monitoring – captures portfolio monitoring assessments and outcomes
- Client Reviews – records periodic client review findings and actions
- Periodic Review – structured periodic review questionnaire with configurable frequency
- Agreement – tracks client agreements, terms of business, and engagement letters
- Lifecycle Timeline – documents key lifecycle events and milestones for the entity
- Power of Attorney – records power of attorney details, scope, and expiry dates
Risk
- Risk Factor – captures individual risk factors with weighted scoring
- Risk Assessment – aggregates risk factors into an overall risk rating for the entity
Registers
- Gifts & Benefits – logs gifts and benefits received or given, with values and approvals
- Breaches – records regulatory or policy breaches with remediation tracking
- Errors & Omissions – captures operational errors, near misses, and corrective actions
- Register of Charges – maintains a register of charges and security interests
- Conflicts – documents conflicts of interest and management actions taken
- Complaints – tracks client complaints, resolutions, and root cause analysis
- Exceptions – records policy exceptions with justification and approval chains
- Issues – logs general issues and action items with assignment and status tracking
- Guarantor Member – records guarantor member details for guarantee structures
- Litigation – tracks active and historical litigation involving the entity
Tax Profiles
- Individual – tax residence, identification numbers, and reporting obligations for natural persons
- Company – corporate tax residence, status, and CRS/FATCA classification
- Trust – trust tax residence, classification, and beneficiary reporting requirements
Generic Extensions
- Loan Facility – extends loan facility records with custom fields
- Fixed Asset – extends fixed asset records with custom fields
Miscellaneous
- Notes for Annual Accounts – captures free-text notes to be included in annual account preparation
What Happens When an Entity Is Deleted
When an entity is deleted via the four-eyes deletion workflow:
- All inventory instances associated with the entity are permanently deleted.
- Generated action items from review points are deleted.
- The inventory template itself is not affected – templates are shared across entities and remain available for other entities.
Property Bags
Property bags are reusable lookup lists that can be referenced by inventory fields across the entire system. They are managed centrally at Admin > Global Information > Properties and are the recommended approach for dropdown options that need to be shared across multiple inventories or that may change over time.
Creating a Property Bag
Navigate to Properties


Go to Admin > Global Information > Properties.
Create a new category
Click New Category and enter a name. Category names must not contain spaces – use PascalCase or camelCase (e.g., DonationType, RiskLevel).
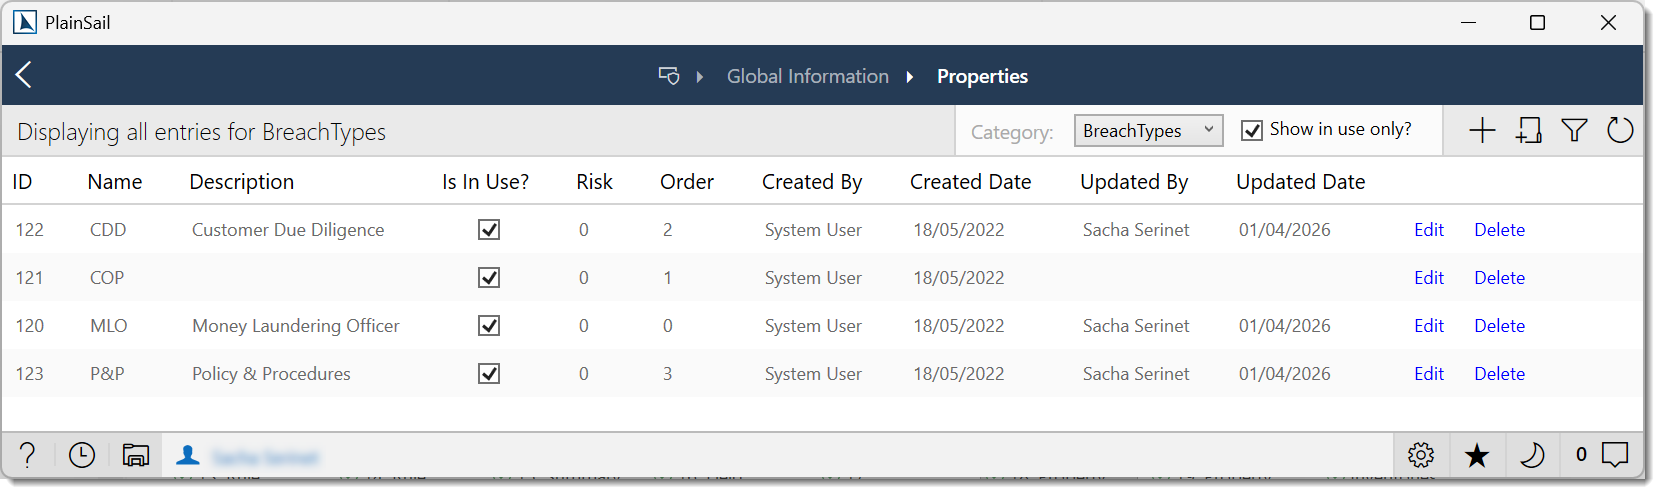
Add items
Within the new category, add items that will appear as options in the dropdown. Each item has a display name and an optional description.
Reference in inventory fields
When adding an Inline List field to an inventory template, set the source to the property bag category you created. The field will automatically display the items from that category as its options.
To disable an item from a property bag without deleting it (preserving historical data), untick the “Is in use” checkbox on the item. The item will no longer appear as an option in dropdowns but will remain visible on existing records that already selected it.
Exporting Inventory Data
Inventory data can be exported to Excel from two locations:

- Entity Inventories tab – select the inventories to export, then click Export (or right-click > Export to Excel).
- Global Info > Inventories – filter by template and use the Export to Excel button on the grid.
The exported file contains one row per inventory instance with columns for each field.
Review Points
The Client Review workflow in PlainSail uses inventory responses to generate structured action items called review points. This mechanism allows organisations to build questionnaire-based review processes where specific answers automatically produce follow-up actions, recommendations, or escalation notes.
Inspection Group Structure
Review points are configured using a specific field pattern within an inventory template, known as an inspection group. Each inspection group consists of the following fields:
1. Question Field
The primary question field must be an Inline List type. This presents the reviewer with a set of predefined answer options (e.g., “Satisfactory”, “Requires Action”, “Not Applicable”).
2. Options Field (Hidden)
Each question field must have a corresponding hidden options field that defines what action to generate for each possible answer. The options field follows a strict naming convention:
QuestionFieldName:Options
For example, if the question field is named “DirectorVerification”, the options field must be named DirectorVerification:Options.
The options field must be of type Instruction and uses a specially formatted Description to define the answer-to-action mapping. Each line in the description follows a colon-delimited format:
Answer:Action:Description
- Answer – the exact text of the Inline List option (must match precisely)
- Action – the action type to generate (e.g., “ReviewPoint”, “Escalation”, “None”)
- Description – the text of the generated action item or review point
3. Explanation Fields (Optional)
You may include additional hidden fields for capturing free-text explanations or supporting details. These are typically hidden by default and revealed using Show/Hide rules when the reviewer selects an answer that requires further elaboration (e.g., showing a “Reason for non-compliance” text field when the answer is “Requires Action”).
Worked Example: CDD Review Points
The following example demonstrates a complete review point configuration for a Customer Due Diligence inventory.
| Field Name | Type | Options Configuration |
|---|---|---|
| PEP Check Completed | Options | Yes:None:PEP check passed|No:Action:PEP check not completed - escalate to MLRO |
| Source of Wealth Verified | Options | Verified:None:Source of wealth documentation received|Pending:Review:Awaiting documentation from client|Not verified:Action:Source of wealth not verified - escalate |
| Adverse Media Found | Options | Yes:Action:Adverse media found - review required|No:None:No adverse media found |
Options Syntax Breakdown
The options field syntax is Answer:Action:Description, where:
| Component | Purpose | Values |
|---|---|---|
| Answer | The selectable option presented to the user | Free text (e.g., “Yes”, “No”, “Verified”, “Pending”) |
| Action | What happens when this answer is selected | None = no action; Action = creates an action item; Review = creates a review item |
| Description | The text recorded on the generated action item | Free text describing what needs to happen |
Multiple options are separated by | (pipe).
What Happens at Review Time
The user opens the CDD inventory for the entity and answers each review point field.
The system generates action items based on the selected answers – for example, “PEP check not completed – escalate to MLRO” (Action) and “Awaiting documentation from client” (Review).
These action items appear in the entity’s Tasks tab and in the Global Info > Tasks view. Assigned users receive notifications.
Inspection Group Naming Convention
Review points can be organised into inspection groups using a dot-delimited naming convention:
[GroupName].[SubGroup].[FieldName]
For example: CDD.PEP.Check, CDD.PEP.Level, CDD.SourceOfWealth.Verification, CDD.AdverseMedia.Screening. This groups related checks together in the inventory form and in generated action reports.
Inventory Reports
PlainSail provides several built-in reports for inventory data:
| Report | Location | Description |
|---|---|---|
| Inventory Completion | Global Info > Inventories | Shows completion percentages across all entities for a template |
| Overdue Inventories | Dashboard > Inventories widget | Shows inventory items assigned to you that are incomplete |
| Review Point Summary | Reports Dashboard | Summarises action items generated from review points |
To run a cross-entity report, navigate to Global Info > Inventories, filter by template, and use the Export to Excel button to download results.
Permissions Reference
The following permissions control access to inventory features. Permissions are managed at Admin > Permissions.
| Permission | Description |
|---|---|
Inventories_View |
View inventory instances on entities. |
Inventories_ViewOtherGroups |
View inventories assigned to other user groups (not just your own). |
Inventories_Edit |
Edit inventory field values. |
Inventories_Create |
Launch new inventories on entities. |
Inventories_Delete |
Delete inventory instances. Requires four-eyes approval for certain templates. |
Inventories_Change_IsHidden |
Change the hidden/visible status of an inventory. |
GlobalInventories_View |
Access the Global Info > Inventories view (cross-entity inventory list). |
Templates_Admin |
Create, edit, and manage inventory templates. |
Inventories_View, Inventories_Edit, and Inventories_Create. Grant Inventories_ViewOtherGroups only to supervisors or compliance officers who need cross-group visibility.
Keyboard Shortcuts
The following keyboard shortcuts are available when working with inventories:
| Shortcut | Context | Action |
|---|---|---|
| F5 | Inventory list | Refresh the inventory list |
| Ctrl + N | Inventory list | Launch a new inventory |
| Ctrl + + | Inventory list | Add a new inventory (alternate) |
| Ctrl + P | Client inventories | Pop out all inventories into a separate window |
Frequently Asked Questions
What happens if I delete a template field?
Deleting a field from a template definition and then synchronising the template will permanently remove that field – and all of its stored data – from every live inventory instance that uses the template. This action is irreversible. If you want to hide a field without losing data, set its “Is in use” or “Is visible” property to false instead.
Can I rename a template?
Yes, you can rename a template at any time. The rename takes effect immediately for new inventory launches. Existing live inventories will reflect the new name after a synchronisation. Note that renaming a template does not affect any report definitions or workflow references – those are linked by the template’s internal identifier, not its display name.
How do mandatory fields affect the completion percentage?
Each mandatory inventory (instance mode “Exactly one” or “At least one”) contributes to the entity’s overall completion percentage. Within each inventory, every visible, active, required field that is unfilled reduces the completion score proportionally. Hidden fields (whether hidden by default or by a visibility rule) do not count towards the completion calculation.
Why don’t hidden fields show on the inventory?
Fields can be hidden for several reasons: the field’s “Is visible” property is set to false, a HideFieldsAction or ShowOnlyFieldsAction rule is suppressing it, or the field’s “Is in use” property is disabled. Check the template designer’s visibility rules and field properties to determine which condition is causing the field to be hidden.
How do I create a new property bag?
Navigate to Admin > Global Information > Properties, click New Category, and enter a name without spaces. Then add items to the category. You can then reference the property bag in any Inline List field by setting the field’s source to the new category. See Property Bags for detailed steps.
Can I use the same field in multiple templates?
Yes – and this is encouraged. When you drag an existing field from the right-hand panel onto a template, you are reusing the same field definition. This means the field shares its name, type, and configuration across all templates that include it. This is beneficial for reporting, as data from the shared field can be aggregated across templates. However, changes to the shared field’s definition (such as type or validation) will affect all templates that use it.
What’s the difference between inline lists and property bag references?
An Inline List field stores its options directly on the field definition – the list values are embedded within the inventory template. A property bag reference (configured via the Inline List field’s source property) pulls its options from a centrally managed property bag. Use property bags when the same list of options is needed across multiple fields or templates, or when the options need to be maintained independently of the template (e.g., a list of jurisdictions that is updated periodically).
Should I create new templates or update existing ones?
If the data structure is fundamentally different, create a new template. If you are adding fields, changing rules, or adjusting behaviour on an existing concept, update the existing template and synchronise. Updating avoids data fragmentation – all historical and future instances remain on a single template, which simplifies reporting and maintenance. Creating a new template is appropriate when the use case is distinct (e.g., a new regulatory requirement that warrants its own data collection).
How do I launch the same inventory for 100 entities at once?
Use the Admin > Utilities > “Add inventory to entities” utility. Select the template and the target entities, then click Launch. A background task processes all entities. Monitor progress in Admin > Queued Tasks.
How do I get a report showing completion across all entities?
Navigate to Global Info > Inventories. Filter by template to see all entities with that inventory and their completion percentages. Use the Export to Excel button to download to Excel.
What happens to inventory data when an entity is deleted?
All inventory instances for the deleted entity are permanently deleted along with the entity. Generated action items from review points are also removed. The inventory template itself is not affected.
Can I export inventory data to Excel?
Yes. Use the Export button on the entity’s Inventories tab or the Global Info > Inventories grid. The exported file contains one row per inventory instance with columns for each field.
- Entities & Client View – entity-level inventory tabs and CDD data
- Workflow & Approvals – inventory-driven workflow steps and triggers
- Global Info & Compliance – cross-entity inventory views and reporting
- Admin & Permissions – inventory template configuration and roles
Test Yourself
Check your inventories knowledge with these 10 questions covering templates, fields, synchronisation, and day-to-day inventory management.