Help Centre
Accounting
Full double-entry accounting – chart of accounts, transaction batches, trial balance, bank reconciliation, rate conversions, FX revaluation, year-end closure, financial statements, report builder, scenarios, exchange rates, investments, invoice layout, and reporting.
Key points
- All accounting entries go through transaction batches with a full lifecycle (In Progress → Posted)
- Account plans control which subset of the chart of accounts each entity uses
- Bank reconciliation matches imported statements against posted transactions automatically
- Year-end closure locks previous periods and transfers P&L to the balance sheet
- Scenarios are reusable transaction templates for repetitive journal entries
- Supports multi-currency with automatic FX revaluation and cross-rate calculation
Overview
The Bookkeeping and Accounting module provides a full double-entry accounting system for managing the financial records of entities (companies, trusts, foundations, partnerships, etc.) within PlainSail. It covers journal entry, transaction batches, chart of accounts management, trial balance reporting, bank reconciliation, investment portfolios, exchange rates, year-end closures, and financial statement production.
Key concepts
- Ledger (Account) – a named account in the chart of accounts, identified by a unique numeric code. Each ledger belongs to an account type group (e.g. Assets, Liabilities, Revenue, Expenses).
- Transaction – a single debit or credit entry posted against a ledger for a specific entity, with a value date and amount.
- Transaction Batch – a container for one or more transactions. Batches go through a lifecycle (In Progress → Posted/Cancelled) and are the mechanism through which all accounting entries enter the live ledger.
- Account Plan – a named subset of ledger accounts that can be assigned to an entity. Different entities can use different subsets of the chart of accounts.
- Trial Balance – a report showing all ledger balances for an entity at a point in time, confirming that debits equal credits.
- Scenario – a reusable template of transactions that can be applied to speed up repetitive journal entries.
- Subledger – a detail-level breakdown within a ledger account (e.g. individual bank accounts within a "Bank Accounts" ledger, or individual investments within a "Portfolio" ledger).
- Year-End Closure – closing a financial year: generating closing entries for P&L accounts, posting them, and locking the period.
Navigation
The Bookkeeping area is accessed from the main navigation ribbon under Bookkeeping. Entity-specific accounting (trial balance, batches, bank reconciliation) is also accessible from the Accounting tab when viewing an entity in the Client View.
Chart of Accounts
The chart of accounts is the master list of all ledger accounts available in the system. Every transaction references a ledger account. The chart is shared across all entities, but account plans control which subset of ledgers each entity uses.
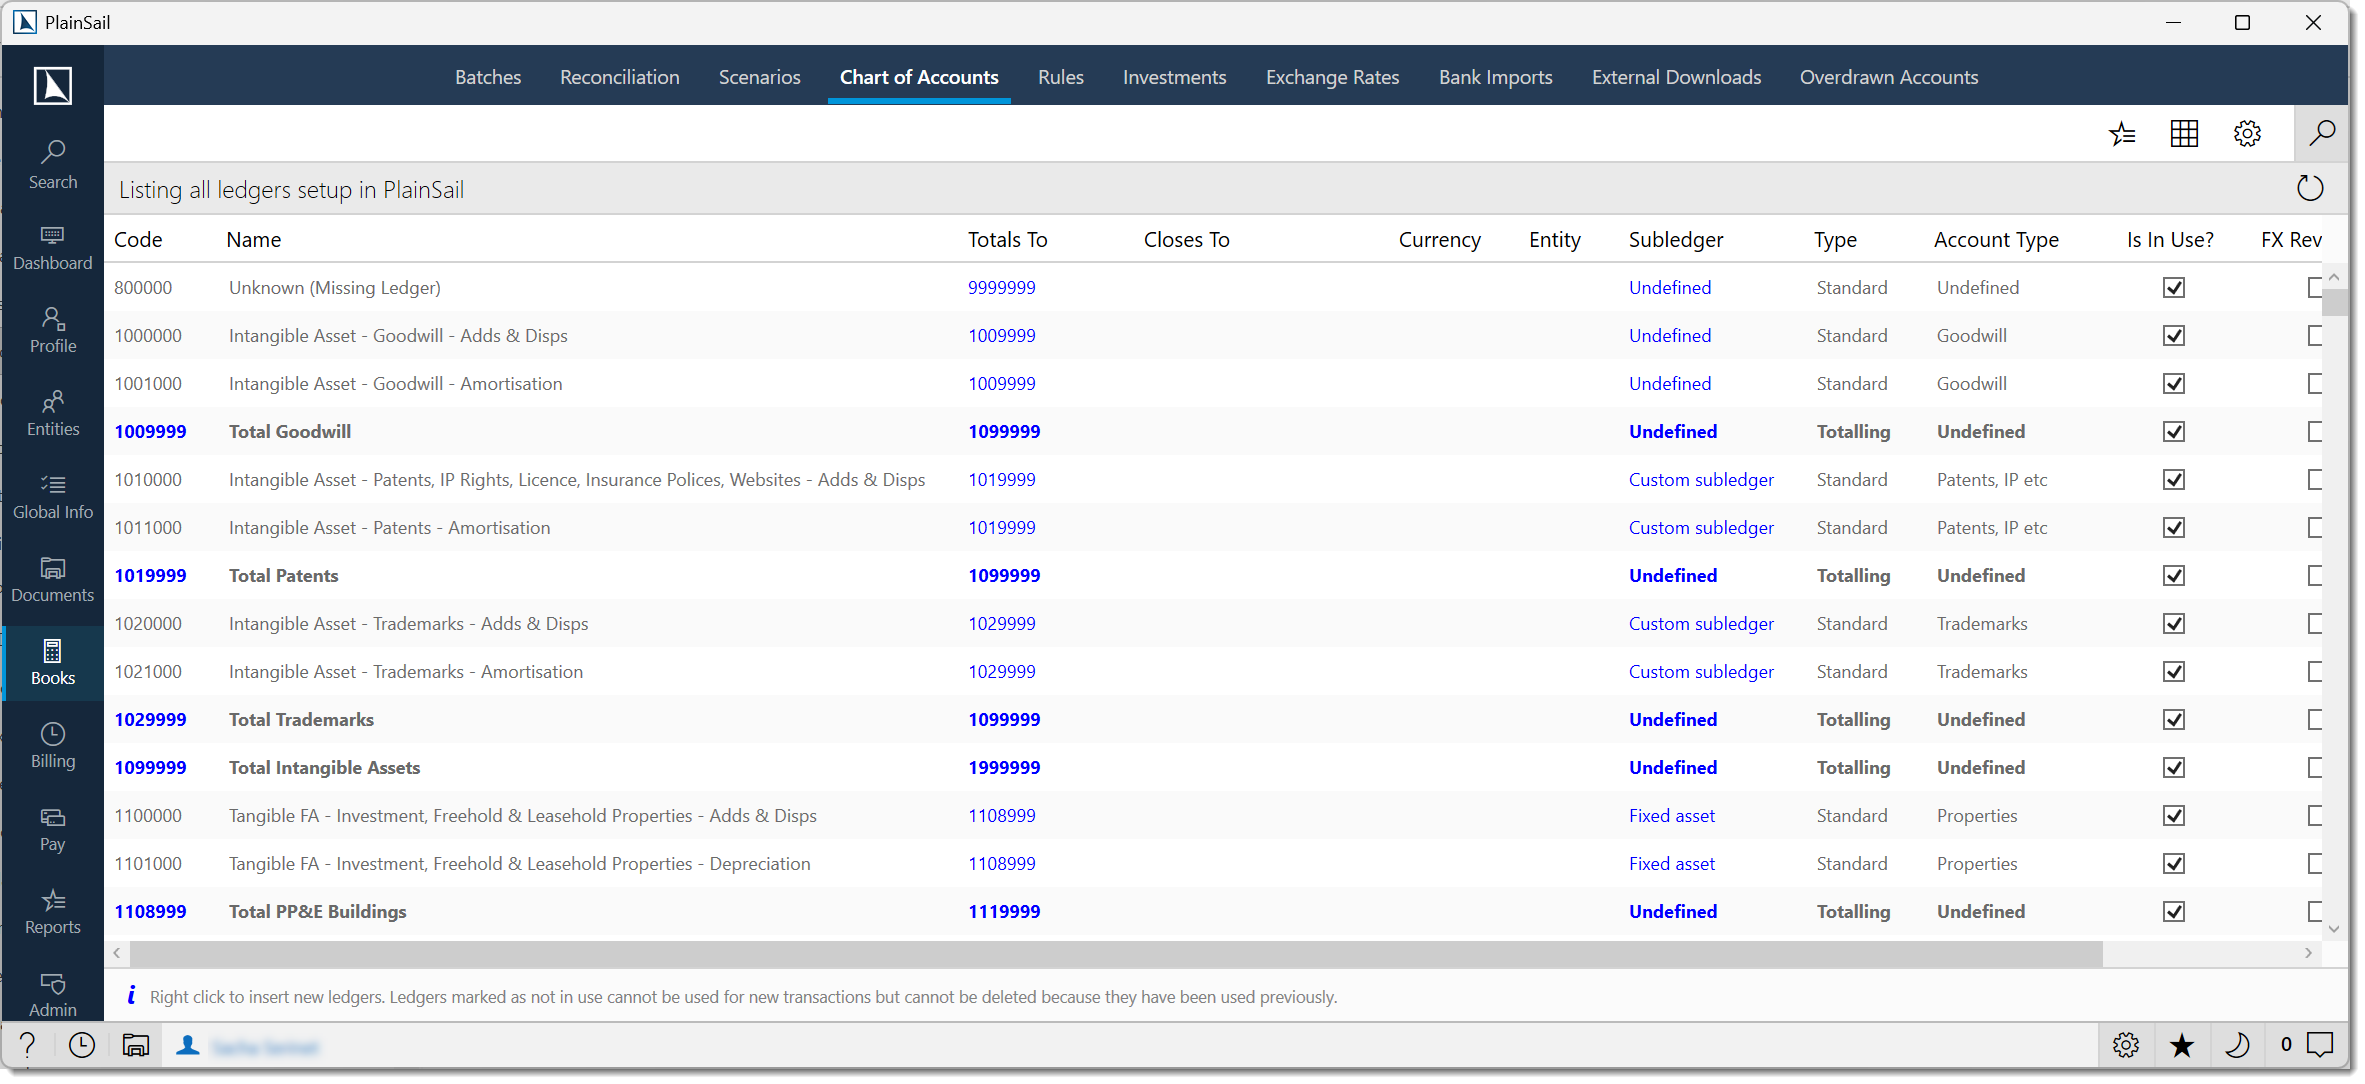
Navigate to Bookkeeping > Chart of Accounts to view and manage ledger accounts.
Bookkeeping_ChartOfAccounts_View to view the chart. Bookkeeping_ChartOfAccounts_Edit to create or edit ledgers. Bookkeeping_ChartOfAccounts_Delete to delete ledgers.
Ledger list columns
- Code – unique numeric identifier. By convention, totalling ledgers end in
99. - Name – descriptive name of the ledger.
- Type – Standard, Totalling, Bank Account, or Investment.
- Account Type – classification (Assets, Liabilities, Revenue, Expenses, etc.).
- Totals To – the totalling ledger this rolls up into.
- Currency – the ledger's currency (blank = base currency).
- In Use – whether the ledger is active.
- Subledger Type – type of subledger detail, if any.
Filtering and grouping
- Search – filter by code, name, or any visible property. Press Escape to restore the full list.
- Group by Totals To – show only ledgers that total to the selected ledger.
- Group by Closes To – show only ledgers whose year-end closing entries flow into the selected ledger.
- Group by Currency – show only ledgers with the same currency.
- Group by Business Entity – show only ledgers assigned to the same entity.
- Group by Subledger Type – show only ledgers with the same subledger detail type.
- F5 – refresh the list from the database.
Creating Ledgers
Select a ledger in the list to establish context (the new ledger's code will be calculated relative to it).
Click Insert Before or Insert After to create a single ledger with an auto-calculated code, or Insert Block 5 / Insert Block 10 to create a block of sequential ledgers.
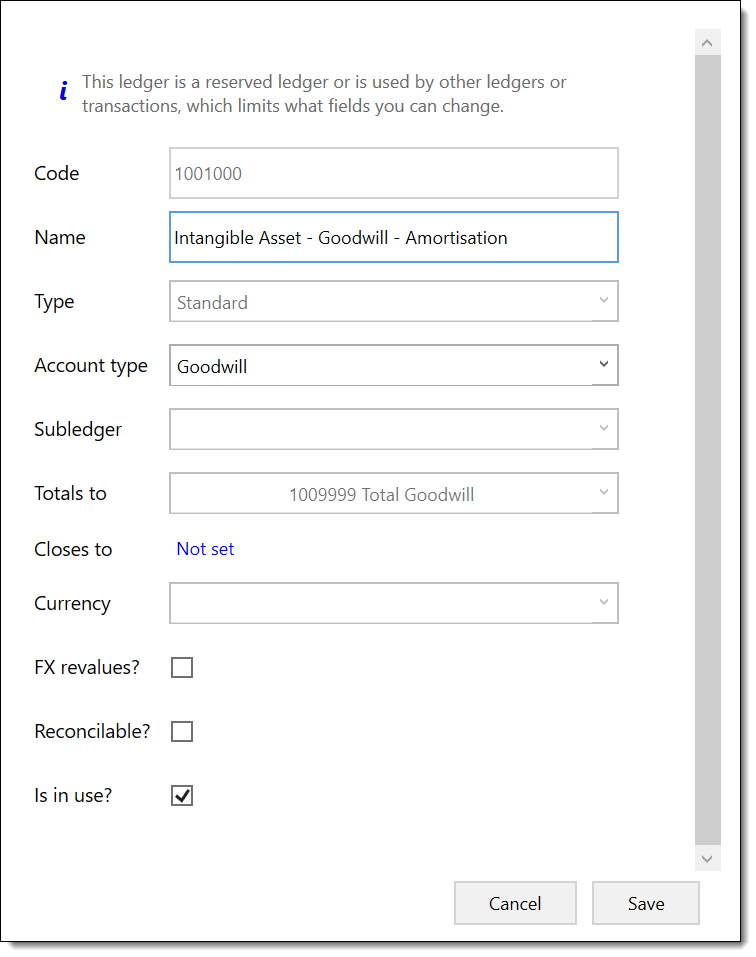
The ledger editor opens. Complete the fields and click Save.
Ledger editor fields
- Ledger Code (required) – unique numeric code. Must be less than the "Totals To" code. Cannot be changed if the ledger is in use.
- Name (required) – unique name. A warning is shown if a totalling ledger's name does not contain the word "total".
- Ledger Type (required) – Standard (regular posting account), Totalling (subtotal row, no direct postings), Bank Account (for bank account ledgers), or Investment (for portfolio/investment accounts; must use a Portfolio, Quoted Investment, or Unquoted Investment subledger).
- Account Type (required) – classification group (Assets, Liabilities, Revenue, Expenses, Current Assets, Fixed Assets, Turnover, Expenditure, etc.). Totalling ledgers should use "Undefined".
- Totals To – the totalling ledger this rolls up to.
- Currency – if set, the ledger operates in a specific foreign currency. Investment accounts cannot have a currency set.
- Subledger Type – enables a detail breakdown: Any Entity, Bank Account, Custom Subledger, Debt, Fixed Asset, Loan (Borrower), Loan (Lender), Quoted Investment, Unquoted Investment, Portfolio.
- Subledger Optional – if ticked, transactions can be posted with or without a subledger detail.
- Closes To (Credit/Debit) – the ledger(s) to which balances are transferred at year-end. Both must be set together.
- Closes To Overrides – entity-specific overrides for unique closing behaviour.
- FX Revalues – if ticked, participates in foreign exchange revaluation. Must be Standard or Bank Account type, and must not close down.
- Is Reconcilable – if ticked, the ledger can be used in bank reconciliation. Totalling ledgers cannot be reconcilable.
- In Use (required) – inactive ledgers cannot be used for new transactions.
- Business Entity – optionally ties the ledger to a specific entity (legacy feature).
Editing a ledger
Select the ledger and double-click or click Edit. The editor opens with current values. If the ledger is in use by transactions or rules, certain fields (code, type) may be restricted. The record is locked while being edited – if another user is editing, you'll see a "locked" message.
Ledger editing restrictions
| Field | Restriction |
|---|---|
| Code | Cannot be changed if the ledger has posted transactions. |
| Currency | Cannot be changed if the ledger has posted transactions. |
| Account Type | Can be changed, but warnings appear if the new type is incompatible with existing transactions. |
| Account Plan | Can only be changed by users with the Entities_Accounting_ChangeAccountPlan role. |
| Name | Can be freely edited. |
| Description | Can be freely edited. |
| Is Active | Can be deactivated if no unposted batches reference it. Deactivated ledgers are hidden from selection but retain historical data. |
Deleting a ledger
Select the ledger and click Delete. If the ledger has never been used, it is permanently deleted. If it has been used, it is marked as inactive ("not in use") instead. If other ledgers reference it (via "Totals To" or "Closes To"), update those references first.
Account Types & Plans
Account type groups
Ledger account types classify ledgers for reporting purposes. The system includes predefined groups:
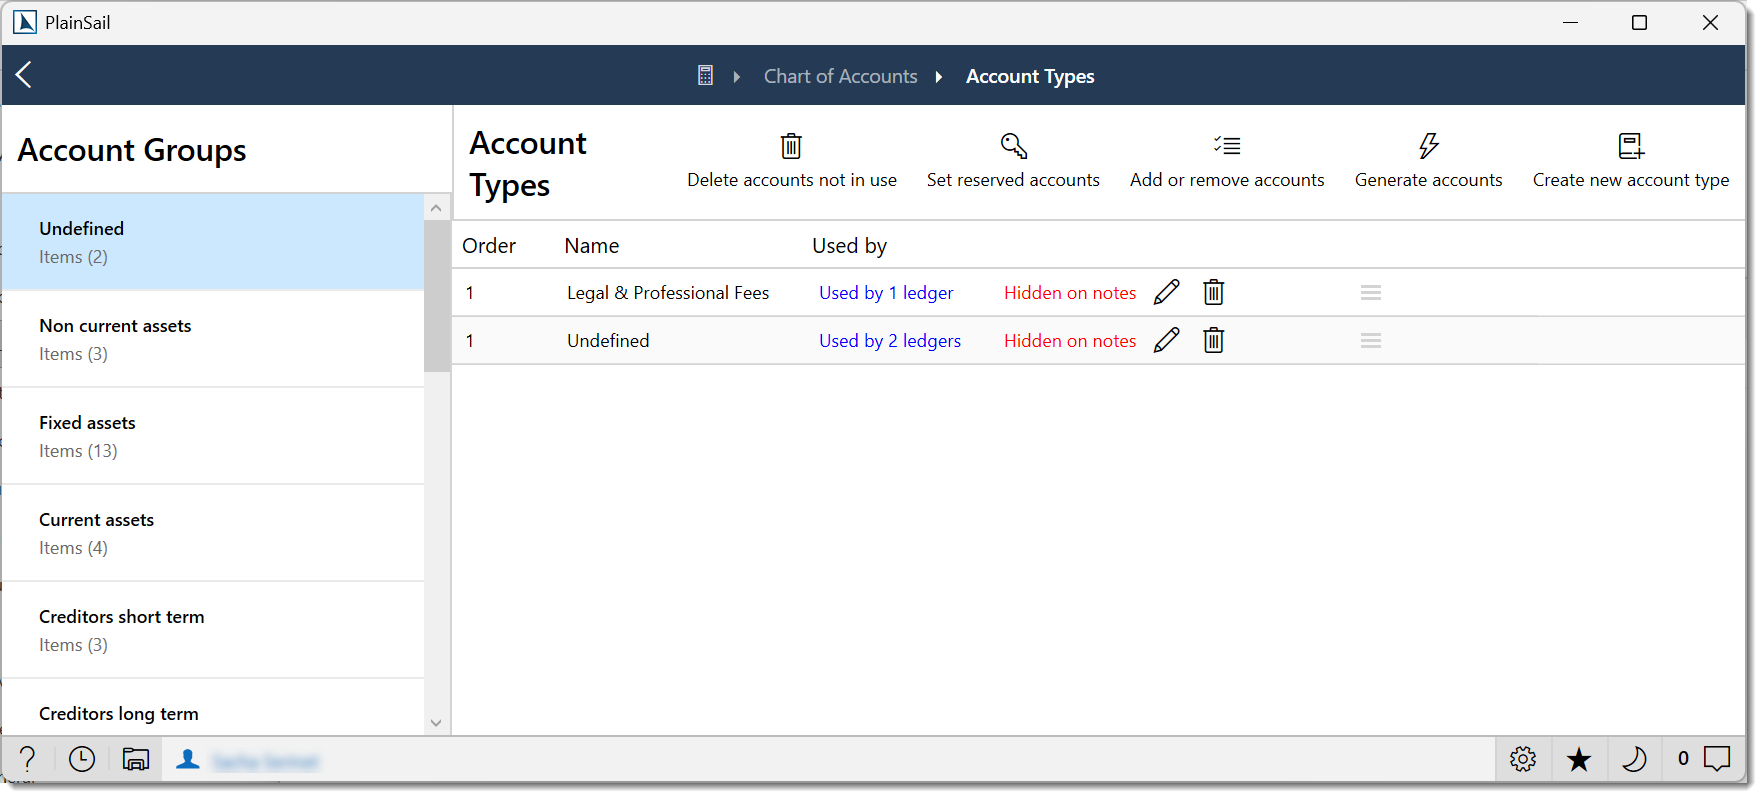
- Assets – general assets
- Non-Current Assets / Fixed Assets – long-term assets, property, plant, equipment
- Current Assets – cash, receivables
- Liabilities – general liabilities
- Creditors (Short Term / Long Term) – payables due within or after one year
- Equity / Capital and Reserves – share capital, retained earnings, accumulated funds
- Revenue / Turnover – sales, fees, income
- Expenses / Expenditure – operating costs
- Taxation – tax provisions
- Trust Income / Capital – trust-specific account types
- Distributions – dividends, beneficiary distributions
Manage account types from the chart of accounts screen by clicking Manage account types.
Account plans
Account plans define which subset of the chart of accounts is available for a particular entity. An entity is assigned an account plan, and only ledgers in that plan appear when posting transactions.
Navigate to Bookkeeping > Account Plans (or click Manage account plans on the chart of accounts screen).
Bookkeeping_ChartOfAccounts_AccountPlans_ViewEditDelete
- Create – click Add new, enter a name, and save.
- Edit – click the edit button on an account plan row.
- Delete – if the plan is in use by entities, it is marked as "not in use" instead of being deleted.
- View users – click Show used by to see which entities use the selected plan.
- Refresh – click the refresh button to reload the list.
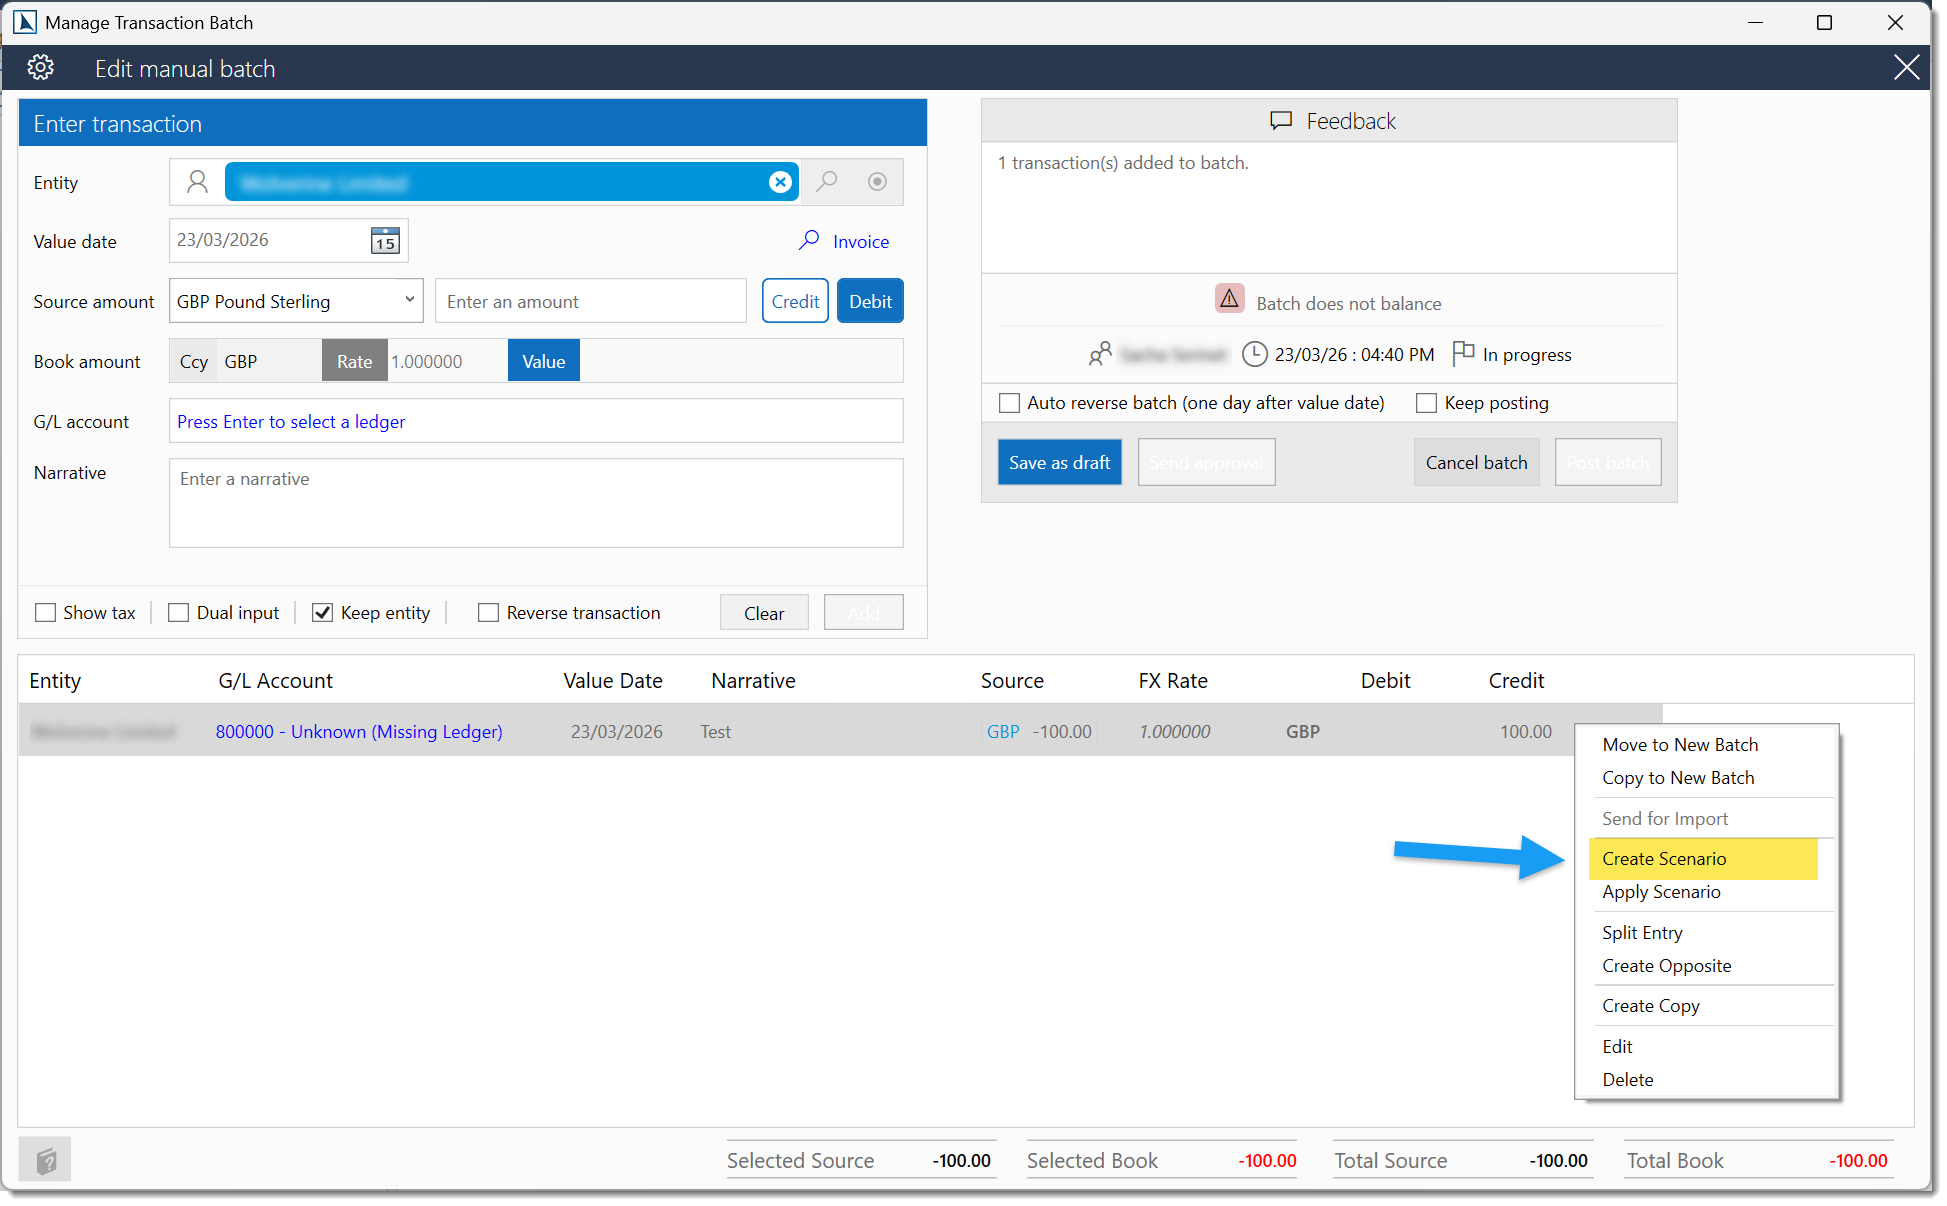
Transaction Batches
All accounting entries are created within transaction batches. A batch is a container that holds one or more journal transactions and goes through a lifecycle before posting to the live ledger.
Batch lifecycle
- In Progress – actively being edited. Transactions can be added, modified, or removed.
- On Hold – paused. No further edits until moved back to In Progress.
- Waiting for Authorisation – submitted for approval by another user.
- Rejected by Authoriser – approver has rejected; returns to an editable state.
- Requires Repair – encountered an issue during posting; needs manual intervention.
- Ready to Import – validated and ready to be posted.
- Imported (Posted) – transactions posted to the live ledger. This is final.
- Request to Cancel – cancellation requested.
- Cancelled – cancelled. This is final.
- Reversed – a new batch with opposite entries was posted.
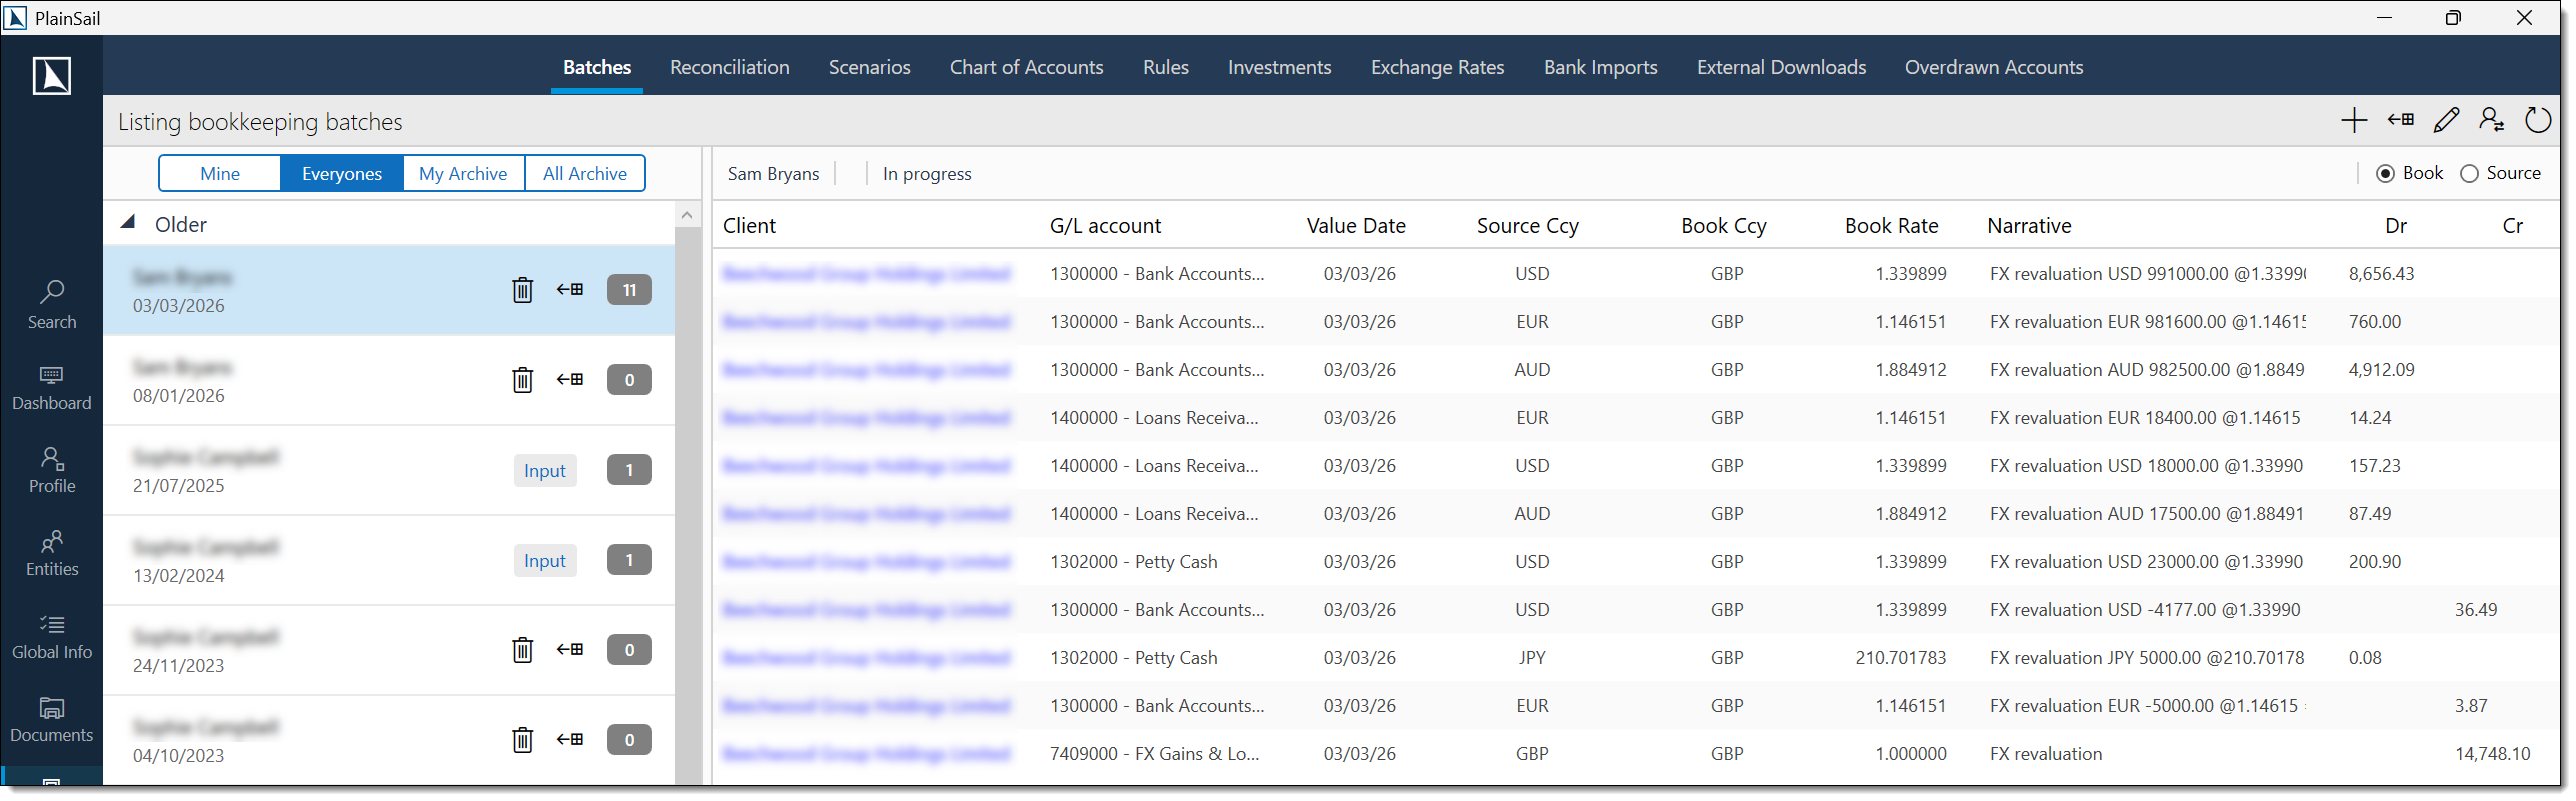
The batch list
Navigate to Bookkeeping > Batches. Batches are grouped by date and filtered by tab:
- My Active – your own in-progress, on-hold, awaiting-authorisation, rejected, or requiring-repair batches.
- All Active – all users' active batches (requires Administrator role).
- My Archive – your completed, cancelled, or ready-for-import batches.
- All Archive – all users' archived batches (requires Administrator role).
Bookkeeping_MyBatches_View to see your own batches. Administrator role for all-users views (All Active / All Archive tabs).
Each batch shows: Batch ID, description, status, entity name, creator, creation date, and a lock indicator if another user has it open.
Creating a new batch
Press Ctrl+N or click New Batch. The Batch Editor opens with a blank batch (status "In Progress", type "Manual Journal").
Entities_Accounting_PostJournal
The Batch Editor
The batch editor is a dedicated window with three main areas:
Batch details panel (top)
- Batch ID – auto-assigned identifier.
- Status – current lifecycle status.
- Description – optional description of the batch's purpose.
- Auto-reverse in one day – if ticked, the system posts a reversing batch one day after each transaction's value date. A confirmation prompt appears when posting.
- Keep posting – if ticked, after posting, a new empty batch opens automatically so you can continue entering transactions.
Transaction entry area (centre)
Each transaction requires:
- Entity – the entity this transaction relates to. Start typing to search. Pre-filled if opened from an entity's accounting tab.
- Ledger – the ledger account. Only ledgers in the entity's account plan are shown.
- Subledger Detail – if the ledger has a subledger type, select the specific detail (bank account, investment, etc.).
- Value Date – the date the transaction takes effect.
- Narrative – text description. Auto-complete suggests narratives used previously in this batch.
- Source Amount – positive = debit; negative = credit.
- Source Currency – defaults to the entity's base currency.
- Exchange Rate – if the source currency differs from base, the conversion rate.
- Base Amount – calculated from source amount × exchange rate.
- Invoice ID – optional reference. Auto-complete suggests invoice IDs used previously.
- Opposite Transaction – automatically generates a contra entry to balance. Can be hidden via the Hide Opposite toggle.
Press Enter or click Add to add the transaction. The input area clears for the next entry. If Keep Last Input is enabled, entity, ledger, and date are retained.
Click a transaction in the list to edit it, modify values, and click Save. Press Escape to cancel and return to new-entry mode.
Transaction list (bottom)
Displays all transactions in the current batch with: entity, ledger, value date, narrative, debit/credit amounts, currency, invoice ID, and running totals showing the batch balance.
Editor options
- Hide Opposite – hides opposite transaction entry fields for a cleaner interface.
- Keep Last Input – retains entity, ledger, date, and currency from the previous transaction.
- Quick Tab – pressing Tab skips optional fields for faster data entry.
- Select Invoice is Tab Stop – includes the invoice selector in the Tab order.
All options are saved per user and persist across sessions.
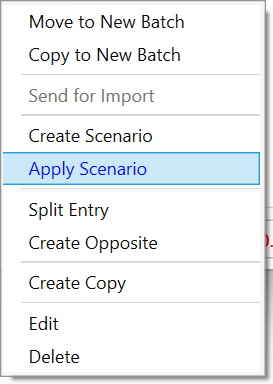
Transaction actions
- Copy to New Batch – copies selected transactions to a new batch. Originals remain.
- Move to New Batch – moves selected transactions to a new batch. They are removed from the current batch.
- Import to New Batch – copies to a new batch and immediately posts (imports) it.
- Create Scenario – creates a reusable scenario template from selected transactions.
- Apply Scenario – applies a saved scenario to generate transactions based on a template.
- Split Transaction – splits a single transaction into two, redistributing the amount.
- View Posted Transactions – opens a read-only list of all posted transactions for the selected entity and ledger, for reference while entering new ones.
Posting & Approval
Posting a batch
Click Post (or use "Send for Import" in the batch details panel).
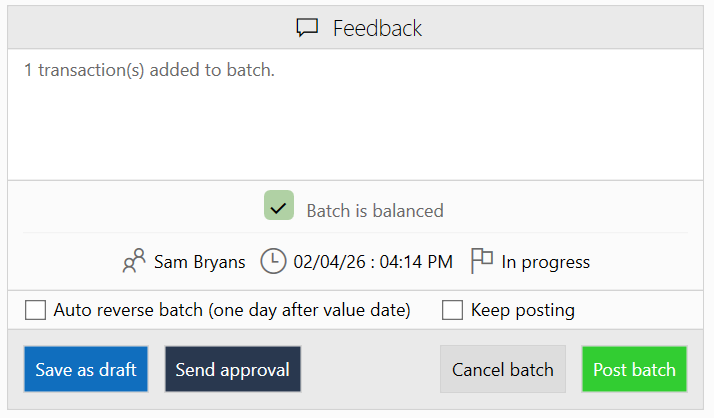
Confirm the prompt: "Post this batch?" If Auto-reverse is enabled, an additional confirmation appears.
The system validates (all transactions must be valid, at least one must exist, no unsaved edits). If validation passes, the batch is posted and status changes to Imported.
If Keep posting is enabled, a new empty batch opens automatically.
Batch approval workflow
Click Send for Approval. Select an approving user and enter an optional reason.
The batch status changes to Waiting for Authorisation and the approver is notified.
The approver reviews and either Approves or Rejects (with a reason). Rejected batches return to an editable state.
Other batch actions
- Place on Hold – pauses the batch. If it has no transactions, it will be deleted.
- Cancel Batch – requests cancellation with a confirmation prompt.
- Reassign – changes the primary entity shown on the batch list (does not affect individual transaction entities within the batch).
Batch locking
When a batch is opened for editing, it is locked to prevent concurrent edits. If another user has it locked, a message shows who. Locks are released when the editor window is closed. If a batch is closed with zero transactions, it is automatically deleted.
Reversing a posted batch
Navigate to the entity’s Accounting tab > Batches.
Select the posted batch to reverse.
Click Reverse (or right-click > Reverse Batch).
A confirmation prompt appears: “Are you sure you wish to reverse this batch?” Confirm.
The system creates a new contra batch with all debit/credit entries swapped. The original batch’s status changes to Reversed and the contra batch is posted automatically.
Entities_Accounting_ReverseBatch
Multi-entity batches
A single batch can contain transactions for multiple entities. Each transaction row in the batch editor has its own Entity field, so you can post debits and credits across different entities within one batch.
The batch list displays a primary entity name for reference, but this does not restrict which entities can appear in the batch’s transactions.
Entity Accounting Dashboard
When viewing an entity in the Client View, the Accounting tab provides a dashboard summarising the entity's financial position.
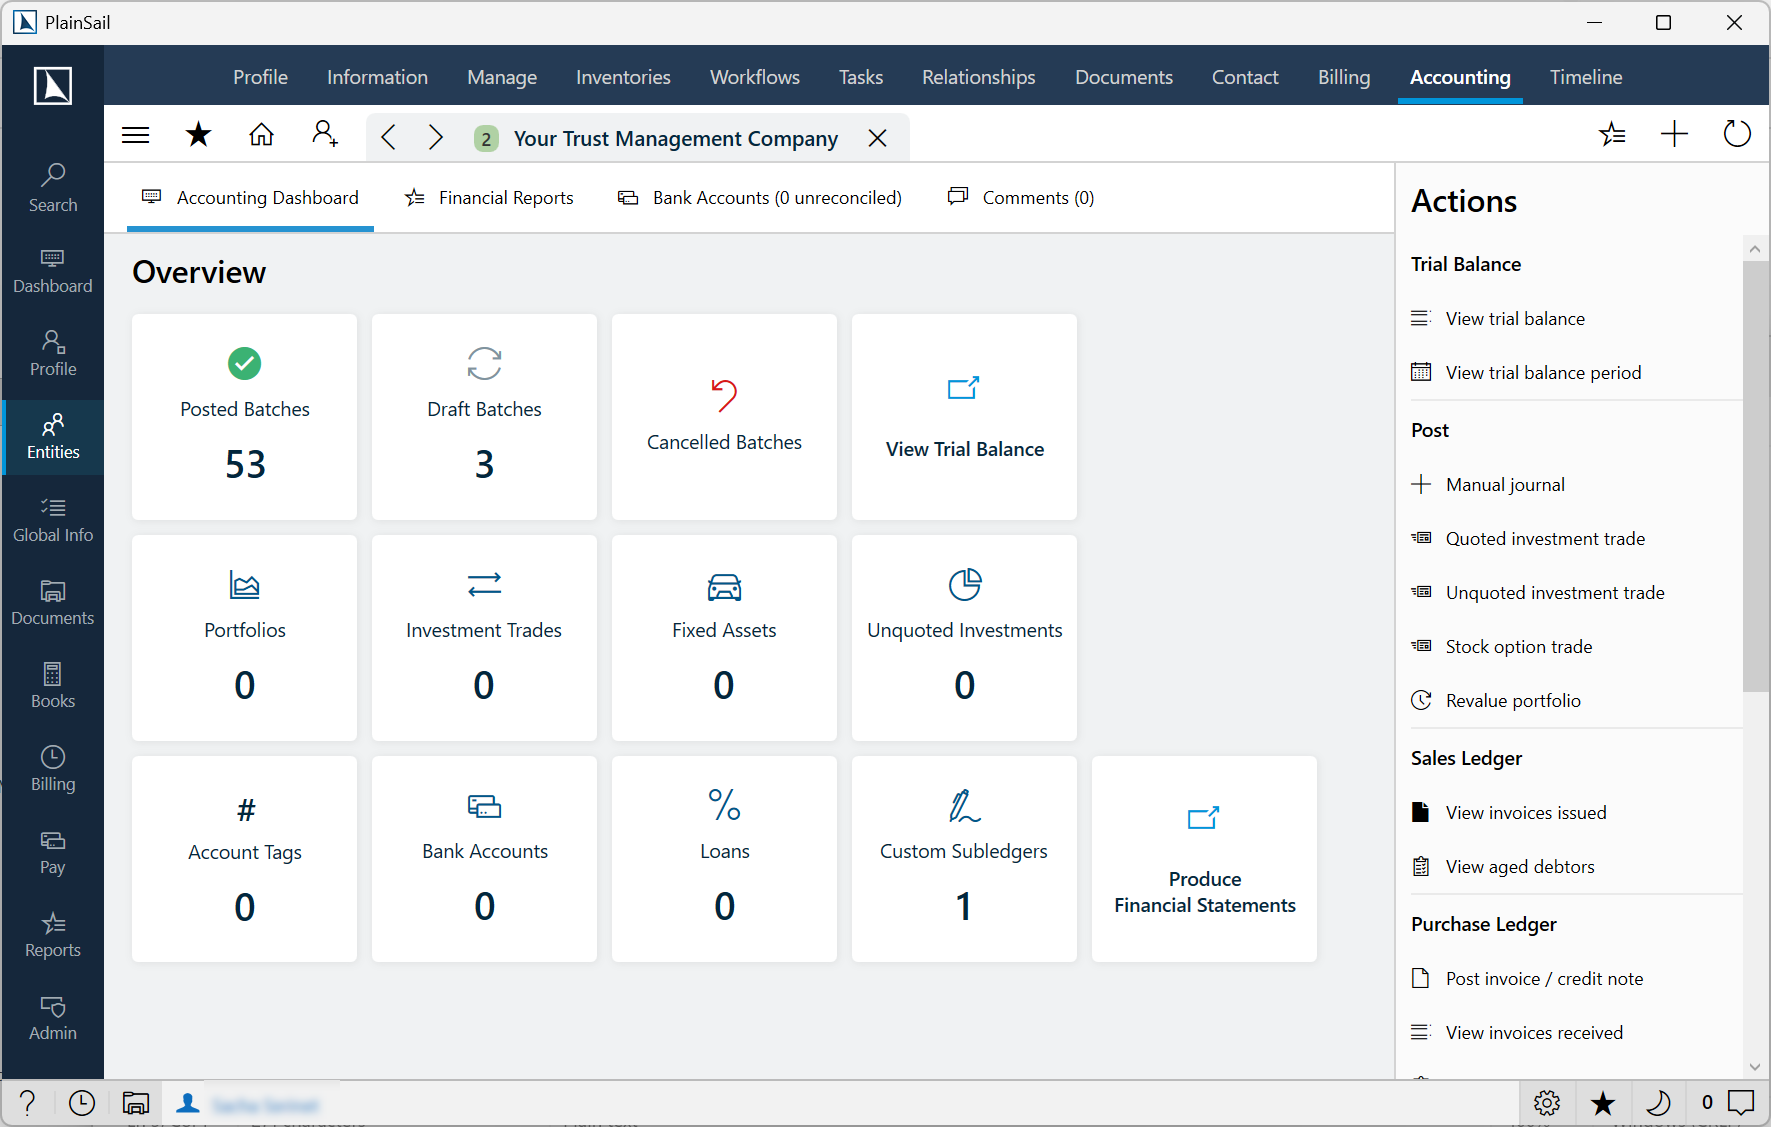
Dashboard sections
- Dashboard – overview tiles showing statistics (draft/completed/cancelled batches), navigation links, and summary information.
- Bank Accounts – all bank accounts with current balances and bank logos. Accounts with pending reconciliation items show a reconcile badge.
- Reports – all available accounting reports (SSRS and internal).
- Notes – a notes panel for recording bookkeeping notes against the entity.
Dashboard actions
- View Draft/Completed/Cancelled Batches – opens popouts showing filtered batch lists for this entity.
- View Trial Balance – navigates to the entity's trial balance. Requires
Entities_Accounting_ViewTrialBalance. - View Loans / Debts / Bank Accounts / Portfolios / Fixed Assets / Unquoted Investments / Custom Sub-Ledgers – navigate to the relevant entity data.
- View Investment Trades – opens a popout showing all investment trades.
- View Account Tags – opens the ledger tag editor.
- Produce Financial Statements – opens the financial statements production wizard.
- Reconcile – on a bank account tile, opens bank reconciliation. Requires
Entities_Accounting_ReconcileBankAccount. - Reconcile Portfolio – opens investment transaction import/reconciliation.
- Open Report – run an accounting report. Requires
Entities_Accounting_ViewAccountingReports.
Ledger tags
Ledger tags are personal shortcuts (starting with #) that map to a specific ledger account and optional subledger detail for a specific entity. They speed up transaction entry by allowing you to type a tag name instead of searching for the ledger.
From the accounting dashboard, click View Account Tags, then add, edit, or remove tags and save. Tags can also be created directly from the batch editor by clicking the "create tag" button next to the ledger field.
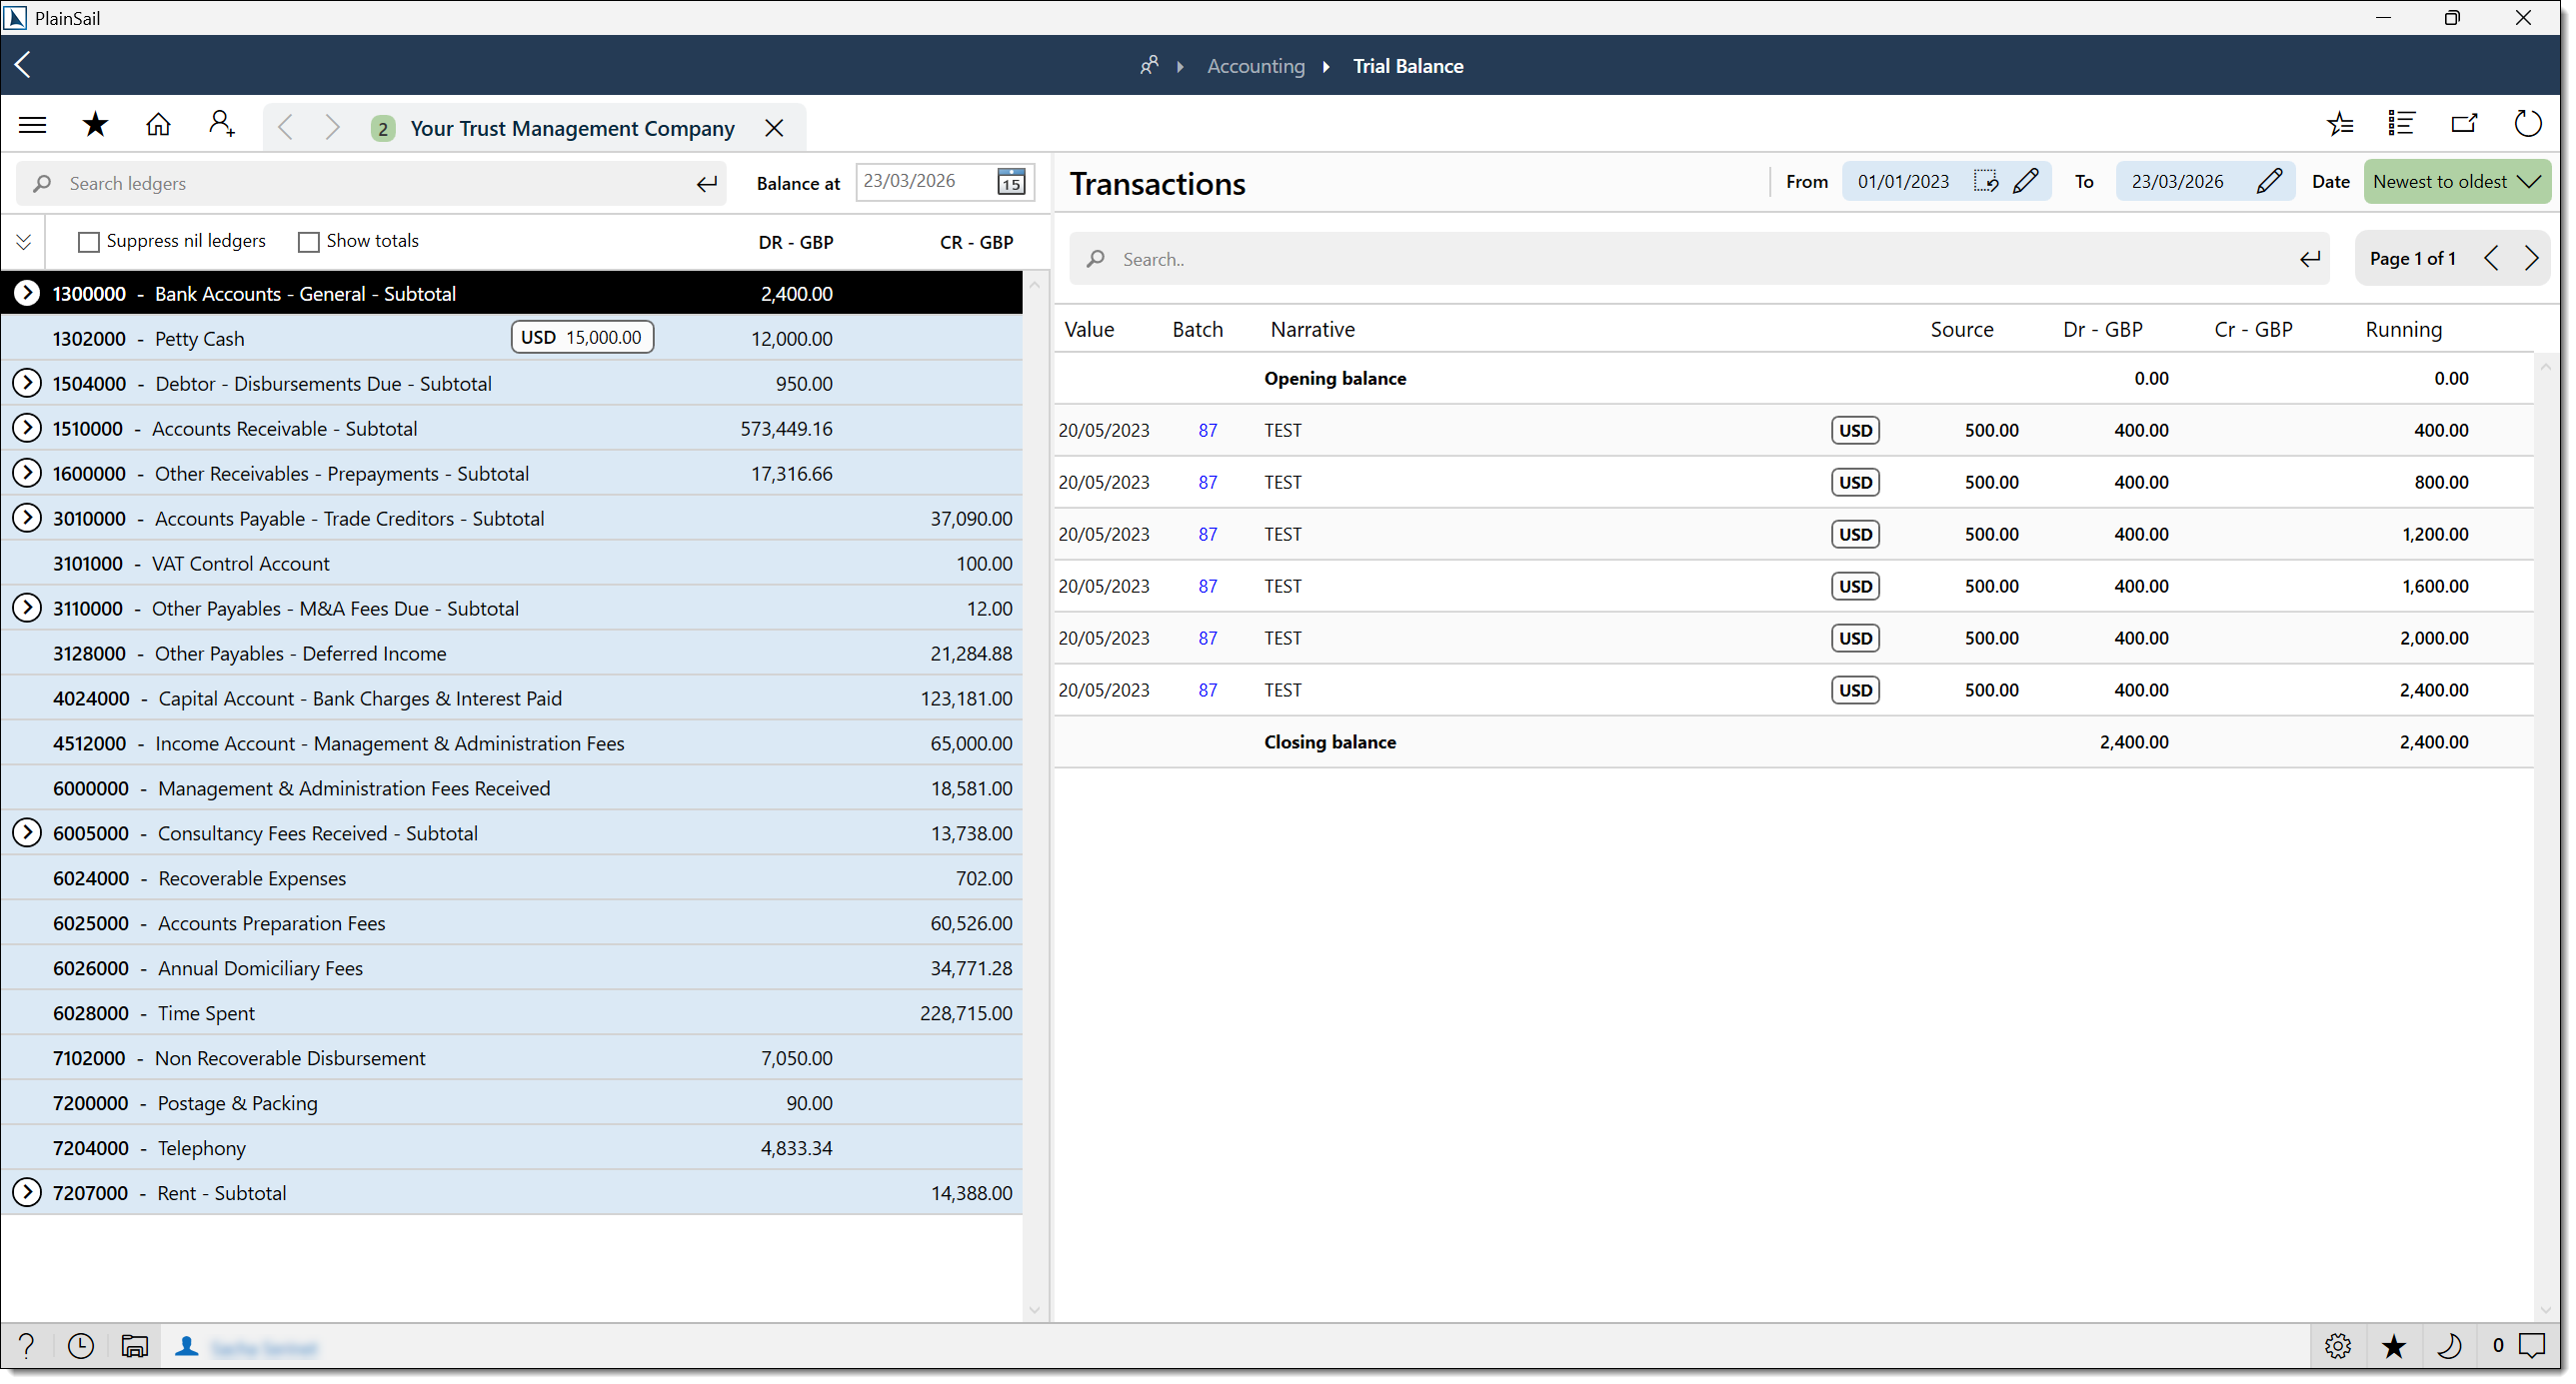
Trial Balance
The trial balance shows all ledger account balances for an entity at a specific point in time, confirming that total debits equal total credits. Navigate from the entity's Accounting tab by clicking View Trial Balance.
Entities_Accounting_ViewTrialBalance
Display
- Each ledger account with code, name, and balance (debit or credit column).
- Totalling ledgers showing subtotals for their group.
- Balances in both base currency and source currency (for foreign-currency ledgers).
- Drill into individual ledger accounts to see the underlying transactions.
Actions
- New Batch – open a new batch pre-populated with the current entity.
- Perform FX Revaluation – generate FX revaluation entries for all ledgers marked as FX-revaluing.
- Filter by date – view balances at different points in time.
- Drill into ledger – click a row to see all transactions posted to that account.
Transaction audit trail
To trace a posted entry back to its batch:
From the Trial Balance, drill down on a ledger account to see individual transactions.
Each transaction shows the batch reference (batch number and name).
Click the batch reference to open the original batch.
The batch shows:
- Who created it.
- When it was created.
- When it was posted.
- All transaction lines.
- Whether it has been reversed.
Subledger reconciliation
Subledgers are detailed ledgers that support a control account (e.g. individual debtor balances supporting the total debtors control account).
Run the Trial Balance for the entity.
Compare the control account balance with the sum of subledger balances.
If they match, the subledger is reconciled.
If they don’t match, investigate:
- Transactions posted to the control account without a subledger entry.
- Subledger entries that bypass the control account.
Bank Reconciliation
Bank reconciliation matches transactions imported from bank statements against transactions posted in the accounting system to ensure that the bank balance in the books matches the actual bank balance.
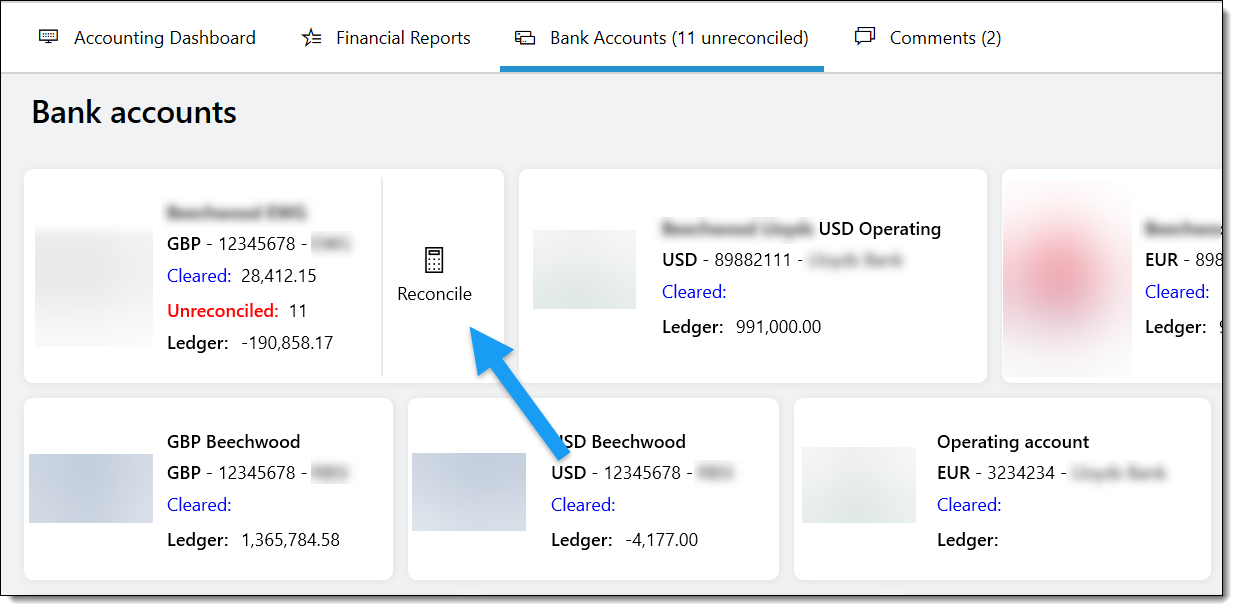
Navigate from the entity's Accounting tab → click Reconcile on a bank account tile, or from Bookkeeping > Bank Reconciliation.
Entities_Accounting_ReconcileBankAccount
Selecting a bank account
Click the bank accounts button to show all accounts with unreconciled entries. The list shows bank name, account number, currency, and the count of pending transactions. Click an account to begin.
Reconciliation display
- Bank account details – bank name, account number, currency, and bank logo.
- Statement Opening Balance – from the imported bank statement.
- Statement Closing Balance – from the imported bank statement.
- Ledger Reconciled Balance – current reconciled balance in the accounting ledger.
- Net Unreconciled – total of all unreconciled statement line amounts.
- Balance After Reconciliation – projected balance after all shown items are reconciled.
- Difference – difference between statement closing and ledger reconciled balance.
- Statement Lines – unreconciled bank statement transactions ordered by date.
Reconciling transactions
Each statement line shows the bank transaction details and any matched transactions (auto-suggested) or rule matches.
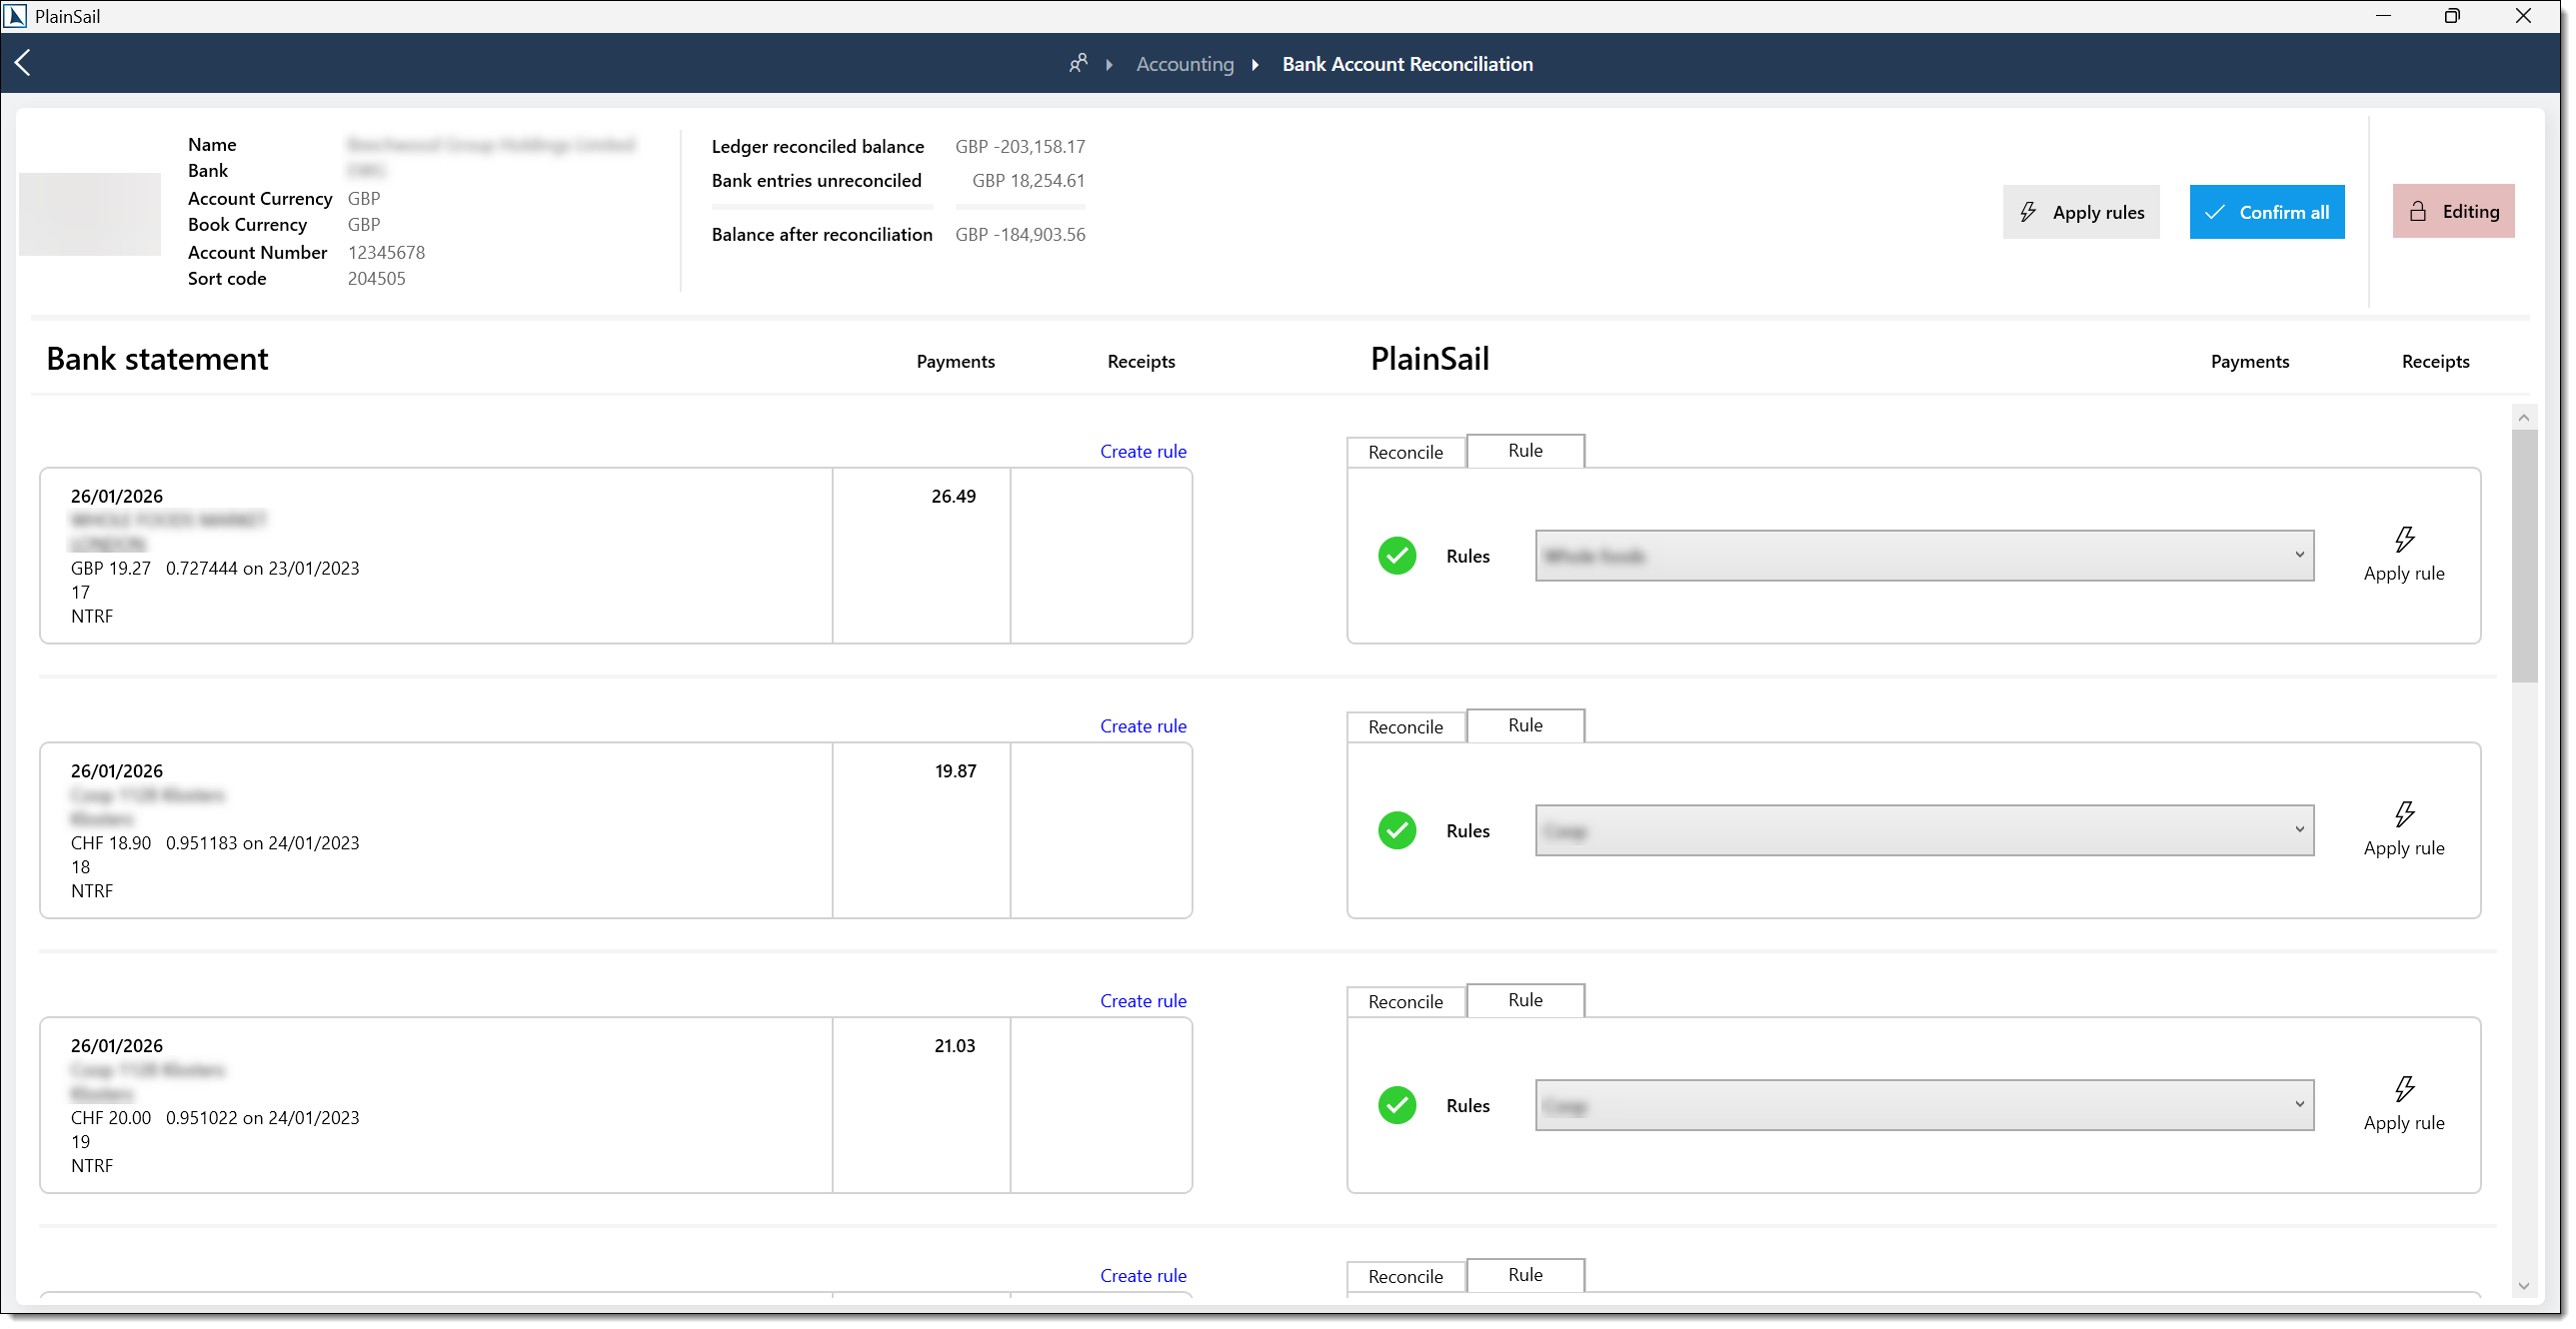
- Automatic matching – the system automatically suggests matches between statement lines and posted transactions.
- Manual reconciliation – click a statement line to expand, review the suggested match, and click Reconcile.
- Batch reconciliation – press Ctrl+Shift+R to automatically reconcile all statement lines with confirmed matches.
- Apply all rules – click Apply All Matching Rules to process all statement lines matching a reconciliation rule.
When a statement line is reconciled, it is removed from the unreconciled list, the ledger reconciled balance updates, and matching suggestions on other lines referencing the same posted transaction are updated.
Locking
Bank accounts can be locked during reconciliation. Click Lock to prevent concurrent access. If another user is reconciling, a message informs you. Locks are released when you navigate away.
Reconciliation Rules
Reconciliation rules automate matching for recurring transactions (e.g. monthly direct debits):
On an unreconciled statement line, click Create Rule.
The rule editor opens, pre-populated with the bank transaction details. Define matching criteria (description pattern, bank, entity, currency) and target ledger account.
Click Save. The rule is immediately applied to all matching statement lines.
Bookkeeping_BankReconciliation_Rules_Edit to edit rules. Bookkeeping_BankReconciliation_Rules_CreateGlobal to create global rules.
Handling incorrect rule matches
When “Apply all rules” produces an incorrect match:
The matched transaction is highlighted in the reconciliation screen.
Unmatch the incorrect pairing by selecting it and clicking Unmatch or pressing Delete.
Manually match the bank statement line to the correct ledger transaction.
Edit the rule (if the rule is wrong) via Bookkeeping > Reconciliation Rules to prevent future mis-matches.
Delete the rule if it is no longer valid.
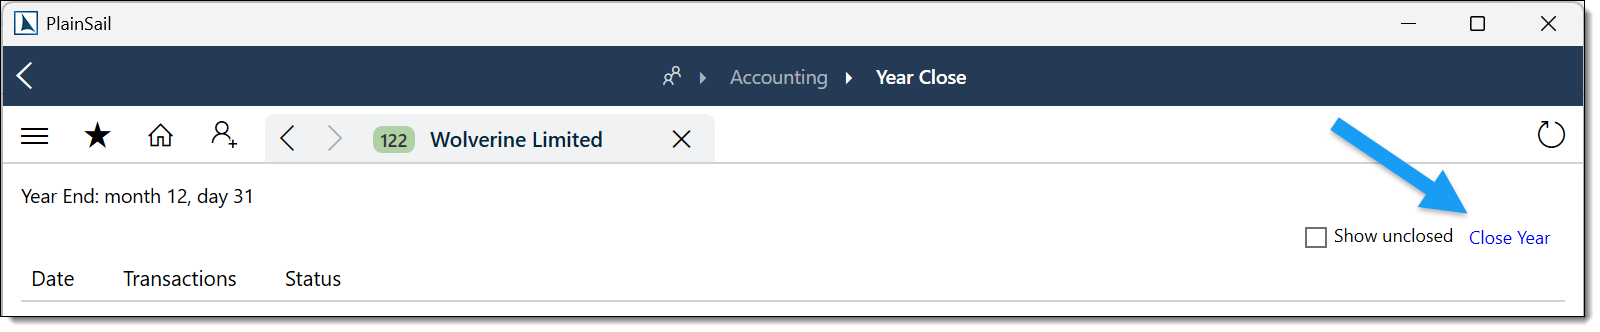
Year-End Closure
Year-end closure finalises a financial year for an entity. It validates pending transactions, optionally performs FX revaluation, generates closing journal entries that transfer P&L balances to the balance sheet, and locks the closed period.
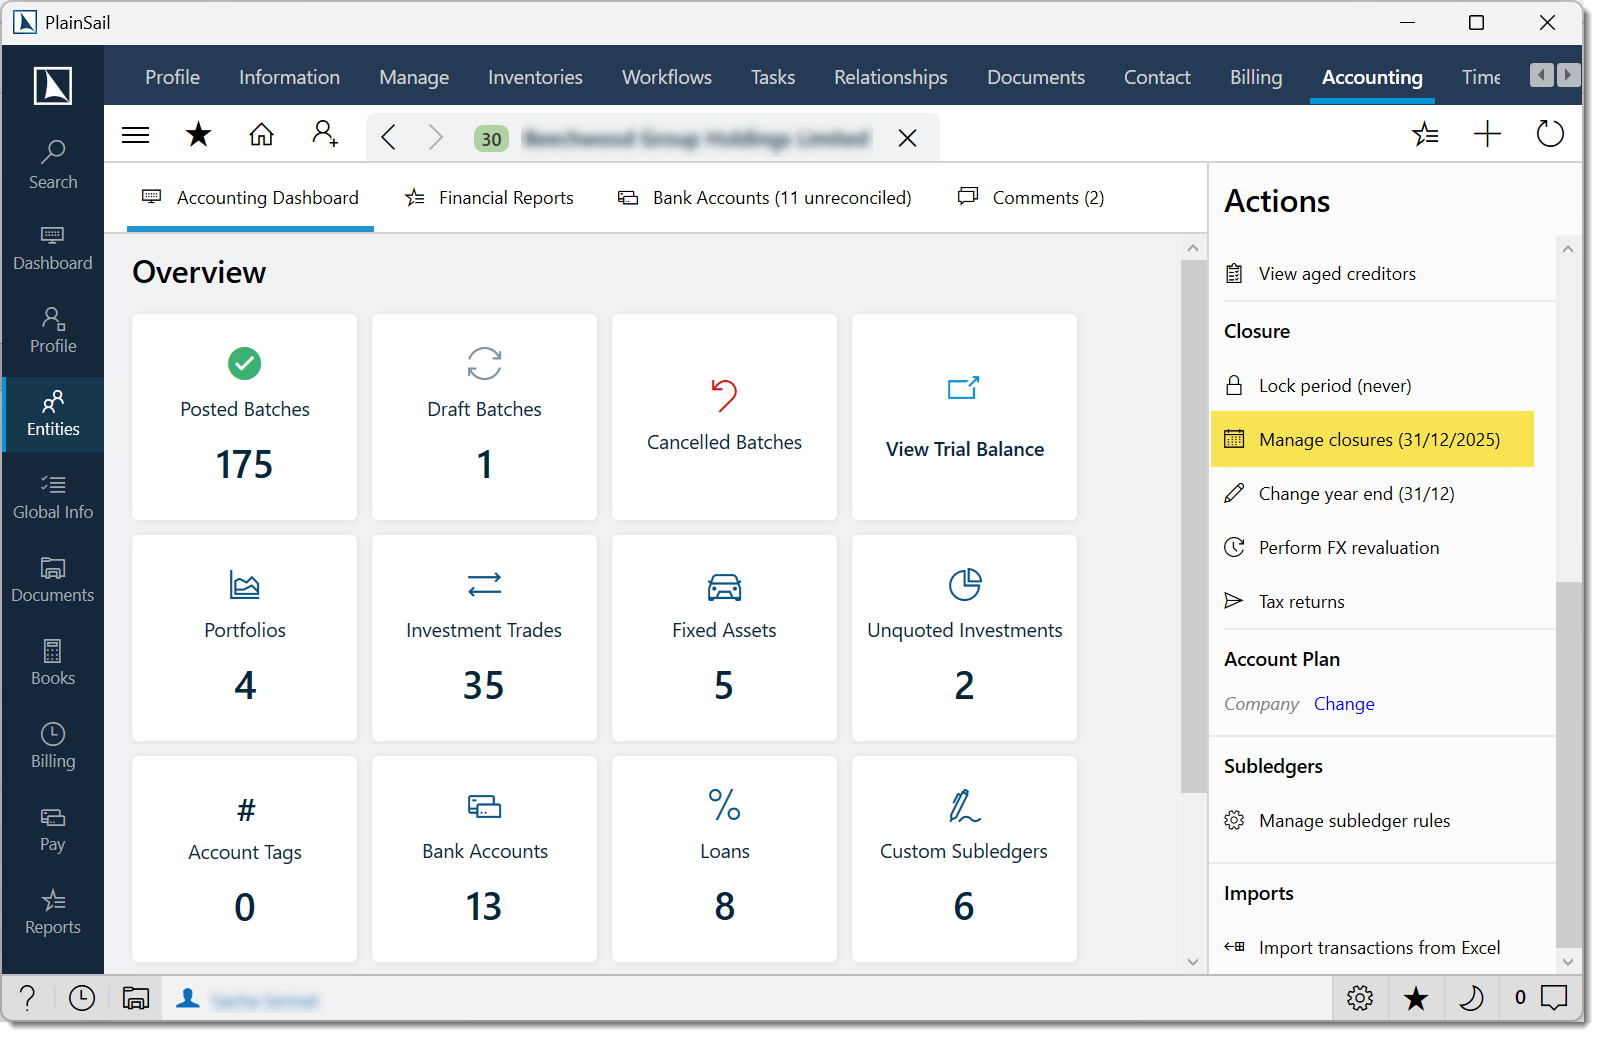
Entities_Accounting_CloseYear
The Close Year wizard
Validate Dates – confirm the closure date (typically the last day of the financial year). The system checks that the entity has the required accounting periods configured.
Validate Pending Transactions – checks for any unposted (draft) batches dated before or on the closure date. You must post or cancel them before proceeding.
Generate FX Transactions – if the entity has foreign-currency ledgers that require revaluation, FX revaluation entries are generated and posted immediately. Skipped if no foreign-currency accounts exist.
Generate Closing Transactions – calculates P&L balances and generates journal entries to close them to the appropriate balance sheet accounts (as defined by "Closes To" settings). You can review before proceeding.
Confirm and Close – review the summary (entity name, closure date, number of closing transactions) and click Confirm to post the closing entries and lock the period.
After closure
- The closure date is recorded on the entity and becomes the "Last Closed Date".
- No transactions can be posted with a value date on or before the closure date.
- Subsequent years can be closed by running the wizard again.
Financial Statements
Financial statements (accounts) can be produced from PlainSail directly from the accounting data, generated as Excel workbooks based on SSRS report templates.
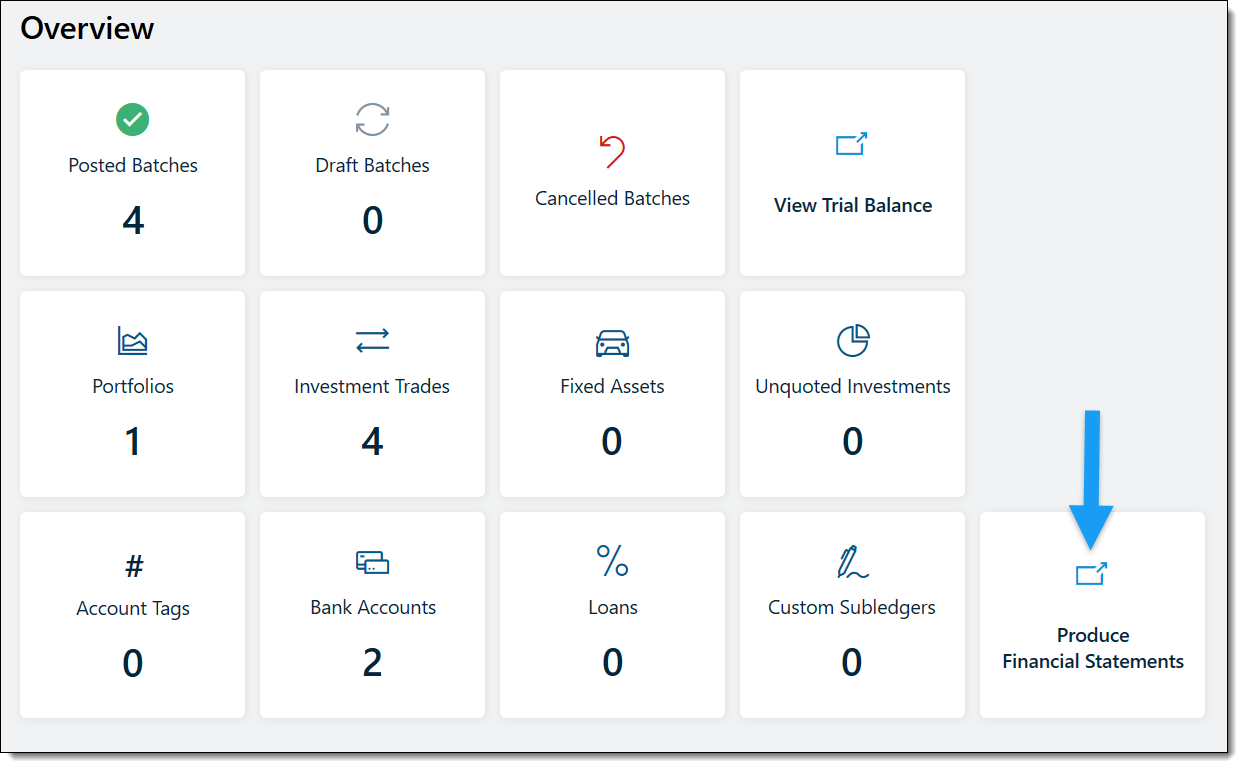
Producing financial statements
From the entity's Accounting tab, click Produce Financial Statements.
Configure date fields: Current period (From/To) and Prior period (From/To) – auto-calculated based on the entity's last closure date.
Set options: Include Workings (working papers spreadsheet), Recalculate Row Heights (Excel formatting), Include Tiny Amounts as Zero (treat small rounding amounts as zero).
Click Produce Accounts. The system performs the following sub-steps:
- Calculate balances – queries the trial balance for the current and prior periods.
- Generate FRS workings – calculates cash equivalents, retained earnings, reserve account note groups, and rounding adjustments.
- Apply rounding – amounts are rounded to the configured precision.
- Download from SSRS – the financial statement template is fetched from SQL Server Reporting Services.
- Process through Excel – the template is populated with calculated data in Excel.
- Save – the generated financial statements document is saved to the entity’s document library.
- Open – the document opens in Excel for review.
Click Preview Workings to produce a draft working papers spreadsheet without full financial statements. Click Manage Notes to edit accounting policy notes that appear in the statements.
Scenarios
Scenarios are reusable transaction templates that speed up repetitive journal entries. A scenario defines transaction lines with ledger accounts, currencies, and calculation rules, but without specific dates or amounts – those are filled in when applied.
Bookkeeping_Scenarios_View to view. Bookkeeping_Scenarios_Edit to create or edit.
Creating a scenario
Create from the batch editor (select transactions → Create Scenario) or from the scenario manager:
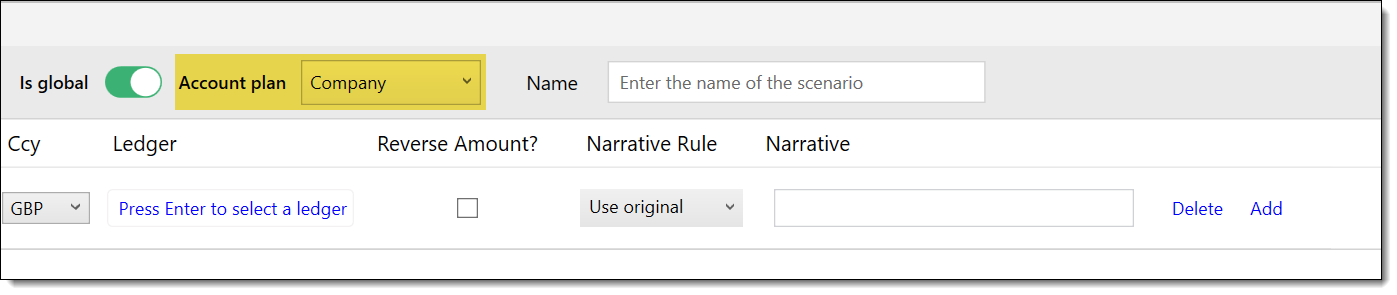
- Enter a name for the scenario.
- Optionally select a currency (or "Use Original" to inherit).
- Choose Entity-specific (only available for one entity) or Global (available for all entities; must select an account plan).
- For each line, define: ledger, subledger detail, entity, currency override, narrative rule, and whether to invert the original amount.
Applying a scenario
From the batch editor: select a transaction, click Apply Scenario, review the generated transactions in the dialogue, and click OK to add them to the batch.
Intercompany transactions
For transactions between entities managed by the same firm:
Post a debit batch on Entity A (e.g. debit intercompany receivable, credit revenue).
Post a credit batch on Entity B (e.g. debit expense, credit intercompany payable).
Use consistent narratives and reference numbers.
Periodically reconcile intercompany balances using the Trial Balance reports.
Eliminations for group reporting
For group reporting or consolidated accounts, intercompany transactions need to be eliminated. Use the Scenarios feature to create elimination entries that zero out intercompany balances for consolidation purposes.
Bookkeeping_Scenarios_View and Bookkeeping_Scenarios_Edit for scenario management.
Exchange Rates
The exchange rates module manages foreign currency rates used for multi-currency transactions and FX revaluation. Navigate to Bookkeeping > Exchange Rates.
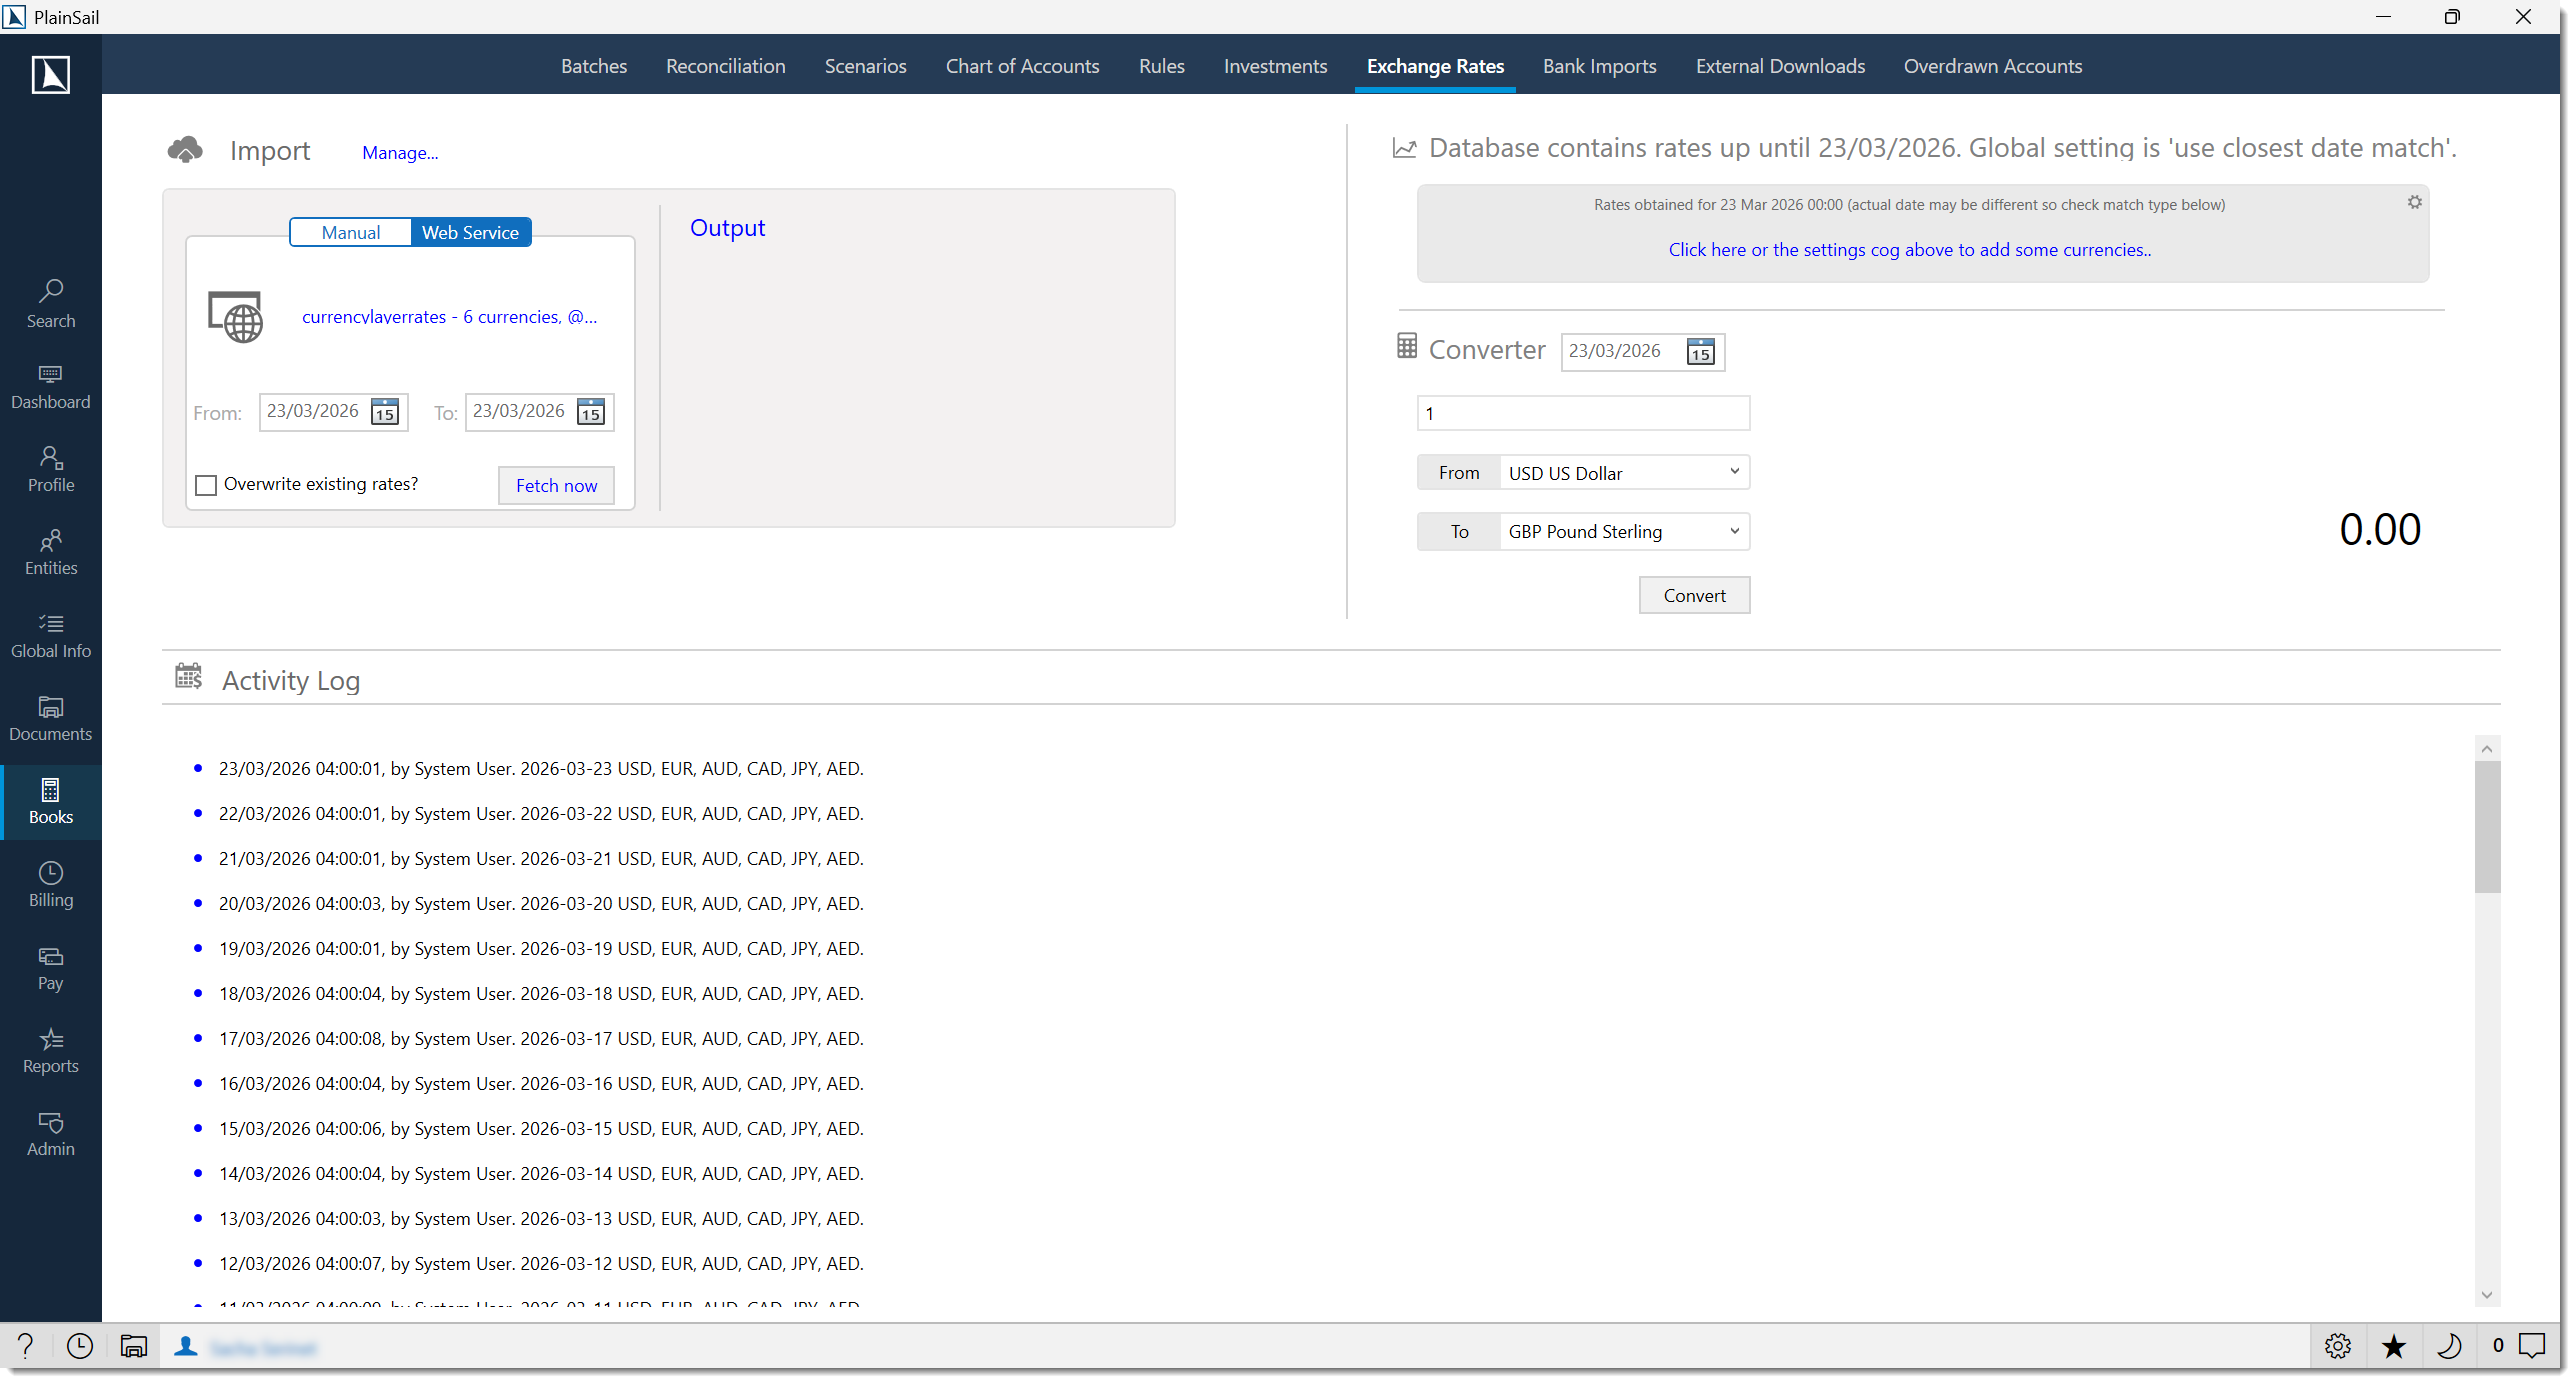
Bookkeeping_ExchangeRates_View to view. Bookkeeping_ExchangeRates_Edit to import or edit.
Import methods
- Manual File Import – import rates from an Excel (.xls, .xlsx) or CSV file. Existing dates are overwritten; new dates are added.
- API Service – if an external exchange rate provider is configured, rates are fetched automatically at a configured time each day.
Fetching rates from API
Switch to the Service tab. Select a Start Date and End Date.
Choose whether to Overwrite Existing rates for matching dates.
Click Fetch Date Range and confirm. For large ranges (10+ days), a warning appears.
Configuring the provider
Click Configure Rates to set the provider API key, currencies to fetch, and the time of day for automatic fetches.
Converter tool
A built-in currency converter is available at the bottom of the exchange rates screen. Select currencies and an amount to see the converted value using the latest rates.
Manage individual rates
Click Manage Rates to view, edit, and add individual exchange rates for specific dates.
Rate Conversions
When a transaction is posted in a currency different from the entity’s base currency, PlainSail looks for an exact match (currency + date) in the exchange rate table. How the system handles missing rates depends on a key configuration setting.
Require Exact FX Dates setting
This setting is found under Admin > Configuration > Options and has two modes:
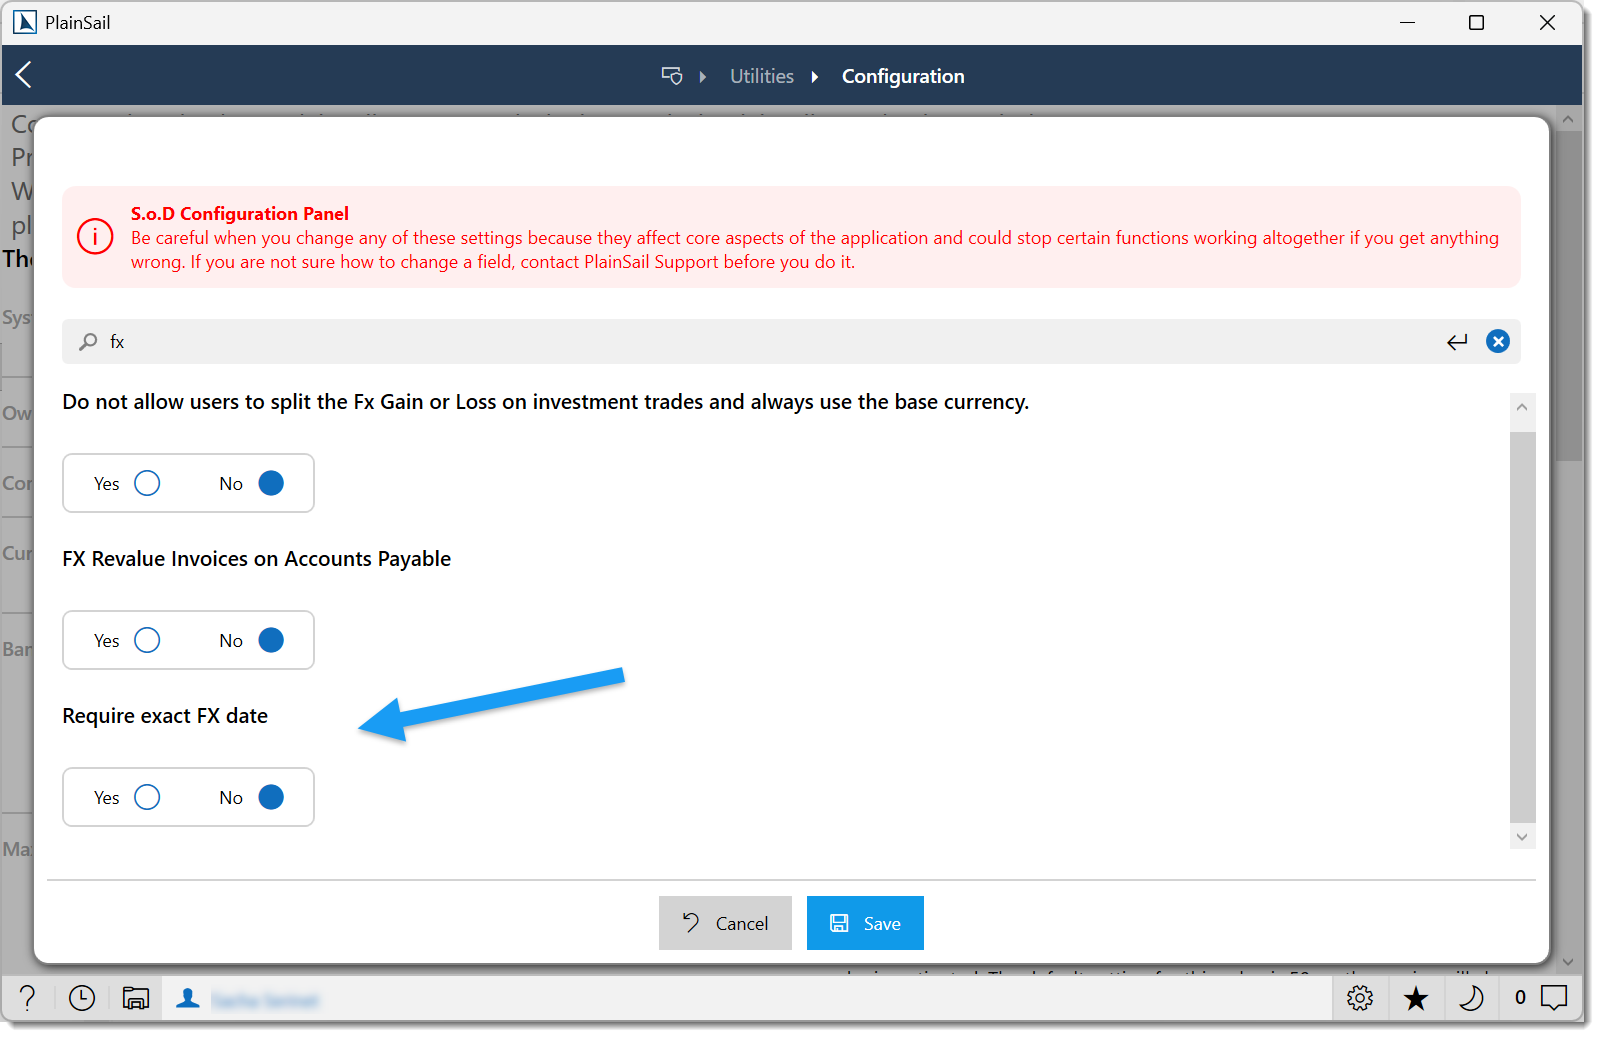
- Yes – if no exact rate is found for the transaction date, an error is raised. You must fetch or manually enter the rate before the transaction can be posted.
- No – PlainSail uses an algorithm to find the best available rate. For example, if 10 days of rates are missing between the 15th and the 25th and you post a transaction on the 20th, the system calculates a median rate between the two closest available dates. For larger gaps, the single closest available date may be used instead.
Manual override
In the Batch Editor screen, you can override the system-determined rate with your own value – the book value recalculates automatically based on the new rate. Conversely, entering a specific book value manually causes PlainSail to set the exchange rate appropriately.
Cross rates
Exchange rates are stored against your company’s base currency. For conversions between two non-base currencies, PlainSail calculates a cross rate using the following formula:
fromRate = GetRate(fromCurrency, date)toRate = GetRate(toCurrency, date)crossRate = fromRate / toRate
For example, if £1 = $3 and £1 = €2, then the cross rate for EUR to USD is €1 = $1.50. The Converter screen displays the type as “Cross rate” alongside the calculated value.
Cross Rate = Rate A ÷ Rate B, where Rate A is the exchange rate from Currency A to the base currency and Rate B is the exchange rate from Currency B to the base currency. For example, if EUR/GBP = 0.8850 and USD/GBP = 0.7900, then EUR/USD = 0.8850 ÷ 0.7900 = 1.1203.
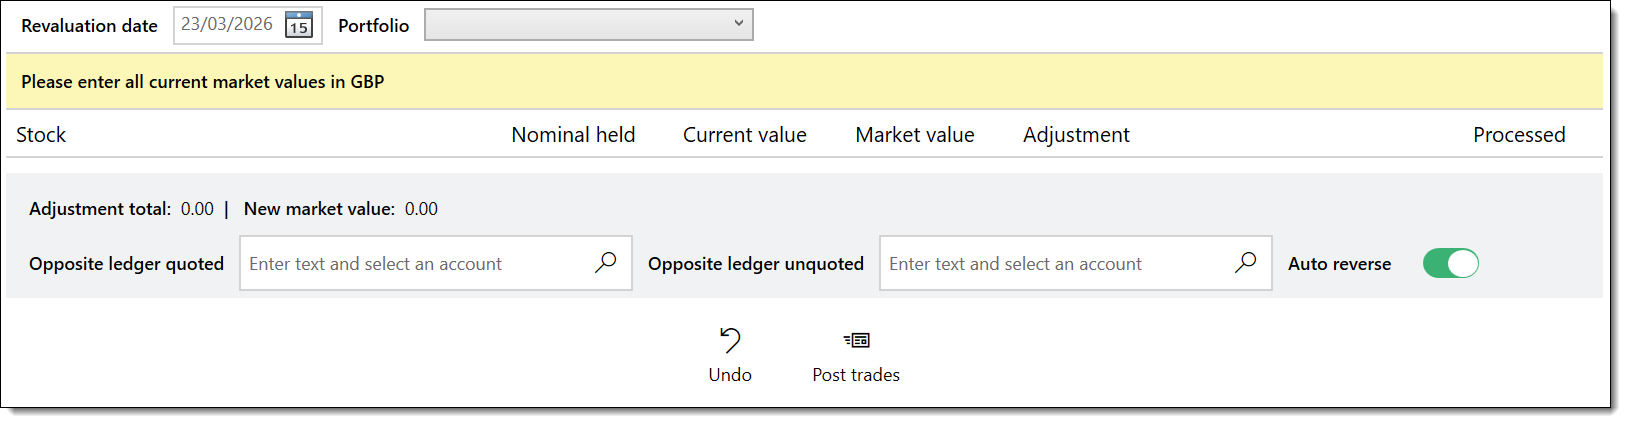
FX Revaluation
Certain ledger accounts are configured for FX revaluation – this is controlled by a checkbox on the ledger setup screen. Revaluation adjusts the book value of foreign currency balances to reflect current exchange rates, ensuring your financial statements are accurate at period-end.
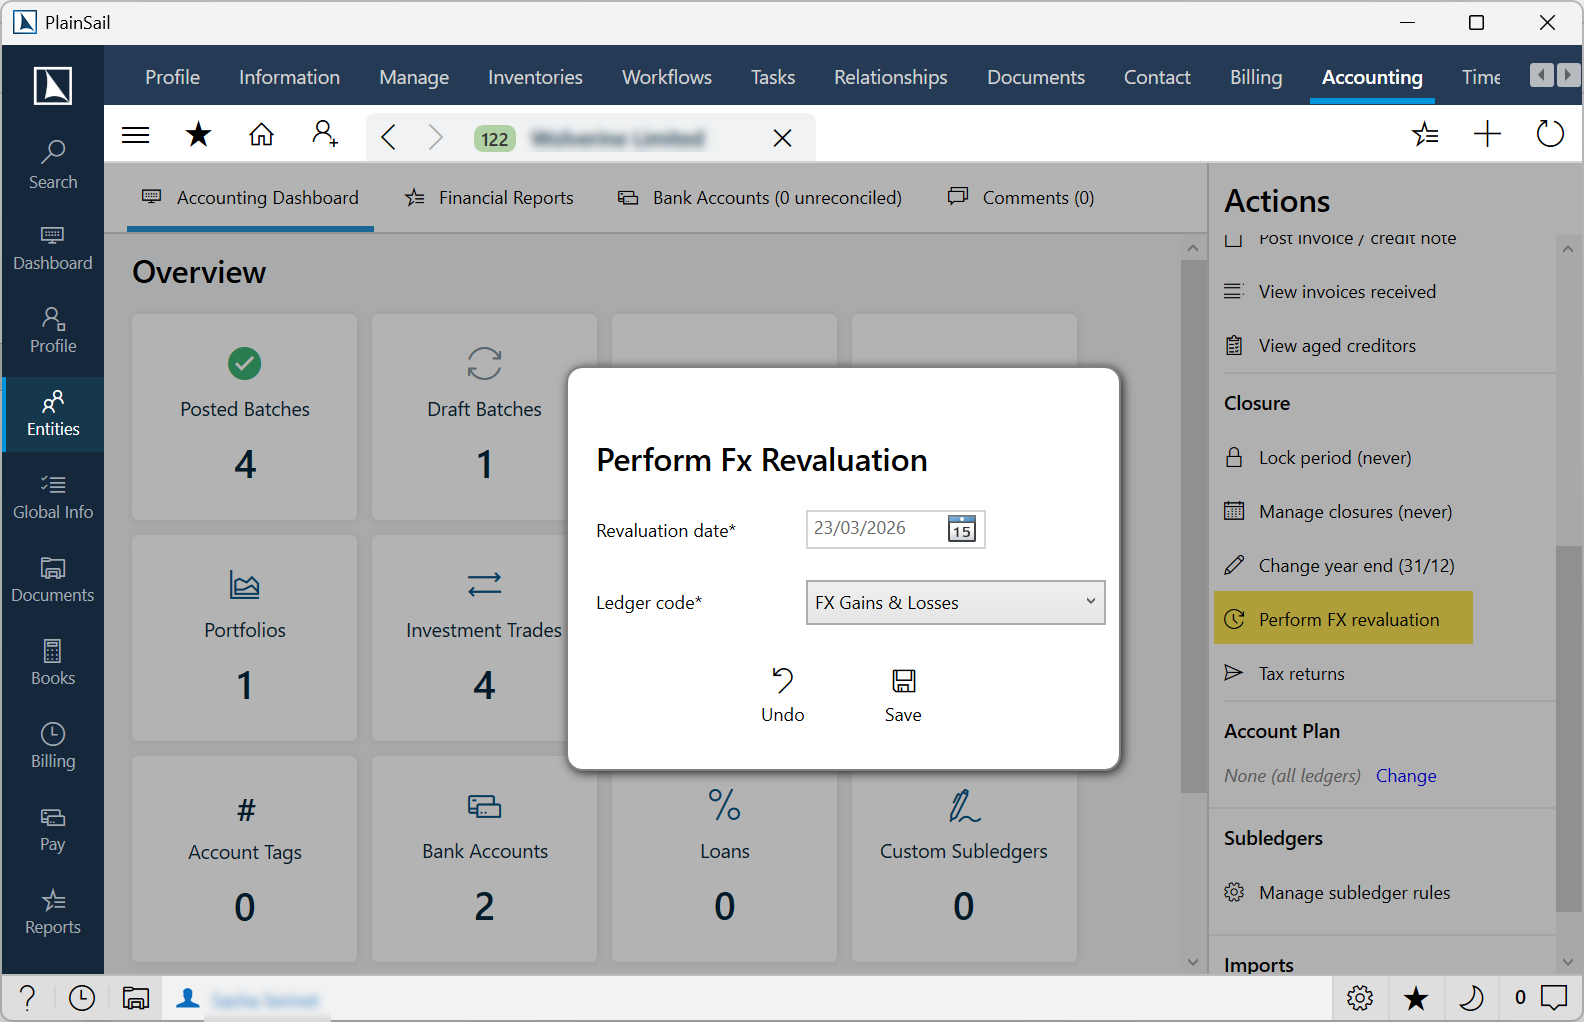
Revaluation is run as a batch process from the entity’s Accounting screen. The process works as follows:
- Revaluation amounts are calculated using the exchange rate for each relevant currency on the specified revaluation date.
- The resulting adjustments are posted to a new batch.
- You can review and edit the batch before posting – for example, to adjust individual rates if required.
Reviewing revaluation transactions
When the system generates FX revaluation transactions, check the following before approving:
- Revaluation date – confirm the date is correct for the period you are closing.
- Exchange rates – verify the rates used match your expected rates for that date.
- Gain/loss amounts – ensure the amounts are reasonable relative to position sizes and rate movements.
- Ledger accounts – confirm the correct FX gain/loss accounts are debited and credited.
Watch for anomalies such as unusually large gains or losses (which may indicate an incorrect exchange rate), missing positions (a foreign currency balance that was not revalued), or zero-value entries (which may indicate the rate has not changed or the position is zero). Once reviewed, confirm the revaluation batch for posting.
Investments & Portfolios
The system supports tracking investment portfolios including quoted investments (stocks, bonds), unquoted investments (private equity, property), and stock options.
Quoted investments
Publicly traded securities with name, ticker, exchange, currency, and pricing. Requires Bookkeeping_QuotedInvestments_View, _Create, _Edit.
Unquoted investments
Privately held assets managed similarly to quoted investments but without market-based pricing. Requires Bookkeeping_UnquotedInvestments_View, _Create, _Edit.
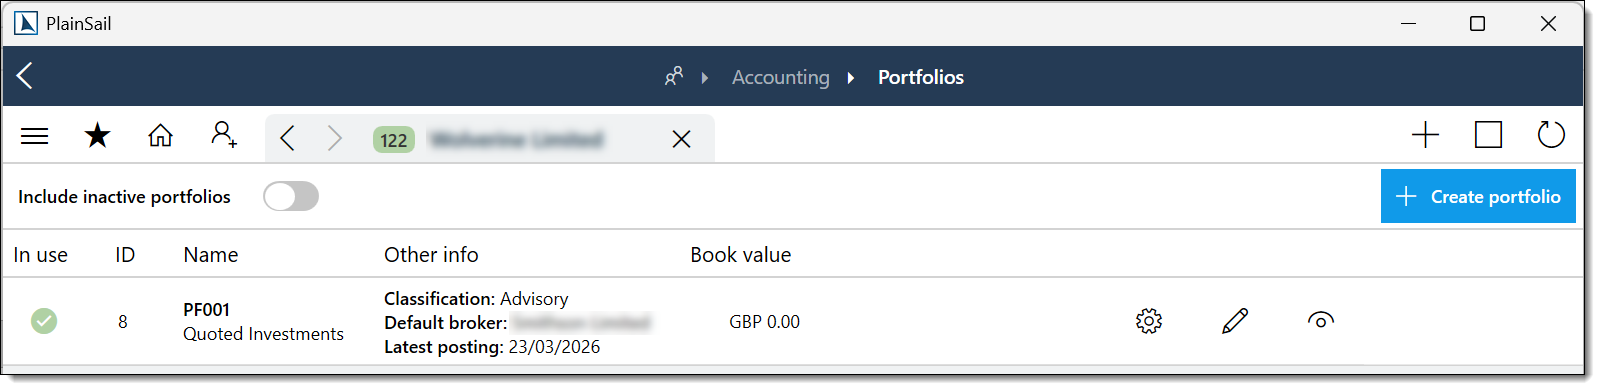
Portfolios
Collections of investments held by an entity. From the entity’s Accounting tab, click View Portfolios to see holdings, valuations, and transaction history.
Creating a portfolio
Navigate to the entity’s Accounting tab > Portfolios.
Click Add Portfolio.
Complete the following fields:
| Field | Required | Description |
|---|---|---|
| Name | Yes | Portfolio name (e.g. “Main Investment Portfolio”). |
| Currency | Yes | Base currency for the portfolio. |
| Classification | No | Category from the PortfolioClassification list. |
| Start Date | No | Date the portfolio was opened. |
| Custodian | No | The custodian entity. |
Click Save.
Entities_Accounting_Portfolio_Create
Investment trades
Buys, sells, and revaluations recorded as transaction batches with type “Trade”. Click View Investment Trades from the entity’s Accounting tab.
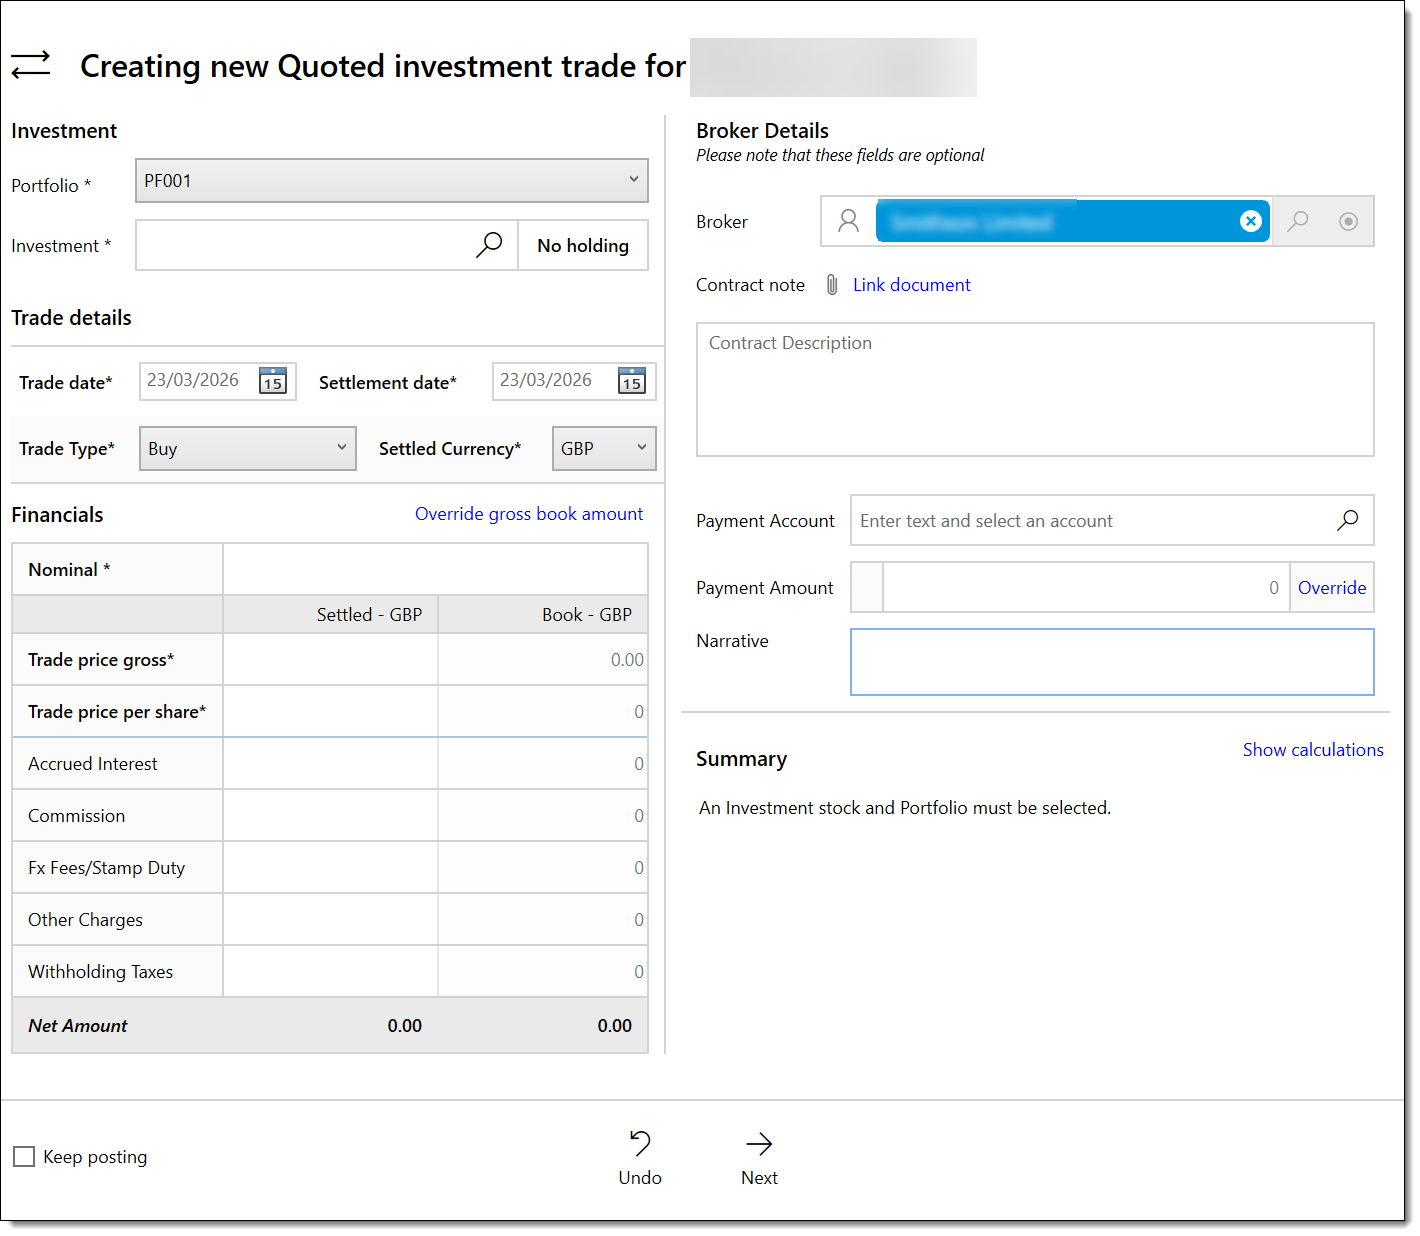
Recording a trade
Open the portfolio.
Click New Trade (or use the Post Trade button from the Accounting tab).
Complete the trade details:
- Investment – select the security (quoted or unquoted).
- Trade Type – Buy or Sell.
- Quantity – number of units.
- Price – price per unit.
- Trade Date – when the trade was executed.
- Settlement Date – when settlement occurs.
- Currency – trade currency.
- Fees/Commission – any transaction costs.
Click Post. The system generates the accounting entries (debit investment account, credit bank/settlement account).
Entities_Accounting_PostTrade
Running a portfolio revaluation
Navigate to the entity’s Accounting tab > Portfolios.
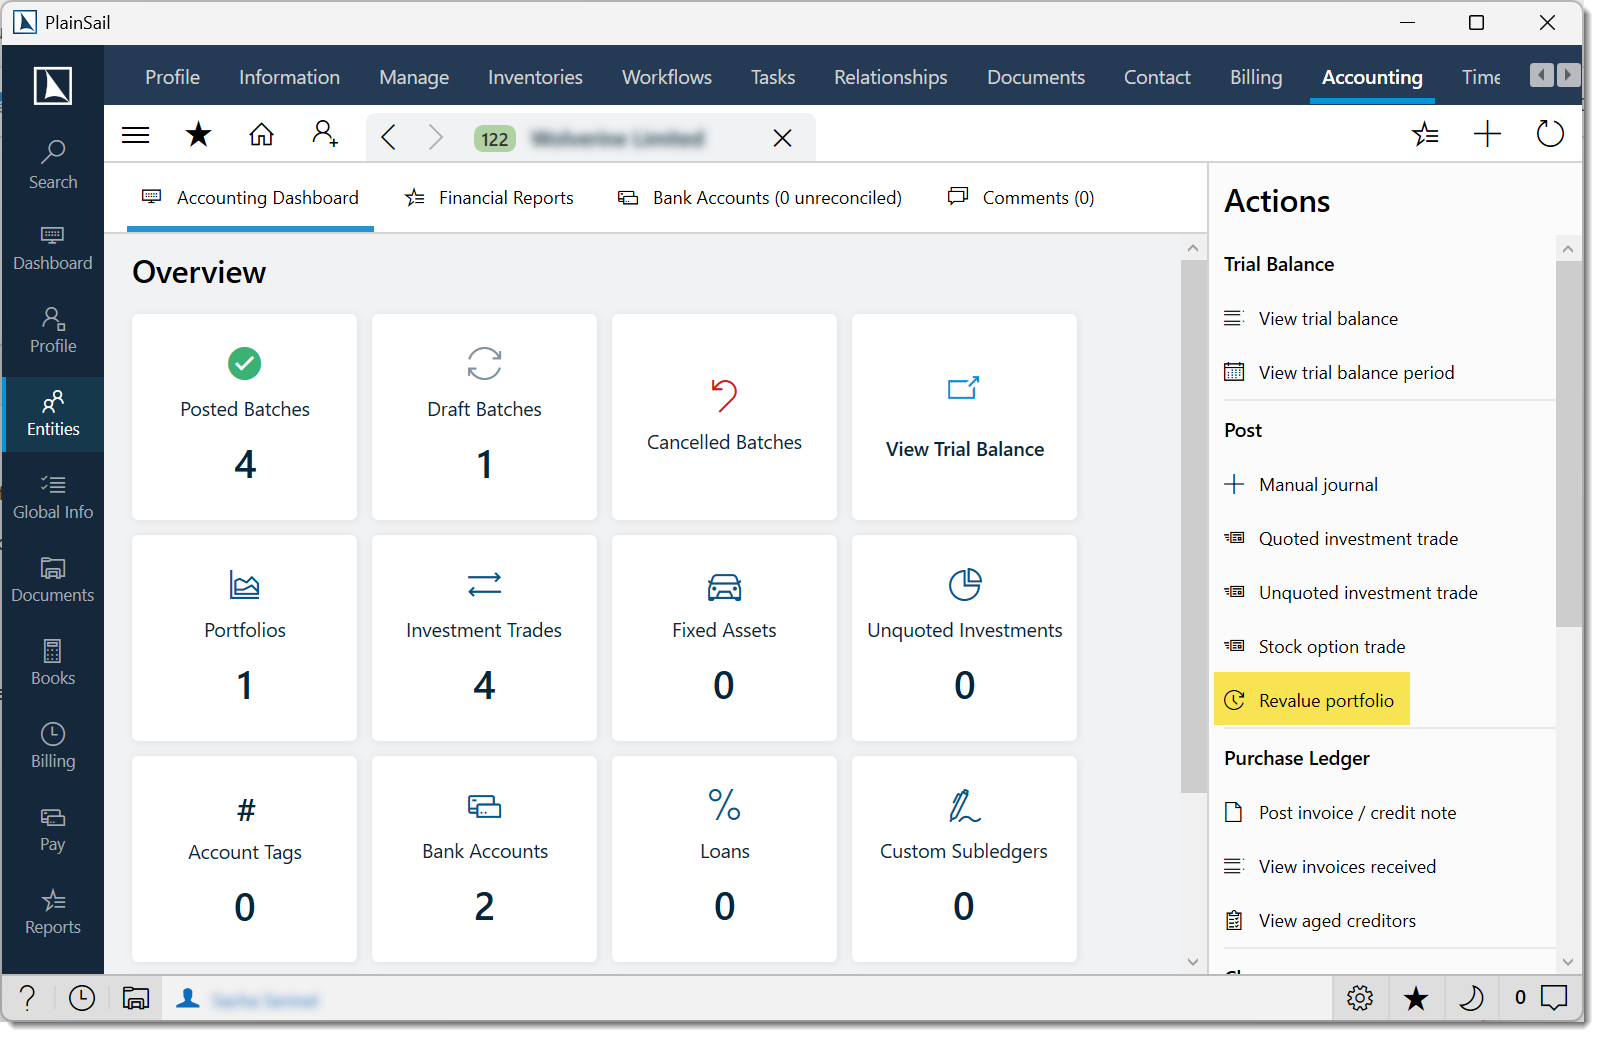
Select the portfolio.
Click Revalue.
Select the revaluation date.
The system:
- Fetches current market prices for quoted investments.
- Calculates unrealised gains/losses for each position.
- Generates revaluation journal entries.
Review the entries and confirm posting.
Investment data sources
| Source | Constant | Description |
|---|---|---|
| Manual | N/A | User enters prices manually. |
| Landytech | Landytech | Automatic import from Landytech investment platform (requires configuration). |
Fixed assets
Property, equipment, and vehicles are tracked separately. Click View Fixed Assets from the entity's Accounting tab.
Bank downloads
Bank statement data is imported from external sources for bank reconciliation. Manage from Bookkeeping > Bank Downloads. Imported transactions appear as unreconciled items against the relevant bank account.
Bookkeeping_BankReconciliation_BankDownloads_View
Bank statement import
Navigate to Bookkeeping > Bank Downloads.
Select the entity and bank account.
Click Import.
Select the file from your local machine. Supported formats: MT940, Investec, RBSI, EWG, Barclays, Landytech.
The system parses the file and shows transactions for review.
Confirm the import. Transactions appear in the bank reconciliation screen as unreconciled items.
Import error handling
- Unsupported format – an error message identifies the issue.
- Duplicate transactions – the system detects duplicates by date, amount, and reference. Duplicates are flagged and can be skipped.
- Parsing errors – individual lines that fail to parse are highlighted. You can skip them and import the remaining transactions.
Reports
Entity accounting reports
From the entity's Accounting tab → Reports section:

- SSRS Reports – server-side reports configured by your administrator (trial balance reports, transaction listings, portfolio reports).
- Internal Reports – application-generated reports (ledger balance reports).
Click a report to launch it. Reports can be opened in the web viewer or an embedded viewer. Requires Entities_Accounting_ViewAccountingReports.
Global bookkeeping reports
From the main Bookkeeping menu:
- Debtors – aged debtor analysis.
- Overdrawn Bank Accounts – accounts with negative balances.
- Ledger Balance Reports – customisable balance reports.
Available accounting reports
| Report | Description | Access |
|---|---|---|
| Trial Balance | Full trial balance for an entity with drill-down to individual transactions. | Entity Accounting tab. |
| Profit & Loss | Income and expenditure statement for a period. | Reports Dashboard or Entity Accounting Reports. |
| Balance Sheet | Statement of assets, liabilities, and equity at a point in time. | Reports Dashboard or Entity Accounting Reports. |
| Bank Reconciliation | Statement showing reconciled and unreconciled bank transactions. | Entity Accounting tab > Bank Reconciliation. |
| Aged Debtors | Outstanding invoice balances grouped by age. | Billing area or Reports Dashboard. |
| Aged WIP | Work-in-progress balances grouped by age. | Billing area or Reports Dashboard. |
| Financial Statements (FRS) | Full financial statements workbook (calculated from trial balance). | Entity Accounting tab > Financial Statements. |
| Transaction Listing | Detailed list of all transactions in a period. | Entity Accounting tab > drill down from Trial Balance. |
Running a report
Navigate to the entity’s Accounting tab or the Reports Dashboard.
Select the report type.
Set parameters:
- Date range – start and end dates for the reporting period.
- Entity – the entity to report on.
- Currency – reporting currency (defaults to entity base currency).
- Comparison period – for P&L and Balance Sheet, set a prior period for comparison.
Click Run. The report opens in the SSRS viewer (embedded or web-based, depending on configuration).
Report export formats
Reports can be exported in the following formats:
- Excel (
.xlsx) - Word (
.docx) - PDF (
.pdf) - CSV (
.csv) - HTML
- XML
Financial Report Builder
The G/L Balance report builder allows you to view balances across groups of accounts for different time periods – ideal for rolling comparisons such as month-on-month profit and loss, quarterly performance analysis, or year-on-year trends.
Creating a new report
Navigate to Reports > G/L Balance Report. The toolbar provides four key options: Expand Options, Date Periods, Entities, Ledgers, and Open Report (for loading previously saved reports).
Date periods
Add one or more date periods, each defined by a start and end date. You can optionally exclude closing transactions – useful for monthly income reports where closing entries would distort the figures. Dates can be entered in two formats:
- Fixed dates – specific calendar dates (e.g. 01/01/2026 to 31/03/2026)
- Dynamic dates – system-resolved at runtime. Examples include:
FirstDayOfCurrentMonth/LastDayOfCurrentMonth– resolved to the current month when you run the reportStartOfCurrentQ1/EndOfCurrentQ1– quarterly boundaries for the current financial yearRunDate– the date the report is executed
Date arithmetic
Dynamic dates support arithmetic – add or subtract years, months, or days using syntax such as AddYear -1. For example, StartOfCurrentQ1 with AddYear -1 in 2020 resolves to 01/01/2019, giving you a straightforward way to build year-on-year comparisons.
Multiple periods
You can add as many date periods as needed for side-by-side comparison. A common configuration is Q1 of the current year alongside Q1 of the previous year, making variances immediately visible.
Entities
Select the entity or entities to run the report against. Multi-entity reports consolidate balances across the selected entities.
Ledger groups
Add groupings such as “Income” or “Expenses”. Use the edit icon to choose specific G/L accounts within each group. Reorder accounts within a group by dragging them to the desired position. Each account line has a Value to Display option:
- Absolute Value – always displays as a positive number
- Opposite Value – inverts the sign (e.g. for P&L accounts where profit should appear as a positive figure)
- True Value – displays the value as-is from the ledger
Use the calculator icon on the group header to toggle the display option for all accounts in the group simultaneously.
Running and saving
Give the report a descriptive name, then click Play to execute. Click Save to store the report configuration for future use – saved reports retain all date periods, entity selections, and ledger groupings.
Invoice Layout
Invoice templates are customised through PlainSail’s document management system, allowing you to tailor the appearance and content of client invoices while preserving the dynamic data fields that populate at generation time.
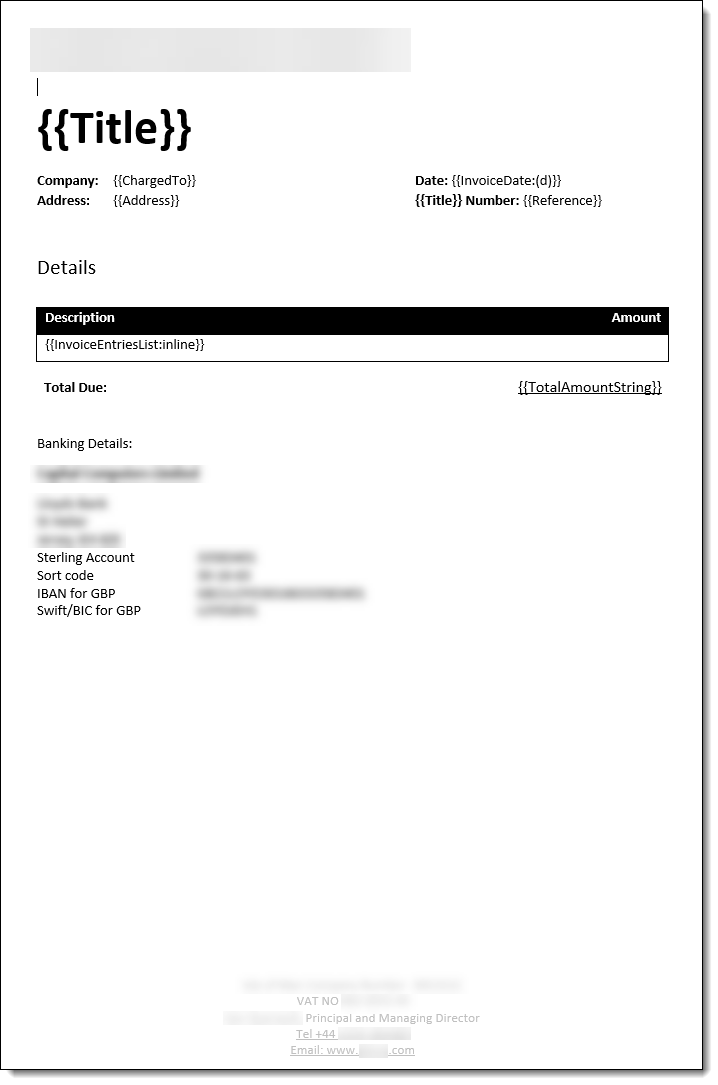
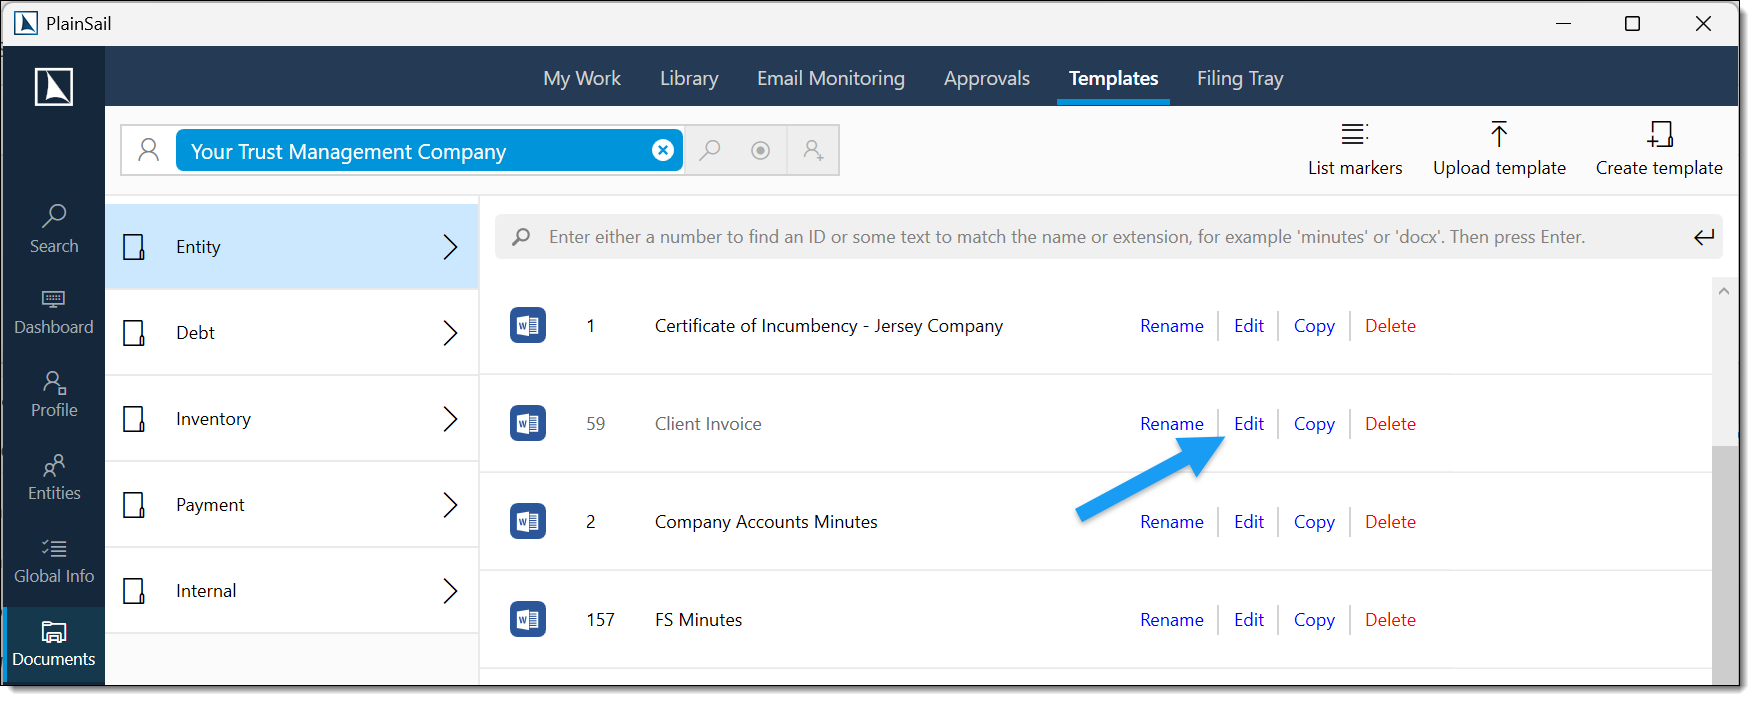
Navigate to the charging entity: Entities > [Your Company Name] > Documents > Document Templates.
Open the document named Client Invoice for editing – this opens the template in Microsoft Word.
Make your changes to the layout, formatting, logos, or static text. Do not delete any markers that look like {{ ClientReference }} – these are used by PlainSail to populate invoice data dynamically.
Save and close the Word document.
Check the document back in via the bottom bar, which shows documents currently checked out. Click the Save icon next to “Client Invoice” to complete the check-in.
{{ ... }}) when editing the invoice template. These are replaced with live data during invoice generation – removing them will result in missing information on produced invoices. If you are unsure which markers are available, contact support for a full list.
Period-End Locking
PlainSail supports period-end locking to prevent transactions from being posted to closed periods. This is managed through the year-end close process:
Navigate to the entity’s Accounting tab.
Run the year-end close process, which locks all periods up to the year-end date.
After closing, transactions cannot be posted with dates in the closed period without administrator override.
Permissions Reference
A complete list of roles used by the Bookkeeping and Accounting module:
Entity accounting roles
Entities_Accounting_View– access the entity Accounting tabEntities_Accounting_PostJournal– create and post transaction batchesEntities_Accounting_PostTrade– post investment trades and revaluationsEntities_Accounting_ReconcileBankAccount– access bank reconciliationEntities_Accounting_ReverseBatch– reverse posted batchesEntities_Accounting_ViewTrialBalance– view trial balancesEntities_Accounting_ViewAccountingReports– view accounting reportsEntities_Accounting_ViewPracticeManagementAccounts– view practice management accountsEntities_Accounting_ChangeAccountPlan– change an entity's account planEntities_Accounting_CloseYear– perform year-end closuresEntities_Accounting_Portfolio_View / _Create / _Edit– portfolio management
Bookkeeping area roles
Bookkeeping_View– access the Bookkeeping areaBookkeeping_Invoices_Post– post invoicesBookkeeping_Payments_Make– make paymentsBookkeeping_MyBatches_View– view your own batchesBookkeeping_OtherUserBatches_View– view other users' batchesBookkeeping_Scenarios_View / _Edit– scenariosBookkeeping_ChartOfAccounts_View / _Edit / _Delete– chart of accountsBookkeeping_ChartOfAccounts_AccountPlans_ViewEditDelete– account plansBookkeeping_BankReconciliation_BankDownloads_View– bank downloadsBookkeeping_BankReconciliation_Rules_View / _Edit / _Delete / _CreateGlobal– reconciliation rulesBookkeeping_QuotedInvestments_View / _Create / _Edit– quoted investmentsBookkeeping_UnquotedInvestments_View / _Create / _Edit– unquoted investmentsBookkeeping_ExchangeRates_View / _Edit– exchange ratesBookkeeping_ManualJournal_InvestmentAccounts– manual journals to investment accountsEntities_Loans_View / _Create / _Edit– loansEntities_Debts_View– view debts
Keyboard Shortcuts
- Ctrl+N – create a new batch (from batch list)
- F1 – toggle hints in the batch editor
- F2 – copy last transaction (duplicate)
- F3 – create opposite of last transaction (reversal)
- F4 – set source from book balance
- F5 – refresh from database (most list screens)
- Ctrl+S – save scenario (in scenario editor)
- Ctrl+Shift+R – reconcile all matched items (bank reconciliation)
- Escape – cancel current operation / close popout / restore list
FAQ
Why do the “All Active” and “All Archive” batch tabs require Administrator?
These tabs show batches from all users, which is a privileged view. Only the Administrator role is required.
What happens if a batch has zero transactions when I close it?
The batch is automatically deleted. This prevents empty batches from cluttering the batch list.
Can I reverse an FX revaluation batch generated during year-end?
If you start the year-end wizard, generate the FX batch in Step 3, then navigate away without completing, the FX batch remains posted and is not automatically reversed. You would need to manually reverse it using the Entities_Accounting_ReverseBatch role.
Which entity types support financial statements?
Company, Corporate Entity, Trust, and Foundation. Other entity types are not supported. Microsoft Excel must also be installed locally.
Can I change a ledger code after it's been used in transactions?
No. Once a ledger is in use by transactions or rules, the code field is restricted and cannot be changed.
What file formats are accepted for exchange rate imports?
Only .xls, .xlsx, and .csv files. The API fetch date range must be within a single year.
Can I delete a ledger that has been used?
No. Ledgers that have been used in transactions or rules can only be marked as inactive ("not in use"). They cannot be permanently deleted.
What happens when I delete an account plan that entities are using?
The plan is marked as "not in use" instead of being deleted. Entities currently using it retain access, but it cannot be assigned to new entities.
Can scenarios use investment subledger types?
No. Scenarios do not support Quoted Investment or Unquoted Investment subledger types in transaction lines.
How does batch locking work?
Only one user can edit a batch at a time. When you open a batch, it is locked. If another user tries to open it, they see a "locked by [user]" message. Locks are released when the editor window is closed.
How do I reverse a posted batch?
Select the batch in the entity’s Accounting > Batches screen and click Reverse. A contra batch is created and posted automatically. The original batch’s status changes to Reversed.
How do I handle intercompany transactions?
Post separate batches on each entity with matching narrative references. Use Scenarios for group-level eliminations. See the Intercompany transactions section under Scenarios.
How do I run a report for multiple entities?
From the Reports Dashboard, select a report and set the entity parameter to include multiple entities (where the report supports this). For consolidated reports, use the Financial Statements feature with scenario-based eliminations.
What subledger types are available and when should I use each?
Subledger types depend on your chart of accounts configuration. Common types are debtors, creditors, and investments. Use subledgers when you need detailed tracking of individual balances that aggregate to a control account.
- Entities & Client View – entity-level accounting tabs and financial data
- Billing & Invoicing – WIP, invoicing, and debtor management
Test Yourself
Test your accounting knowledge with these 10 questions covering journals, reconciliation, year-end, and the features that will make your bookkeeping more efficient.